

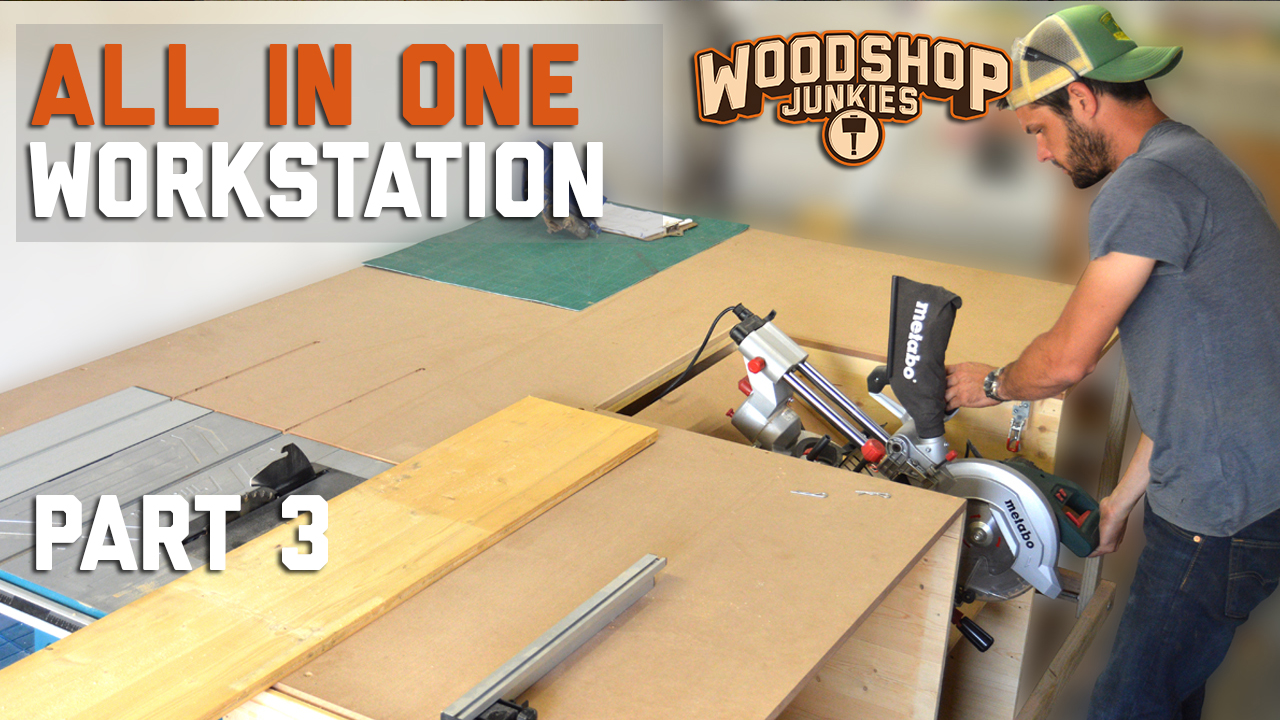
Making the most of a small shop – Part 3
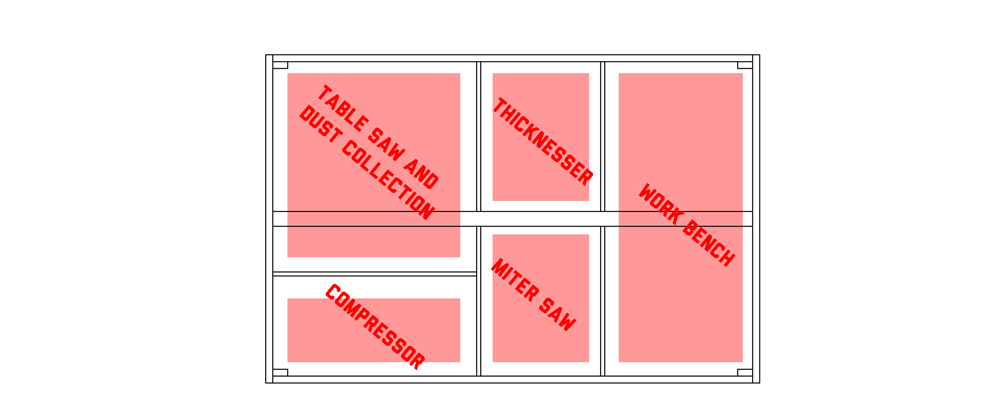
In PART 1 and PART 2 of this, The Ultimate All-In-One Woodworking Bench build, I assembled the frame and with some clever techniques, installed my table saw to sit perfectly flush with the top. However, simply installing a table saw to a woodworking workstation does not make it the “ultimate”. That’s why I jumped right back in and added my second tool to the bench.
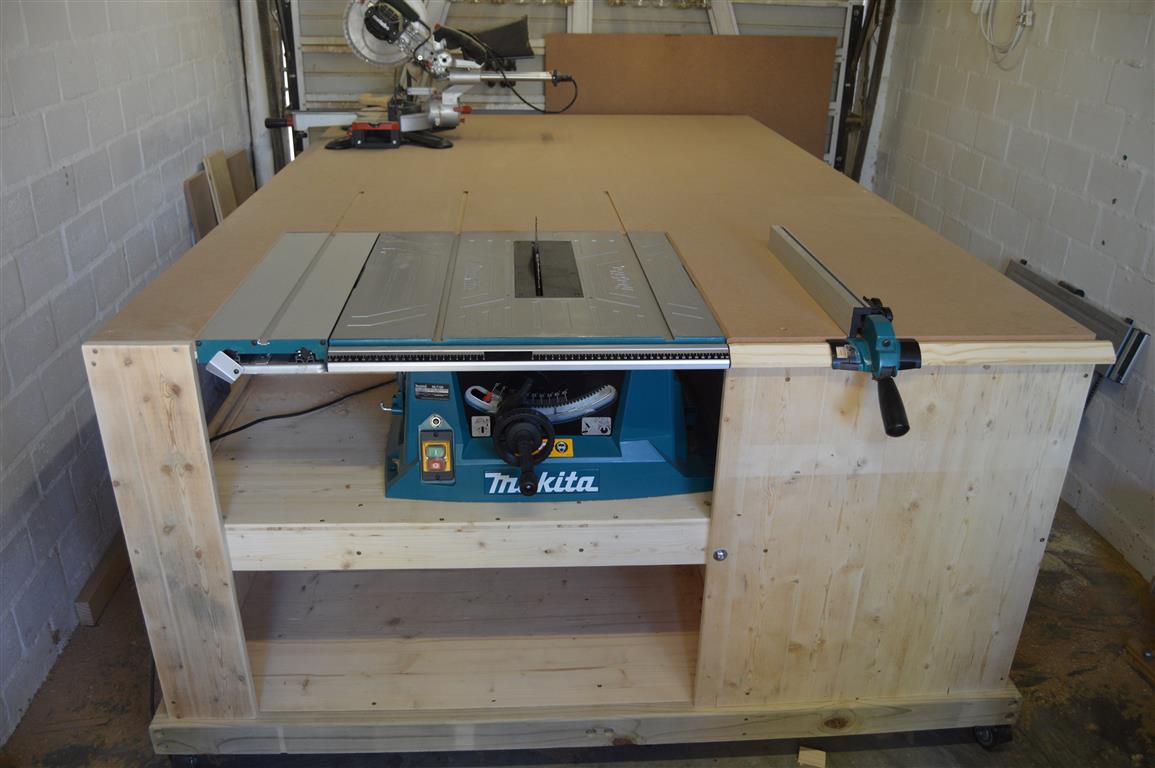
Completed workbench:
- PART 1 – Frame and top
- PART 2 – Table saw
- PART 3 – Miter saw
- PART 4 – Workbench area
- PART 5 – Compressor
- PART 6 – Thickness planer
- PART 7 – Dust collection
- PART 8 – Router table
>>>GET COMPLETE PLAN<<<
After my table saw, my miter saw is one of the most crucial pieces of hardware in my shop and therefore it was to be the next tool to be added to my All-In-One woodworking station.
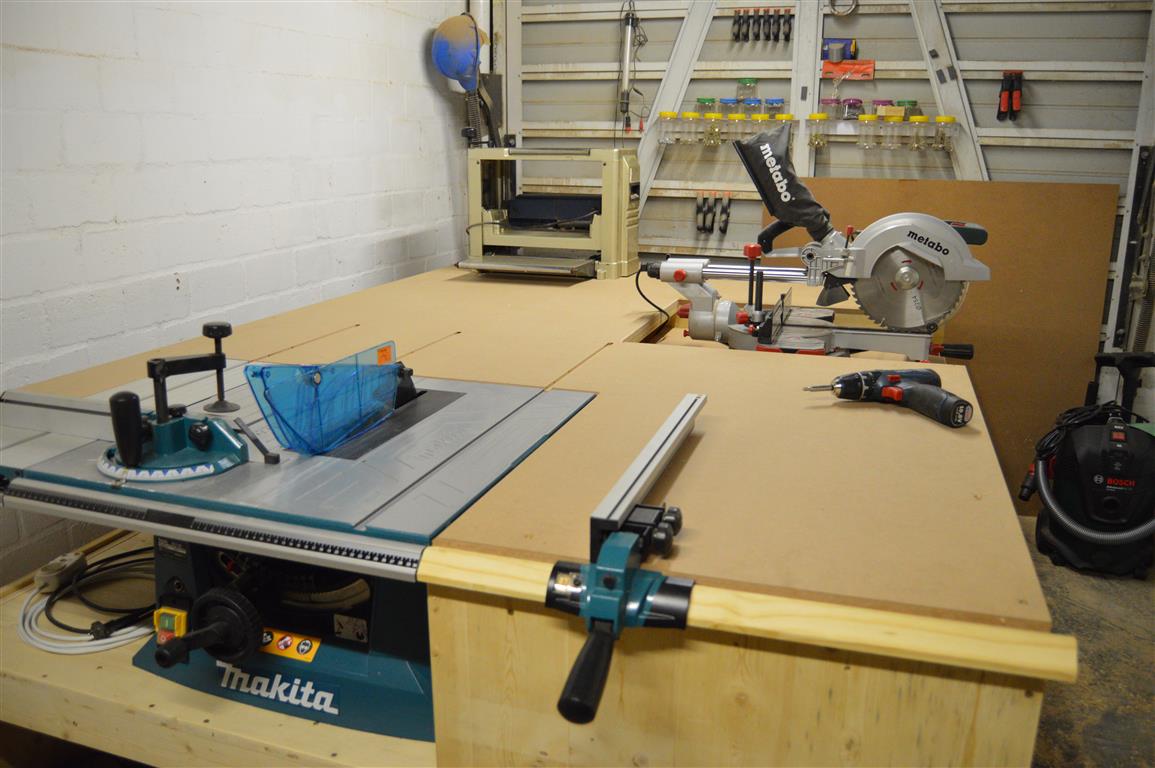
No Clash! Miter and table saw on one workstation
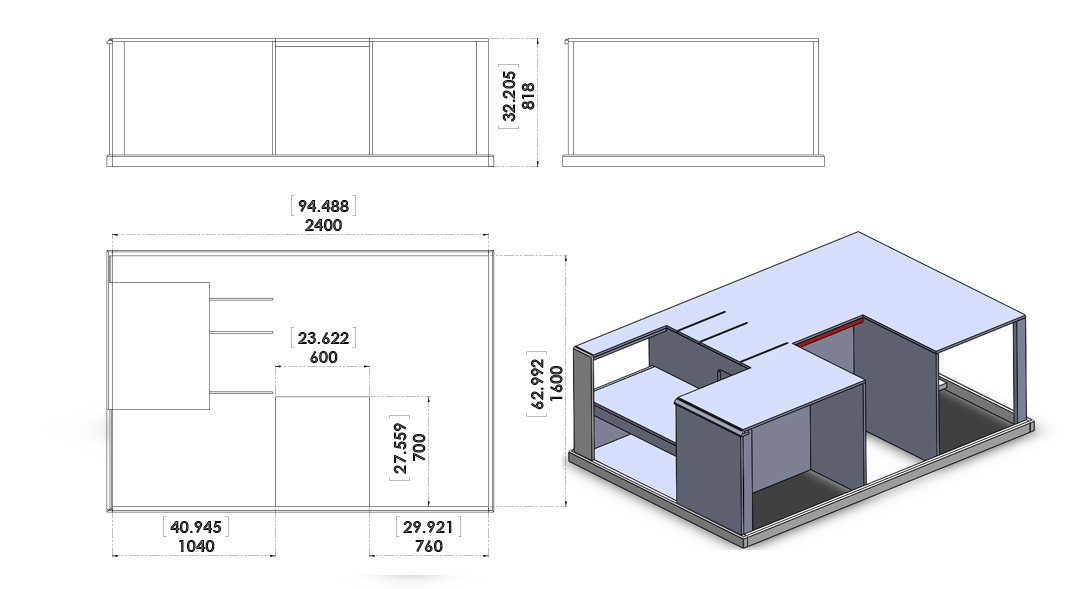
With my Makita MLT 100 table saw installed I was able to use the entire 2.4m(7.8ft)X1.6m(5.3ft) bench top as an outfeed table. This greatly increased the usability of this nifty little table saw.
The trick now would be to install the miter saw in a way that would still allow me to use the entire bench to support overhang when sizing panels with the table saw.
I also wanted to recess the miter saw so that the bed on the saw would sit flush with the top of the bench.
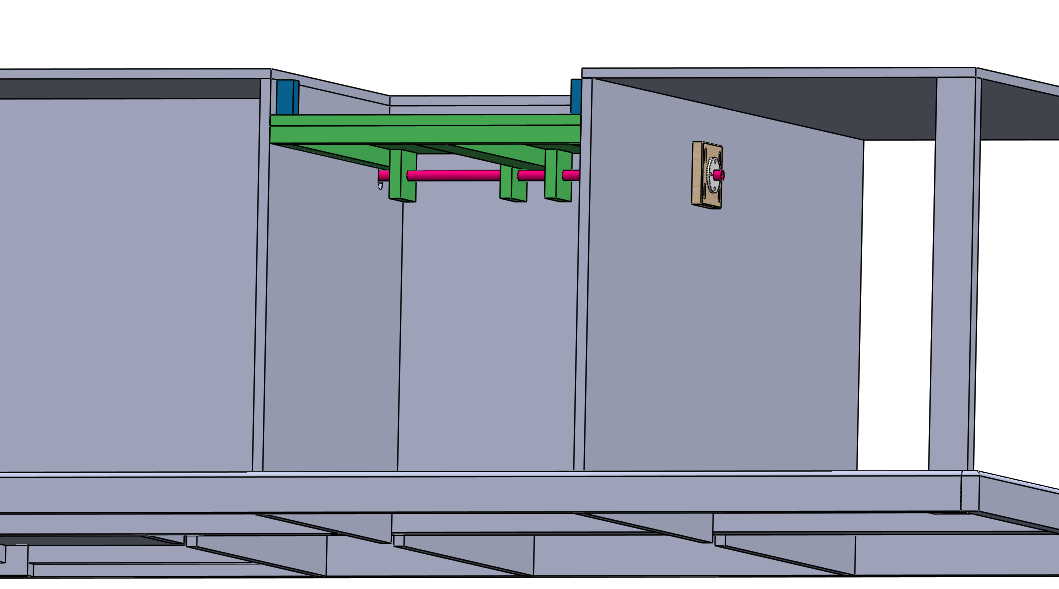
To do this I decided to install a recessed bed with a pivot at the back for my Metabo KGS 254 M miter saw that would allow me to fold it away underneath the bench when it restricts the cutting of large panels with the table saw.
PART 3: Table saw miter saw combo workbench
The instructions that follow are intended to be considered along with the visual instruction provided by the video above.
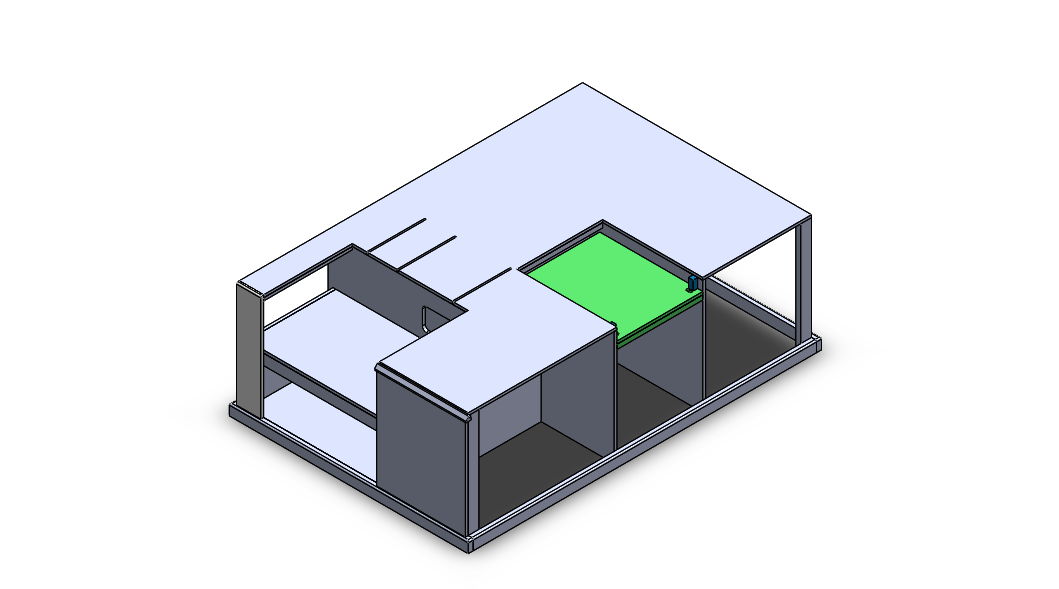
Step 1: Top Cutout
My first step in adding my miter saw to the workstation was to remove the segment of the bench top where the miter saw would be installed.
To make this cut-out, a guide plank was installed on the underside of the bench top at a depth that would adequately accommodate the miter saw. In this case, 700mm(27.559″).
To determine this distance I considered the length of the saw (back to front) with the slide in its forward position.
I used this plank along with the two partitioning panels that form the sides of the miter cavity to guide my cut.
By cutting slightly toward the inside of the guide plank and these panels, I removed the largest part of the cut-out using a jigsaw. The remaining edge was trimmed using a router and a flush trim bit.
The two partitioning panels that form the sides of the box was installed at a width that would accommodate the miter saw bed at a 45° angle in both directions (PART 1).
Step 2: Miter saw base preparation

 With the cavity prepared, I assembled the base to which the miter saw would be fixed.
The base was assembled with stiffener planks on the underside to prevent deflection.
The pipe holders that would form the pivot point was attached to these stiffener planks toward the back of the base.
For the hinge action, I used a 19mm(3/4″) stainless steel pipe which meant that the pipe holders needed a 19mm(3/4″) hole drilled in the center to accommodate the pipe.
Further preparation on the saw base was done by cutting holes on the two front corners to accommodate the latches that will be used to lock the saw base in its working position.
Step 3: Fitting the base to the bench

To add the prepared miter saw base to the bench, holes needed to be added to the cavity side panels that would allow me to extend the pipe through on both sides.
These holes were made to be oversized, allowing the pipe to sit loosely inside them. I could then install bushes on the outside of the side panels in a way that would allow me to slightly adjust the height of the base.
Step 4: Bush and bush housing preparation
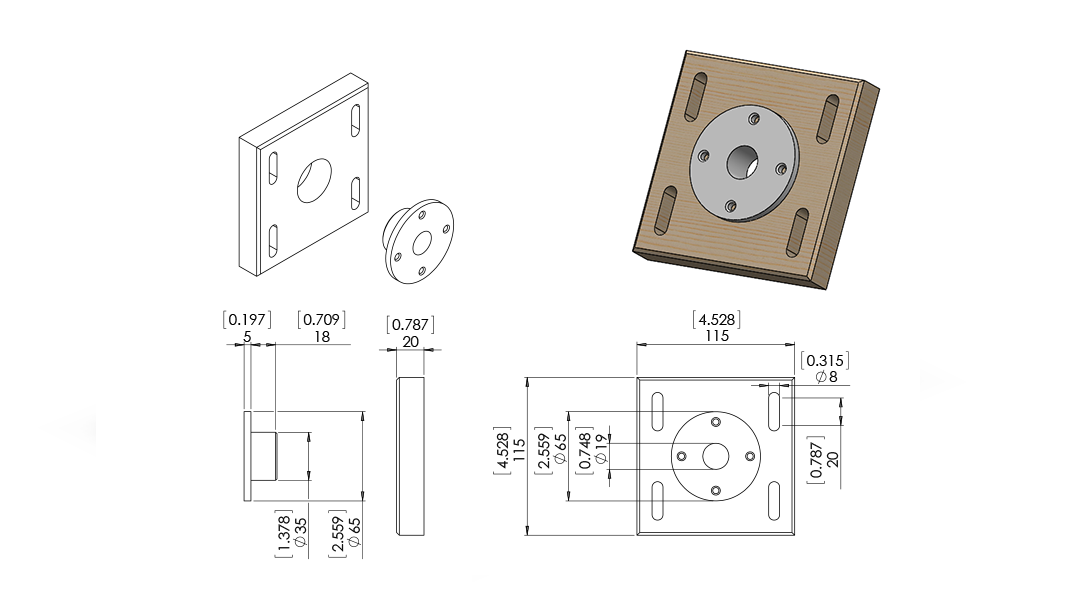
The bush housing was cut from a piece of pine plywood.
A hole was drilled in the center of the bush housing into which the bush would be inserted.
Further preparation of the bush housing was done by adding four slots to be used to fix the housing to the side panels that form the cavity.
The slots were made by drilling two holes per slot and removing the piece between them with a jigsaw.
Adding slots to the bush housing is what would give me the ability to fine-tune the height of the saw.
The bush was made from nylon as it would be more resistant to wear when the stainless steel pipe rotates inside it.
In addition to the this, a flange with four holes was added to the bush so it could be fixed to the housing with screws.
Step 5: Fixing the bush housing and latches
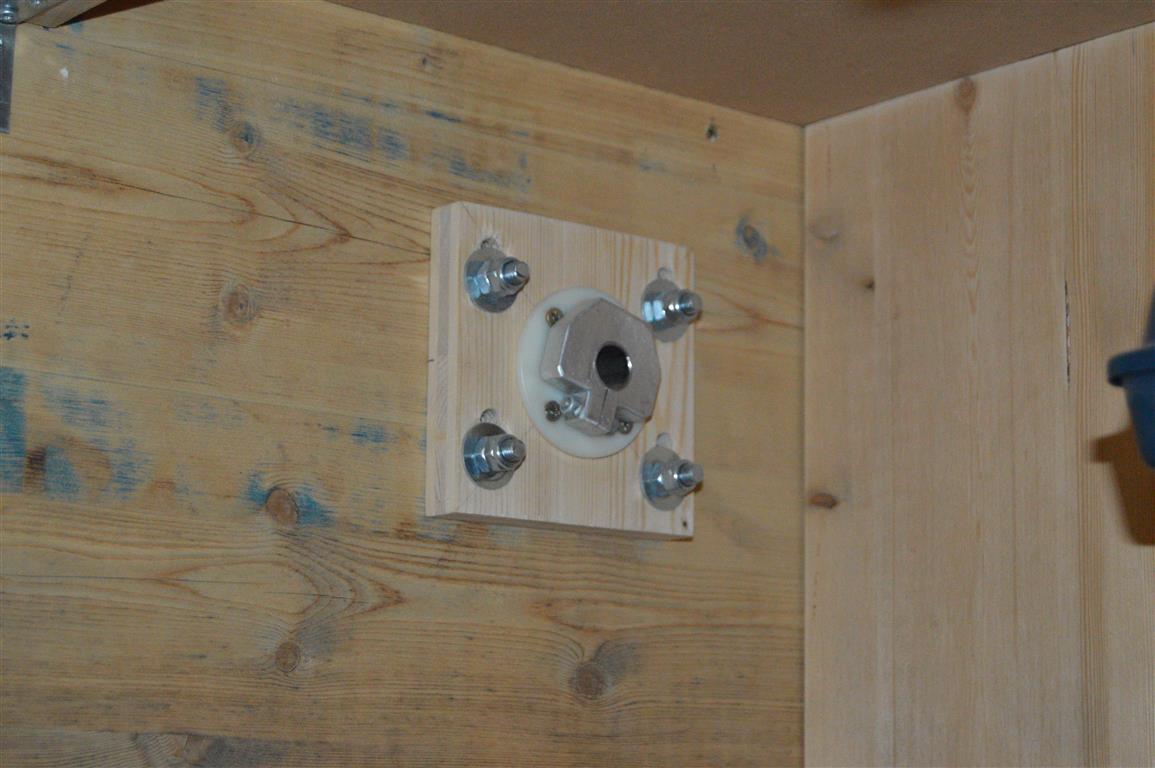 With the bush housings prepared, installing them was as simple as sliding them over the pipe and attaching them with bolts from the inside of the miter saw cavity.
The bolts were sunken to prevent them from clashing with the saw base when it is being folded up/down.
After the bush housings were fixed, a clamp was added to the piece of pipe protruding from each bush to prevent the pipe from moving out of the bush.
At this stage, the base was clamped in its working position and the miter saw attached to it. This allowed me to make fine adjustments to the bush housing to line up the bed of the miter saw with the bench top.
Thereafter, toward the front of the cavity, in line with the holes cut in the base for the latches, stop blocks were installed on both sides.
The toggle latches were installed on top of the stop blocks allowing them to latch the base in place through the holes.
Part 3 Finished!
Part 3 of my All-In-One bench build was concluded with the bush housing secured and the front toggle latches installed.
Now I would be able to disengage the toggle latches and swing the whole saw down and out of the way of the table saw when needed.
Clips were added to the latches to prevent them from popping open while the saw is being used.
I am still planning on adding additional failsafe mechanisms to prevent the saw from dropping in the case of a latch failure. This will be explained as the bench build continues.

Am not sure if I’m missing anything in your build? So far, I’ve seen the construction of the bench, the table saw and mitre saw stations and the compressor.. Am I missing anything?
Regards
Mark
Well, there was the workbench with the power tool storage also?
Plans for that should be out on the site soon also.
Cheers
Jean
Jean,
I have been wanting to do this build for a long time. I never thought of the pivoting mounting tables for the miter saw or the planer. Amazing ideas and designs. Is their still a way to clamp stops on your miter saw to so multiple cuts of the same length? If not that would be a great add on. Cheers mate and can’t wait for the next video.
Hey Ric,
The fence I’m adding for the router table (the last installation) will double as a fence for the miter saw. To this fence, I will add an adjustable mechanism that will allow you to make repeatable quick cuts with the miter saw.
The next video is the dust collector and I’m currently working on finishing it up.
After that, I’m tackling the router table.
Cheers
Jean
I really want to make one of this, may I know where you get your nylon bush and the clamp lock for the bar?
Many thanks
Hey there Patrick,
The bush and the clamp I made myself.
I included the bush dimensions so that it can be mimicked by anyone with a bit of turning skill. If this is not an option you can swap the bush out with bearings.
As for the clamp, unfortunately, I did not add the dimensions for it but a simple cotter pin will yield the same results.
Jean
Hey Jean,
I’m building this workbench right now, and I’m looking to make these bushings. Did you turn these from a solid piece of nylon?
I didn’t turn them myself. A family member with a lathe helped me out but yes, it was turned from a solid piece.
I thank you for your efforts on this project . I have copied the first 4 parts but at this time I can not locate part 5 -7. Not to push, but have you completed the plans for the entire project yet? If so where can I fine the missing links?Just a couple of comments regarding the use of PVC in dust collection. 1. how do you deal with static electricity build up? dust and static electricity is not a good combination. 2. I understand that 90 degree angles can reduce the amount of suction power in the system. Instead of 90 degrees a pair of S curves serve the same purpose with less reduction in power. What are your thoughts? Please continue doing the good work you have been doing on these projects.
Thanks you for your consideration.;
Hey Ken
Firstly, very sorry about the delay in the plans. Besides the fact that I was already behind with the plans, I had some computer issues recently and could not access some of my files. I have recently gotten the repaired computer back and have jumped back in. I hope to start putting up the next parts within the next two weeks.
As for the dust collector system, I must admit, mistakes were made on my part. I’ve never built a system like the one I built for my bench before. I am currently working on rectifying some of these mistakes so stay tuned.
Cheers
Jean
Great project Jean!
What width MDF and plywood did you use?
20mm?
Thanks!
I used 18mm MDF but 22mm would work even better. The plywood is about 20mm yes.
Hi, nice work.
How do you make the ruler for the fence. Do you have a video?
Thanks,
Hi Manual
I assume you mean the rail extension for the table saw fence?
There is a brief description in this video: https://youtu.be/Eu8owh6d9RU
The video is the one where I explain adding my table saw to the station. In the video, I show and briefly explain the rail extension.
Feel free to ask if you need more info.
Jean
Hi I am in the USA can you convert the measurements to imperial instead of metric. I am trying to build one but can’t follow your measurements I know I will have to change some measurements for my tools. Congratulations on your project it is great. Thanks
Hey Chester,
The measurements are already converted to imperial. The units in the brackets [] are inches. The decimal is expressed in a thousandth of an inch.
Cheers
Jean
Have you created downloadable and printable plans for your All-In-One Woodworking Table Miter Saw Station? If so, where can I find them and what is the cost? I am very impressed with your project and may want to replicate it in my small shop.
Hi Kevin,
I am working on very detailed plans that I am planning on making available to people that would like to build their own versions of the bench. Unfortunately, it will only be available in a couple of months.
Cheers
Jean
Hey Jean,
Great work! Are you pulling together an electrical plan?
Jon
Hey Jon,
I’m hoping to make detailed plans with dimension together with all relevant info like electrical diagrams available early in the new year.
Jean
Hey Jean,
I too was curious about the electrical plans for this entire build. I understand life gets in the way, but I was curious if you had an update for this part of the project? Thanks for the great work all together!
Parker
Hey Parker
Thanks for reaching out.
Unfortunately, I haven’t gotten around to doing what I have planned but I will be sure to post it when I do.
Will a notification be made available to subscribers when the downloadable plans become available? Or, better still, when is your next trip to Indiana, U.S.A? 🙂
I will announce on my channel when the plans are live.
I would love a trip to the states but sadly that isn’t on the cards for the near future.
Hi Jean,
Absolutely love your bench and explanations. You mentioned in your mitresaw video about possibly making a cover when it is rotated down but never explained it, then in the router installation video it is obviously in place. I noticed in the other comments that you plan to have a full set of plans in the new year – will this part be included?
Hey Steve,
There is a video on my channel where I explain closing the miter saw. Here it is if you haven’t checked it out. https://youtu.be/11mG6gc4bL0
I am planning on including it in the plans yes.
I hope to have an update with regards to the plans for everyone soon.
Cheers
Jean
Fantastic work table Jean and thanks for the plans. It gives an amateur like me the confidence to have a crack.
I have only just come across your channel and i think its great. Really looking forward to your home improvement videos in 2019.
Great work Jean
Thanks Rodney,
I hope to start posting those videos around mid-Feb.
Hi Jean,
I like your plan, so i am preparing to bulit .
Are you able to use a mitter saw to cut 45 degree in a 600 mm slot?
Thanks for answering!
Best regards
Jozsef
I can with my saw but it won’t be possible with all makes and models.
You will need to consider the saw that you will be using with your bench.
Cheers
thanks!
You can simplify the bushing/clamp combo buy getting a mounted bearing with a set screw for the shaft:
https://www.vxb.com/SBPF201-8-1-2-Pressed-3-Bolt-Flanged-Mounted-p/kit12755.htm
Hey Jean,
I really love this workstation! I am planning out my build right now. i can’t seem to find a place to sell me a whole sheet of MDF. Suppliers in my area only have 4×8 🙁 I wanted to ask you if you will be posting the rest of the build plans here? I’m sure you’re very busy, and I’m not trying to bug you, just wanted to know. Thanks again for this amazing idea!
Hi
I definitely will be posting the rest of the plans. I know they are way overdue but I have been a bit tied up between wedding planning, moving, my full-time job, and making videos.
Thanks for understanding. I will try my best to start getting the info out again.
Congrats on the wedding, moving, AND working full-time!
Gosh have I been there before. My mom didn’t hear from me for like three months.
For your miter saw recessed platform, do you have full functionality of the miter swivel?
I do yes. In some of my more recent videos I make more 45° cuts. I did neglect to take the lock-knob into account but I have found an simple work-around.
I would advise building the saw space 50mm wider however, just to be safe.
I’m stumbling into the same issue. Have the same mitersaw as you have, and cannot reach 45 degrees. How did you solve it ? What’s your work-around?
Hey Paul,
In my case, it seems that it is only the lock knob that jams up against the side wall when doing 45 cuts. For that, there is one of 3 options I thought of. Either remove the knob when making 45 cuts because the spring lock still prevents the bed form moving. You can also opt to use a modified lock knob that is shorter but if you are like me you wouldn’t want to modify your tools. The last, and probably the best option, is to make small cut-outs in the sidewalls that would allow the lock knob to move further than the panel.
I hope this makes sense.
Glad to hear! And congrats on the wedding <3 Thanks for the reply.
Hi Jean,
Awesome built so fare mate!!
I can not find the plans for part 4 as yet.
And any luck with the rest of the plans as yet?
Regards
Hey Jacques
Part 4 plans are available on the site. https://woodworkjunkie.com/workbench-with-power-tool-storage-all-in-one-woodworking-workstation-part-4
I’m currently working on Part 6.
I am not going to build this exactly, but the concept is spot on. I was looking for something modular, but I have a router table (a table top one) that would take a little adapting to your design. Still, great idea and great use of space!
This is amazing, I would love to do something similar as my workshop consists of my 3rd car garage which my kids have taking over with most of their toys. Do you have all you plans on a single pdf. or similar that you would be willing to email?
Beautiful work, I look forward to more videos.
Cheers!
Joe
Hi Joe
I will be making paid versions of the plans available soon as many people have requested such plans. These plans consist of roughly 100 pages and were redrawn on my behalf by a qualified mechanical engineer. I am simply waiting on some legal documents before making the plans live for $9.90. I hope this is acceptable.
Cheers
Jean
Jean –
Question for you. I just cut out my section from the worktop for my miter. I didn’t realize though that you installed a plank on the underside at the very back. Why did you do that?
Hi Chris
The plank had two functions. Firstly it was to stiffen up the top along the edge where I made the cutout. Also, you will notice if you watch the video again, that the cutout I made with the jigsaw was quite crude. Installing the plank on the underside allowed me to run my router with a flush trim bit along the plank to clean up the crudely cut edge. I did the same on the sides but could use the partition panels to guide the router.
I used the same method when I made the cutout for the table saw and thickness planer.
Oh ok. So your miter saw section essentially didn’t utilize the entire space you allocated to it on your 2D diagram? In other words the back plank takes up the “space” between your middle partition and the miter saw table?
Correct. The space left behind the saw bed and the partitioning panel was originally intended for dust collection piping and electrical layout but was later used to store the miter saw lid when the saw is being used. https://youtu.be/11mG6gc4bL0
Awesome! Thanks. Totally understand now.
One last question for today =) …..
Nylon bushings. Necessary? If I have the set screw clamps on each end of the pipe, and the blocks are each drilled with a hole exactly the size of the pipe, why the bushings? I can’t understand what they actually do…?
The blocks with a hole to match the pipe should work just fine also. I opted for the bushings as a way to minimize any potential wear from the pipe moving inside the pine block (with the added weight of the saw) over the long term.
Hi, Jean
Love your work bench and all the thought that went into it. I am looking for the type of latches you used to secure the top up. Where did you get them?
Thanks
Do you mean the toggle latches? I bought them at my local hardware store but they are available on Amazon. https://www.amazon.com/s?k=toggle+latches&ref=nb_sb_noss_1
How did you find the pivot point for your miter saw? I want to tuck mine away as you did but I am having an issue figuring out if it will work.
The pivot point is very much determined by the dimensions of your saw. The distance from the pivot to the front of the saw is the distance from the pivot to the floor. The distance from the pivot to the back of the saw needed to be less than the distance of the pivot to the top of the bench.
Thanks, Jean! I really appreciate that you responded. This helped me out a lot. Looking forward to more of your videos. Can you do one on your signature mallet? Thank you again.
I will see what I can do. Haha
Hi Jean, I came across your videos here recently. I had an idea that I would like to build a workbench like the one you’ve built. When I saw your video it was exactly what I wanted to do. Great Videos. I have many questions. I will start with 2 questions. 1- Is your MDF 5’X8′? Here in the US we only have 4’X8′. Does that limit me? Question 2 -My miter saw is a Ridgid R4221- 12″ miter capacity. If I measure form the top back of the saw to the front bottom front of the saw it measures 30”. I think my saw may be to long. What do you think?
Hi Robert,
On the size of the top, it all depends on what you plan on adding to your bench. I have received pics of many versions of the bench from people from the US so I don’t think you will need to make too many changes. If you find it is too small to add everything you want to you could always look at breaking the top up into 2 sections.
On the 12″ saw. It does seem a bit big but if you look at storing the saw at an angle instead of vertical you might just manage to fit it under the top.
Doing a great job! Make as many videos as you can before your kids come along, mine are grown and moved out . So I have time to copy you work. And I need a A lot of good ideas, that you have. Hard work always pays off. Take care from Elkhart Indiana USA
Hi Jean, love the table. Looking forward to making my own from your plans. One quick question, have you heard of anyone changing up the top to laminated 2×4’s and/or adding side boards to make dog holes for using hold fasts and pegs? Just curious how it would/could work as an adaption, and if anyone has shared any experience about going this route with you.
Unfortunately, no. It sounds like a great idea that would do well to add more functionality to the bench.
any thoughts based on your using the work bench as you made it whether it would move or shift while doing things like hand planing rough lumber? Or, whether the plywood frame would hold the weight and manage the shifting from this type of work? I would love any input you or others may have on this idea. Thanks.
The bench is quite solid and requires a bit of force to move. I haven’t and stability issues with it at all.
Jean, are you able to provide me with the model number of your mitre saw? Just so I can compare the size to my own saw and make adjustments to the design/cavity space to fit my tools. Thanks.
Sure! I have a Metabo KGS 254 M.
Also, now that you’ve had it and used it a while, how do you feel about that triton router? I’ve been looking at including the same setup into my bench when I build it. Just curious if you could go back would you use the same thing, or go more with a traditional router lift setup?
I am very happy with the Triton. My only regret is getting the 1400W and not the 2400W.
Thanks for the reply. I was looking at the bigger model for the planer. Just didn’t know how the triton stood up to a traditional router lift. Thanks!
I would like to k ow if you posted dimensions for the miter saw somewhere. Im looking to building the cabinet in my workshop. Thanks.
Jean, I’ve purchased your plans and I’m figuring out all the dimensions based on standard lumber sizes in the US but there’s one thing I want to verify. What are the exact metric dimensions of the initial top surface MDF panel that you initially install before cutting out sections? Looking at all the diagrams, I’m calculating the starting top size to be 2455 mm x 1655 mm. Is that correct? Once I know those dimensions then I can build out the rest. Thanks so much!
The MDF panel used for the top is 2.4mx1.6m (2400mmx1600mm).
Hey Jean, great work and instruction videos.. One question regarding the miter saw section. Why didn’t you make a 360 degree flip-top one instead of your folding version? The other side of the platform would then be at the same level with your workbench top and you wouldn’t need a cover. Was is the height of your saw or depth that made you take this route? I assume your workbench top is higher than twice the height of the saw, isn’t it?
That’s correct. But the length of the saw made it that I would need a much longer bed to accommodate the full length of the saw. It would have clashed with the bench partitioning.
Hey Jean!!
Wow!! looks like you’ve inspired a lot of people to build their own Ultimate Workbench!! It really is the best design that I have seen and that’s why I bought the plans!! Have you figured out the demensions for the largest tools that will fit in the miter and planer pockets? It looks like to have a Metabo 10″ miter…couldn’t find the length dimension for it?
Any way trying to buy some tools and it would be nice what to look for in tool demensions.
I haven’t really looked at accomodating larger tools, unfortunately. I have had a few people that have made adaptions to my design to fit a 12″ saw but I wouldn’t be able to say exactly how they went about doing so.
I am looking for the bushings and other small parts bolts washers for the miter saw assembly. Would you send the sizes and where to purchase? Not at my local store.
I made them up myself. You can check out the sizes on the cutting list found on the plans page. A simple alternative would be using flanged bearings.
https://woodworkjunkie.com/product/woodshop-junkies-all-in-one-woodworking-bench-plans
Hey Jean, I’ll go ahead and repeat what everyone else said: great ideas and great site! It takes a lot of time and effort to document, film, and publish work like this.
Why did you choose to pivot the miter saw at the back and the thickness planer in the center? I’m designing one that is similar, but would center pivot the miter saw. Any reason I shouldn’t to that?
I’m having trouble locating the all in one work table plans. Everytime I click on the link nothing comes up.