

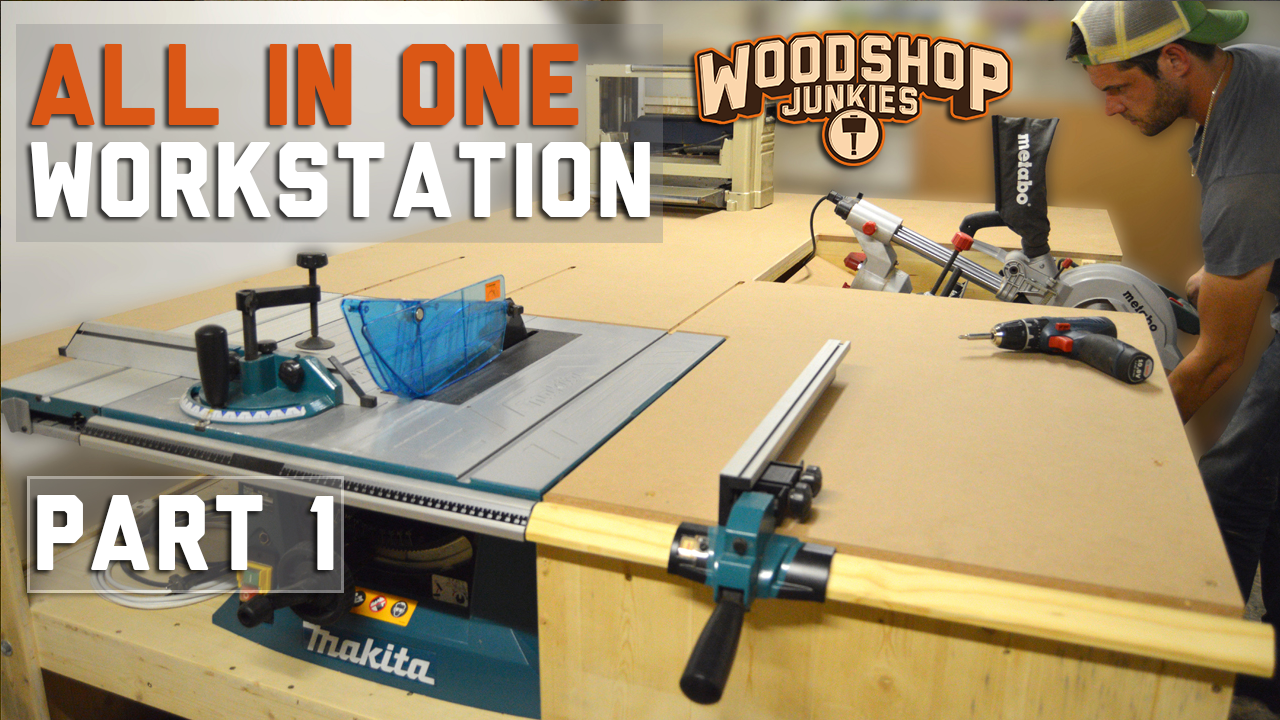
Making the most of a small workshop
In an attempted to make the absolute most of my ridiculously small workspace, something I think most woodworking hobbyist can relate to, I have decided to break down my shop and start over.
The decision was made quite suddenly after having to continuously navigate my cluttered workshop. A feat that often resulted in an irritated woodworker aka, me.
I figured that the only way I would be able to once and for all optimize my <3x6m (10x20ft) space was by building one workbench that could accommodate all of my most used equipment.
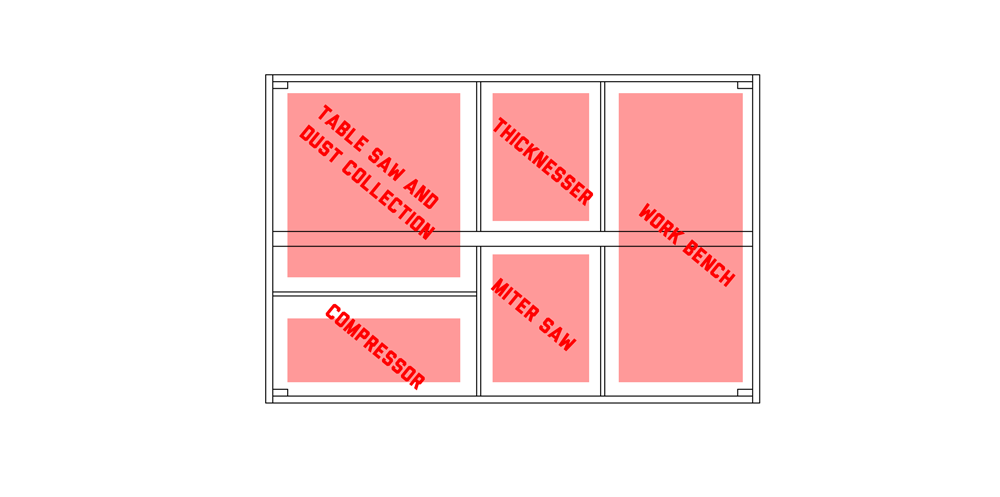
Equipment such as:
- A table saw – PART 2
- Miter saw – PART 3
- Workbench with power tool storage – PART 4
- Thicknesser – PART 5
- Compressor – PART 6
- Dust collection – PART 7
- Router table – PART 8
In addition to all the equipment, I wanted to add centralized power distribution to get rid of all the extension cords. I also wanted the bench on wheels so it could be moved around but most of all, I wanted easy access to everything.
On paper, the idea seemed solid but actually achieving it would take a good amount of planning. An obstacle such as installing my miter and table saw without them clashing would be one of many that needed to be overcome.
After about six revisions of the original, I finally reached a design I would be confident in building and the proses of creating my ultimate ALL-IN-ONE Woodworking Workstation began.
Over a series of installments, I will share the process I followed in building my workstation and sharing the dimensions of each stage for reference purposes.
Note that many of the dimensions are subject to the corresponding equipment and these would need to be adjusted to suit different makes and models.
PART 1: Frame and bench top
The instructions that follow are intended to be considered along with the visual instruction provided by the video above.
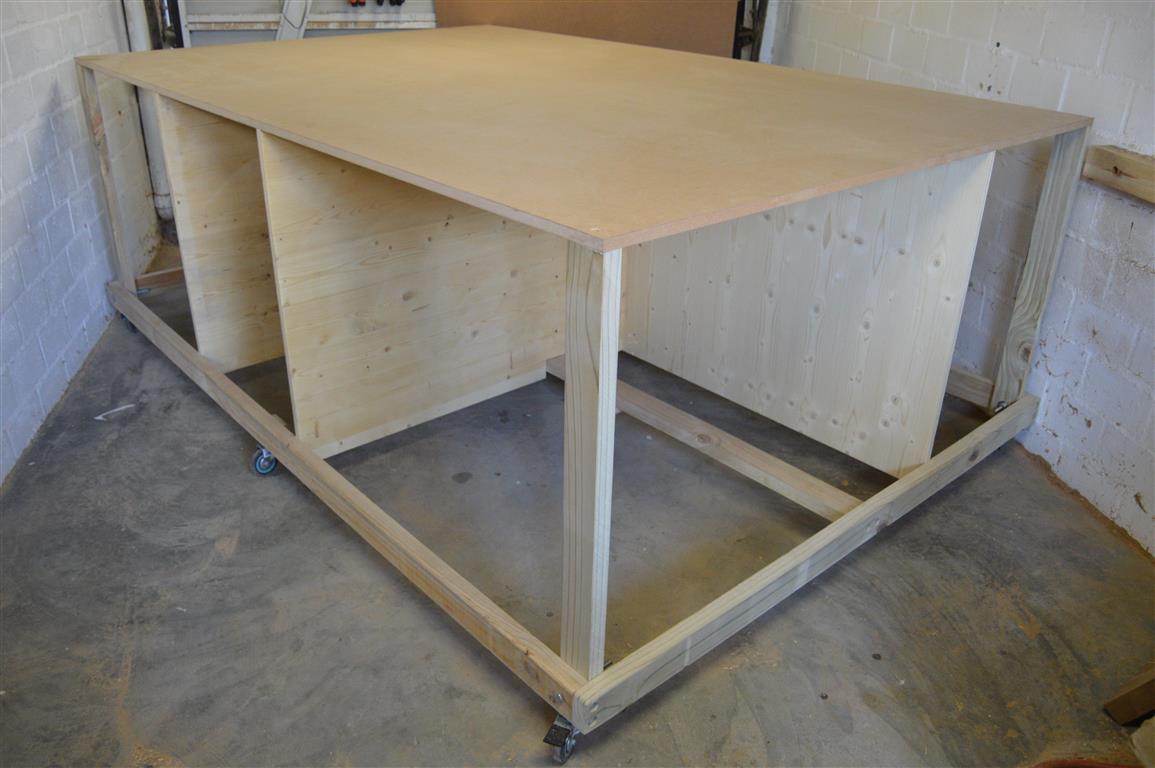
Before I could start adding equipment to my woodworking station I needed to get the basic framework up and on wheels.
This would consist of a base frame, some partitioning, and the bench top. The assembly of which will be described in this post.
Step 1 – Base frame
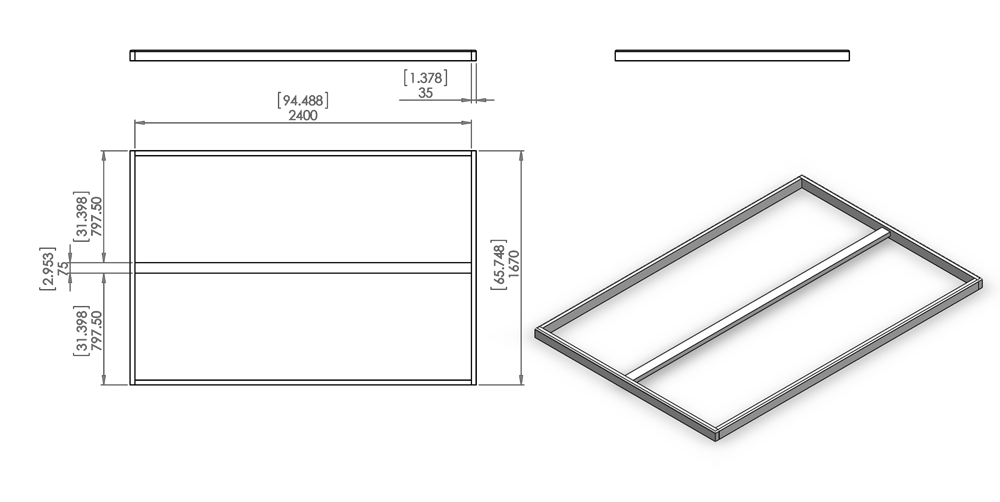
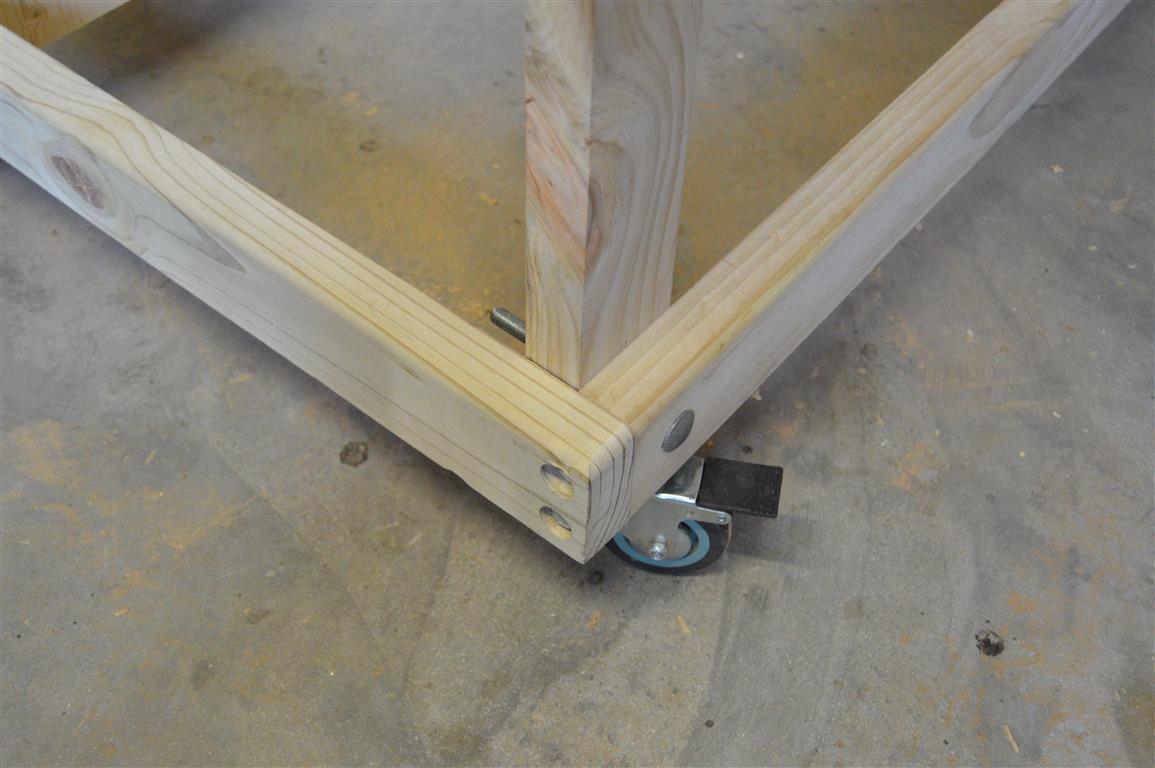
The base frame was assembled using 75x35mm (1.378×2.953“) construction pine that was run through the planer for a better finish and assembled using m8 (5/16“) coach screws that were sunk into the wood.
The base was to be my reference point for the rest of the stage 1 assembly and therefore enjoyed special attention in ensuring it was assembled correctly.
The center brace was installed at a 20mm (3/4“) dept that was equal to the thickness of the plywood I was using. Some of the base panels would later be installed on top of it allowing it to sit flush with the top of the base frame.
The crossectional support will be added by the paneling installed in the next step.
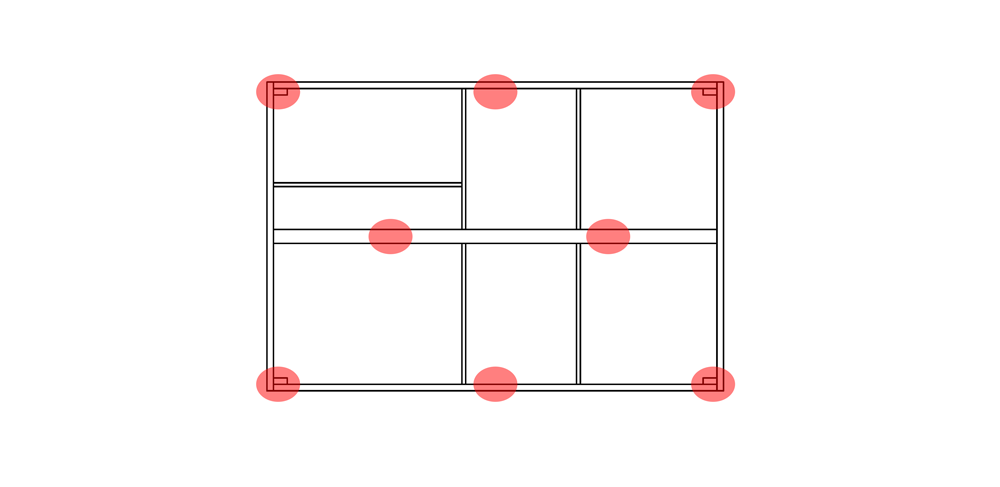
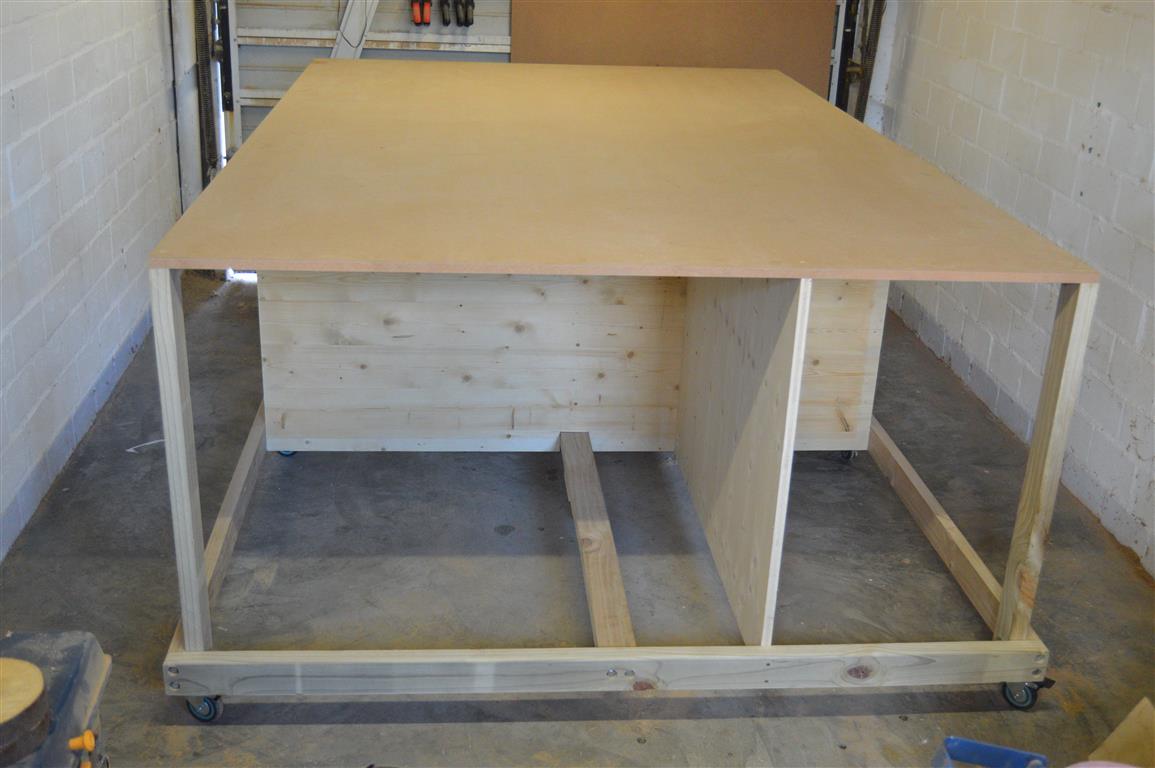
Step 2 – Partitioning and paneling
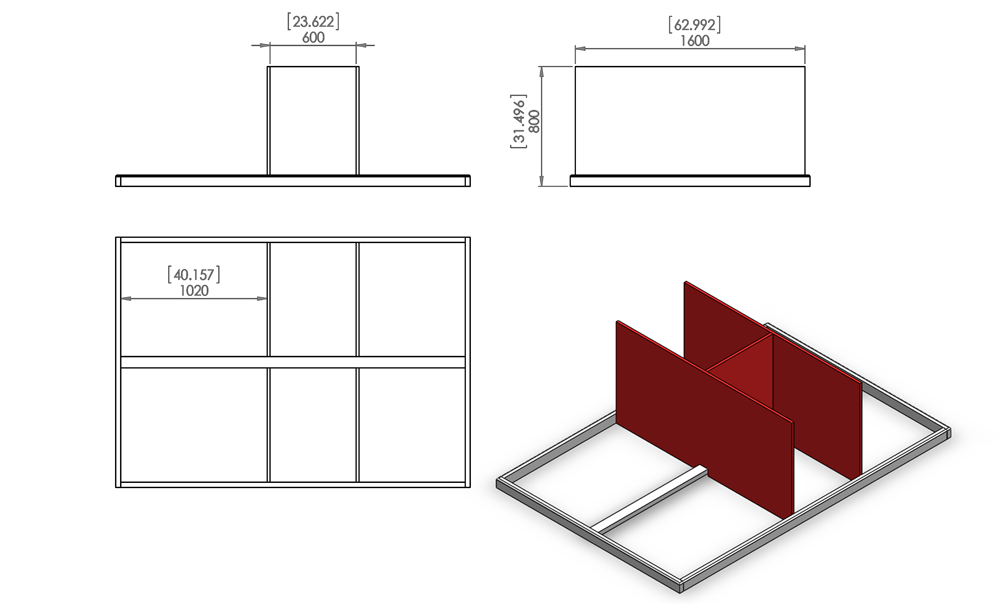
Besides being the central support for the bench top, the paneling installed in this step would also give more cross-sectional support to the base. In addition to this, it created the cubicles that would accommodate the thicknesser on one side and the miter saw on the other.
The miter saw and thicknesser will later be installed to fold away into these cubicles when they are an obstruction to the table saw.
The two larger panels had small cutouts made in the center at the bottom allowing them to slot over the base center brace and attached from the bottom in addition to being attached to the sides. The mid panel, however, was cut slightly shorter allowing it to sit flush with the top of the other two while being placed on top of the center base brace.
Step 3 – Corner posts and paneling
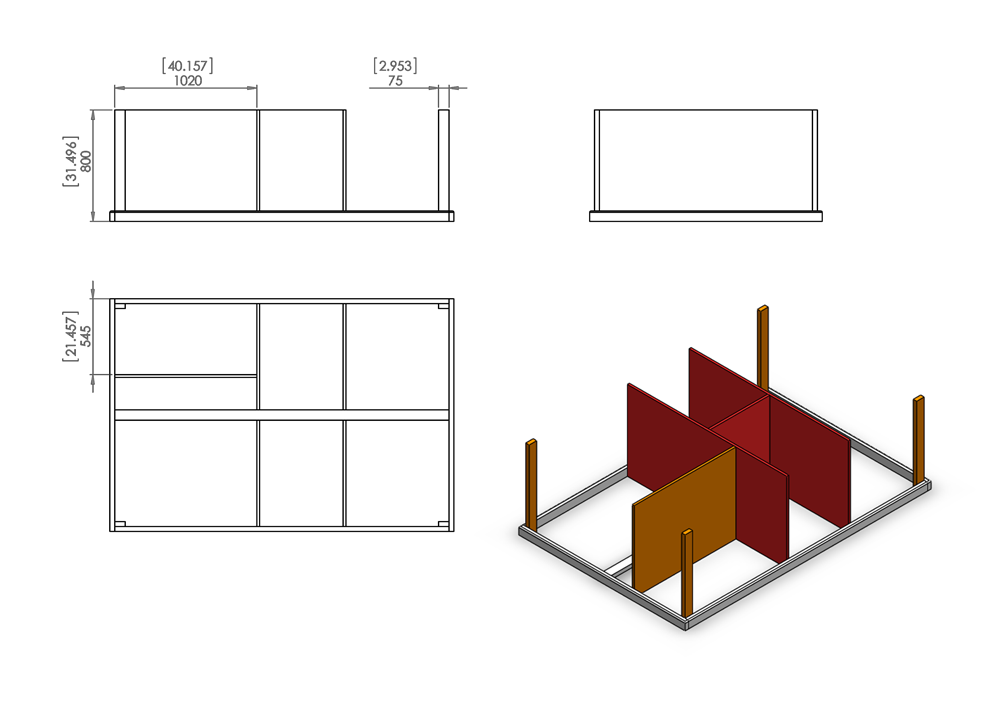
The last step before the bench top would be installed was adding the four corner post along with one last piece of paneling.
The post was installed using the same lumber as the base frame to support the corners of the top while the paneling would be the divider between the compressor and the table saw that would be installed in the next stage (PART 2).
Before continuing to the next step I installed eight heavy duty casters (50kg/110lbs each) to handle the load of the bench when all the planned equipment would be installed. Four of which had brakes.
I installed these at this stage while the bench was still light enough to tip on its side.
The wheels were spaced to distribute the load evenly with the four breaking casters installed under the corner post allowing accessibility.
Because the center brace does not sit flush with the bottom of the base frame a spacer needed to be installed between the brace and the caster.
As for the side casters installed in the center, a spacer was installed on the inside of the frame to support the entire caster base plate as this plate was wider than the lumber used to assemble the frame.
Step 4 – Fit top
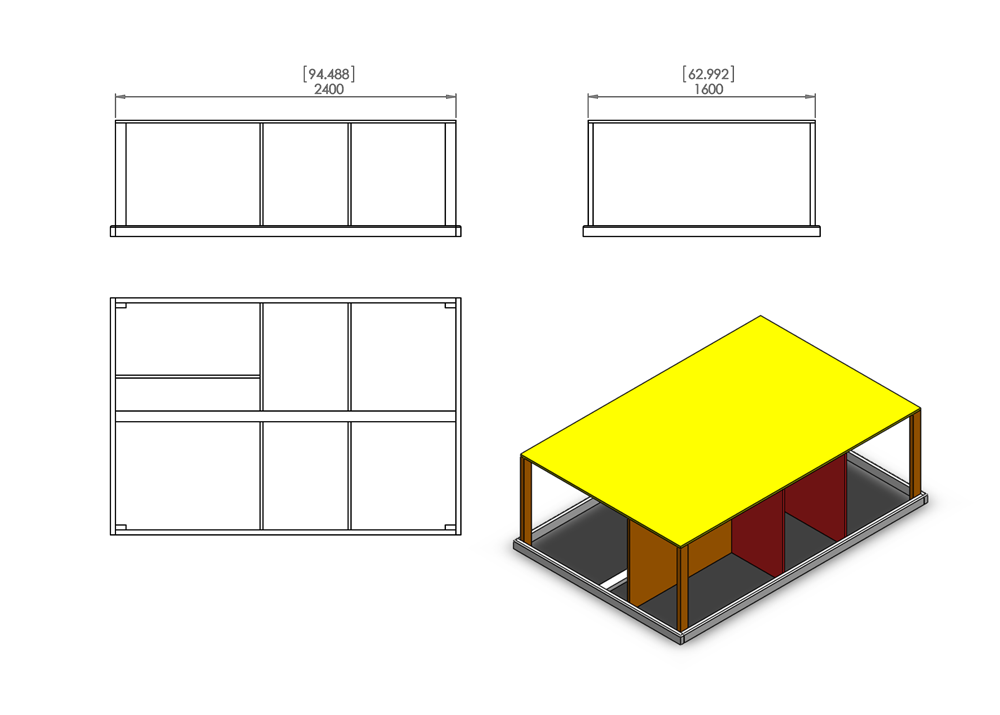
Stage 1 of the ALL-IN-ONE woodworking workstation would be concluded by fixing the top to the already assembled skeleton of the bench.
I used an 18mm MDF board for the top of the bench.
Doing this had a number of advantages.
- The smooth surface of MDF would create very little friction when moving pieces of wood over it. This would be especially useful when the table saw and thicknesser is installed.
- 18mm MDF is strong and would allow me to use a single seamless sheet for the top.
- MDF is easy to work with as it cuts and machines easily without much wear on your equipment.
The bench top is fixed from the top to the corner post and the paneling using screws that are countersunk into the top. This will prevent the screws from scratching or damaging any stock that gets moved over the top of the bench which is, again, especially important when using the table saw and thickness planer.
Stage 1 – Complete
where can i find the downloadable plans for part two and part three of the work bench with the table saw and drop down miter saw.
Hi,
Unfortunately there has been a bit of a delay in the availability of the plans.
The plans should start going up on the site later this week.
They will, however, not be downloadable and only be avaliable on the site.
Jean
Great work! I have enjoyed checking out all of your projects. You have some very well thought out designs and provide excellent detailed instructions. I first saw you on YouTube and came over.
great woerk body. ı follow you on youtube .
Hi Jean,
Great work mate! I’m just looking for the right table for my new space (is 3x6m as your’s) and I thinks your design is AMAZING! Just what I was trying to desing, but better, hahahaha.
May I ask you about the MDF sheet on the top? You said is a 2400×1600 but… is in one piece, right? The usual ones I can find are 2440×1220 ;( Could you give me a bit more info about it? How have you decided on that measure?
Thanks mate! I can’t wait to see how it ends 😉
Hi Carlos,
A full sheet of MDF is 2750×1830 where I’m from (South Africa) though we have 2440×1220 also.
The overall dimensions of the bench were the result of all the equipment I wanted to accommodate on it while keeping it small enough to use comfortably in the small space I have available.
The bench was redesigned a number of times before I was comfortable enough to start building it.
If you need any additional info feel free to ask. The other parts of the build should start going up later this week.
Jean
You should sell the plans. You’ve done the work, make a little make more money by selling the plans. I’d love to start with plans like this and then customize it to my tools and build.
Hey there Russ,
To be honest, I have no desire to make money from the plans. All these projects are things a thought up and if people find value in them and use them, well, that gives me a lot of gratification.
I am considering making other products (like t-shirts) available for purchase if people feel that they would like to support the site.
This is a little bit down the line still, however.
Cheers
Jean
You are the man, I love the design and plan on doing one myself. Great job, and thanks.
Thanks Tom!
It’s always a pleasure.
Hello,
Thank you for sharing this great idea! I have spent the last month building a similar table, although I modified it a bit (Paulk style and 20mm holes in the workbench arena) . I also needed to scale it down to 200cmX122cm for lack of place ( I would have preferred a deeper table but here we have max 244x122cm sheets…). I also had to make some nasty cuts to get the fence for my Dewalt dw745 to slide freely – at one time I considered selling the saw and buying a Makita like you have. The Makita one-sided fence is perfect for such a work table. Anyways, thanks again for sharing and inspiring! Greetings from Norway
Hey,
Glad to hear you like the project. It has definitely made my life a lot easier in the shop.
Though I am a big Makita fan I would advise against swopping the DW745 for the MLT100. Personally, I find the Dewalt to be a better saw.
I am currently working on a fence upgrade for my saw to attach it on the opposite end also.
Cheers
Jean
Jean, first off thanks for this amazing bench. By far, it is the best use of space I have come across. I just had a quick question about measurements on this. I also I am in a one car garage and want to use these plans. On the frame, it shows the dimensions as 2400 x 1670. Then the MDF shows dimension of 2400×1600. Are the 2 of these supposed to match up completely?
Hey Nola,
They are yes.
The outside diameter of the base frame is 2470×1670.
If you look at the top view diagram in “step 1” you will notice that the length indicated on the drawing is only for the piece of wood and not the entire frame length.
On the front view diagram above it, I indicated the lumber thickness at 35 giving you a total frame length of 2470.
I hope this makes sense and apologize if the drawing is confusing. I’ll look into updating it.
Jean
Jean, I have just finished watching all the videos for the workbench, drill bit cabinet etc & they are great. You make it all look easy & you have the mind of a genius. Some of your little tweaks are awesome. I have most of the tools you have but not even a quarter of the skill. Keep up the good work and great videos. By the way I love the dog.
Thanks for the support, Paul. Happy to hear you like the content.
Haha, yeah, my boy is awesome.
Cheers.
I am sorry to ask you this question? (First of all I am building this awesome table!). What are the dimensions in: I know some are in mm and inches. The numbers with brackets around them and numbers under brackets. Thank you for a great table plan!!!! Michael from Tennessee.
Hey Michael,
The units in brackets are inches in thousands. The other units are metric.
Remember to keep in mind that many measurements will change when the design is adapted to suit different types and makes of equipment.
Cheers
Jean
What a wonderful and useful project. Thank you so much. Also, is there a complete set of construction plans yet? A materials list would be most welcome and help us get an accurate and fast start. Can you help with these two items?
Ever thankful,
george grim
Ps: Be most pleased to pay you for these two items.
Hey George,
Unfortunately, I don’t. I didn’t see the point in making the exact sizes of everything available because many dimensions would change as the bench gets adapted for other equipment. The bench was designed, built, and sized to fit my equipment but I can’t guarantee that it would fit different makes and models. I tried to make as much information as possible available to readers for inspiration and so allowing them to adapt the idea to whatever equipment they have in their shops.
You are more than welcome to ask any questions regarding the project and I will do my best to help.
Cheers
Jean
Jean- I just left a comment after watching Part 5, then I returned here to look at the whole project again. When I saw the casters (which I wasn’t remembering during Part 5) I realized why the compressor sits on that shelf. Still, I wonder whether the compressor’s vibration shakes the cabinet enough to create problems if it suddenly comes on while performing another operation?
Also, do you have any thoughts about doing a project like this using a solid core door (36″ x 80″) for the top?
Again, this concept is a fabulous idea & I really appreciate the thought & work you’ve put into it.
Paul
Hey again Paul,
I started building my station from my original design as a prototype with the idea of refining the flaws after a period of use. Luckily, so far there aren’t many (with the exception of the compressor installation).
Because it was a prototype I tried to do it as cost effective as possible.
In a perfect world, I would build it with a solid wood top and frame and only use engineered woods for paneling.
Jean
Hey Jean, I have just a few questions about your all in one bench. I have recently started woodworking so I’m still trying to figure things out. Do you have digital plans & also I have cerebral palsy & when I’m working I need to sit. Can I lower the bench & have it still function with the miter saw & planner tops? Thank you & I really enjoy your channel.
Hi Micheal,
I have digital plans but they aren’t complete yet.
Unfortunately, the height of the bench is required to have the necessary room available to fold down the miter saw.
If you could make the bench wider you could probably adapt the design so that the miter saw flips as the planer does. In which case you will need a bit less height to store the tool. I can’t say for sure if it would actually work without designing and building it myself.
Cheers
Jean
Thank you for the reply, that was very helpful. I have a few ideas in mind. I was also wondering how you did your power supply to the work bench for each tool. Is there a video showing how you did that? Thank you again your knowledge & skill is amazing to watch, can’t wait to see what you do next.
Michael
No problem, it’s a pleasure.
I haven’t added the entire power distribution. I will be doing that in my last video on the bench. Right after I have installed the router table. Hopefully very soon.
Jean
Perfect, I will be watching for that one as well. I also have a bench top router table I need to install.
Thanks,
Michael
Awesome work bench!! What power setup did you incorporate?? I could hard wire everything to a separate panel and fed accordingly but wondering on shat you did to incorporate necessary amperage?? Thanks a bunch
Unfortunately, I haven’t been able to get around to adding a central power layout but my intention to do so still very much exists.
Now I only have a 25A 220VAC supply available to me that would be hard pressed to run all the tools on the bench at once. Especially if they all startup together. This would never happen because I can only work on one at a time but these are the technical power requirements of the bench.
When I add a power layout I would consider some method of interlocking supplies to each tool so that no more than one of the bigger machines can be powered at a time (along with the dust collector of course).
Hi Jean,
Great work, mate! You said is a 2400×1600 sheet, but… I only can find 2440×1220 MDF sheets ;( There is any problema with taht? If I split the top sheet (ex: 2 sheets of 2400×800 each) the bench will continue stable? Could you give me a bit more info about it? Thank you very much mate!!
Hey Carlos,
Unfortunately, without building it myself I can’t really say how stable it would be but I’m sure you could make it work just fine.
There have been one or two people that have contacted me with a similar dilemma and seem to have made it work.
I would, however, consider putting the seam between the two panels slightly off-center. For example, have one 2400×1000 and the other 2400×600.
Let me know if you figure it out or have any more questions.
Jean
Would you be able to give a rough estimate of the cost of wood for this project? I’m in the US but i’m not sure how much of a difference that makes.
Hey Garrett
I responded to your question on my YouTube channel so I’m just going to add that reply here also.
“It’s hard for me to say because I built the bench over a few months and bought the materials bit by bit. Also, all the plywood was salvaged from shipping crates. The only real expenses for me was the MDF top, the wheels, all the fitting and fixtures for all the different installations and of coarse, consumables. In South Africa everything is super expensive and I managed to build the bench on quite a tight budget so I’d say its not crazy expensive but if I had to go out and buy all the plywood wood it would have been a bit of a different story.”
Hope this info is helpful.
Jean
Excellent…!!! I’ve been researching YouTube and the internet for the past 6-7 months for ideas constructing a mobile consolidated work bench. Reason being, I’m in the military and relocate every 3-4 years. When I came across your build I basically went through *Part 1-8* the same day. Great job, great detailed explanation of functionality and design. This is exactly the idea I was looking for. I was about to head to the drawing board, but your build was exactly what I was looking for. With a few tweaks it’ll be awesome. Love your channel, like your advise and look forward to every video you put out. Have a good one mate, cheers…!!!
Hey Roy,
Very pleased to hear you found value in the concept. Best of luck building your own.
Jean
Hello sir.
Nice jobe with your table, i really liked it. So this will be my xmas project 2018 🙂
I have some questions for you.
My workshop/garage is similar to yours i think. How big is it?
And, are you satesfied with the sice?
Anything you would have done different?
Best wishes from Norway 🙂
Hi,
My shop is 3x6m.
I would love a bigger shop but with the bench, I manage quite well in the small space.
Hi.
Exept for the temperature (im using a heatcanon at this moment), were quite even.
I mist thank you for puting the plans out on your site. Thats amazing.
We start the build tomorrow so i cant wait to get the shop organized.
Again, many thanks 🙂
I love this design and am using it as the foundation for my workshop table. After having worked with it for a while, do you ever feel like you should have doubled up the top surface? Looks like you are using 3/4″ MDF – I will be using 3/4″ blondewood single finished side plywood sheets – wondering if I should double up the top.
If it is an option I would say go for it.
When I built mine I didn’t have the funds for anything more than the MDF top.
Great build. Just started watching yesterday so half way through. Couple of questions? Any reason why you didn’t put the Miter saw on a flip like the planer? How is the MDF top holding up?
The miter saw was too long (back to front) to be accommodated in the bench when installing on a rotating bed.
Also, I didn’t want to store the saw upside down.
You mentioned “m8 (5/16“) coach screws”. How long are these?
I’m a beginner and wondering if there is a length ratio to go by when creating a base like this. In the U.S., a 2″x4″ would actually measure 1.5″x3.5″. So the screw would need to be long enough to go through 1.5″ of the first piece of wood and then how far does it need to go into the other piece? I would guess a minimum of 1.5″ into the other piece of wood making the total screw length equal 3″… or a 2:1 ratio of screw length to initial board width. A 4.5″ screw would be a 3:1 ratio. Is this even a “thing”? Or is it “longer” equals “stronger”?
That’s a good question and one I am personally not sure of either.
I am not aware of a set ratio. I normally play it by ear because different wood densities have different requirements when screwing. That’s why I like to have a variety of screw lengths at my disposal when assembling a project such as this.
With coach screws a person is able to apply quite a bit of torque which means it can strip out the wood when working with a softer stock. In this case you would want to use a longer screw.
In the case of hard stock, however, I’ve found that if the screw is too long you run the risk of splitting the wood.
Hi Jean,
This is a definit must-build for me. Being from South Africa myself, I’ve been looking for ways to build a sturdy and robust work bench that can house all of my tools. I was looking at videos from other woodworking channels, and next moment your channel pops up. Luckily for me, I’ve got a double garage at my house, so space for me is not an issue.
Keep up the good work
Walter
Thanks Walter!
And thanks for taking the time to come comment on the site.
Regards
Jean
Really impressed with this. I’ve been looking at different plans and designs to build a new work bench as my shop has grown and I consistently have to put my tools away which takes up so much time. I’m planning on using your design but going to put my own spin on it. Thanks for sharing your work. Looking forward to more designs by you.
Hi Vince,
Great to hear. I hoped people would use my bench for inspiration to design their own benches specific to their needs.
Thanks for the comment and best of luck.
Jean
I have been slowly getting into woodworking as I grow older.
With a table saw, Miter saw, router, Jointer/Planer, other various bench tools, and now a Shapeoko 3 CNC, I find myself running out of room in my garage, just as you have. I started designing a table to flip tools and provide a work surface, then decided to have a gander online. I ran across your site and videos, and what you have designed, is just the absolute best solution. Your concept is just short of genius.
Thank you so much for taking the time to share this work with all of us.
Love the T-shirts as well 🙂
Regards
Scott
Thanks for the feedback Scott.
Very happy to hear you found value in the bench design.
I found by accident your current video, and now looking at your plans, however fo us folks here in the colonies (lol) who dont usually use the metric system, can you convert your next plans to show it in ‘feet/inches’
Thanks
CAM
Hi Cam
The plans include Metric and Imperial units. The values in brackets are expressed in thousands of an inch.
I’m so glad I found this. This workbench is brilliant!! I love the fact that you can add to it as you go along. Plus all I’ll have to do is adjust for the openings to fit my tools. I’m excited to start working on this project, as I too have limited space in my shop, and I’m finding myself becoming more and more frustrated as I work.
Jean, great work and thanks for sharing your design! My “shop” starts getting an upgrade this week As I’m tired of tripping over cords and weaving through and around half a dozen machines, moving things around to make room to work. Been researching workbench designs for a bit, your vid’s are excellent, great mix of details and comedy relief to keep your audience entertained while learning. Time to make some sawdust!
Hey Dave
Thanks for getting in touch. Great to hear you enjoy the videos.
Good luck with your shop upgrade.
Cheers
Like many others who’ve posted here, I have been searching for that “perfect workbench”, and found your design to be both aesthetically pleasing. and extremely functional – with the exception of the compressor. I think I have a solution for that if/when I finally find the time to attempt a similar build. Would a foam rubber matting underneath a wooden base with a lip (the lip would halt the compressor from skating) dampen the vibration?
Thanks for sharing your work, I’m a big fan
Regards from chilly Canada,
Gerry
Hey Gerald
I agree. The compressor was a swing and a miss so I have recently decided to remove the compressor from the bench.
Some sort of insulation between the compressor and the base would definitely go a long way in dampening sound.
Great table! I see one slight problem with the Mitre saw. Looks like you will have a problem with the 45 degree cuts! Can’t wait to see your next video. I also stay in SA, Centurion.
Hi Jean
I am 62 year old recently retired fish monger and you mate have inspired me to start wood working i am going to attempt to build your all in one work station and hopefully do it right thanks again for your inspiration regards Greg
Hi Greg
Thanks for your comment. I am very happy to hear that you enjoy the content. Don’t hesitate to ask if you have any questions.
Greetings from the U.S., Jean.
Your ingenuity and attention to detail are deserving of the craftsman’s community. Keep up the great work. A question: your table top dimensions are 5.25 feet x 7.87 feet. Where on earth did you find MDF that had a width dimension of over 4 feet? The largest dimension of sheet goods I am able to find at lumber stores is 4 feet x 8 feet.
I look forward to your reply. Again, thoroughly enjoy your content.
Hi Damon
I have been getting this question a lot since building the bench. A standard MDF sheet in my country 106×70″. I had no idea that in the US the standard size is much smaller. I will be taking that into consideration when planning my future builds.
What type of paneling did you use for the project?
I mostly used 3 layer pine plywood.
Hi Jean How is the MDF holding up as a work surface? I’m concerned that it may be too soft for pounding or other impact work on the surface. Any thoughts on that?
Cheers, Lance
Hey Lance,
The top on my bench is holding up just fine but if I had the option to use a more resilient material when I was building my bench I would have gone with it instead. I used the MDF because it was the most affordable option for me at the time.
Hi Jean
Can you tell me what size bolts you used for the uprights of your workbench.
Im considering M12 Carriage bolts, but they seem to cost more than gold.
Regards
Matt
Hey Matt,
I used M10.
Hello Jean,
Love this project and this all-in-one table. I have a few questions:
1) what was the length of the 8mm hex head carriage screw that you used for securing the base pieces?
2) when you secured the legs to the base, was it with just one carriage bolt? Did you use a washer with each bolt?
3) Did you have any issues with the screws going into the edge of the plywood panels?
thanks
Hi Stuart
If I remember correctly, the bolt was about 80mm long and yes, I used a single bolt per leg and I did add washers to prevent the bolt from crushing the wood.
As for screwing into the edge of the panels. I drilled pilot holes to prevent the plywood from splitting. Besides that I didn’t have any issues.
Jean,
so, my phase 1 is complete and I have added the base panels to store my compressor and the open storage at the workbench end. I plan on doing the workbench and the drawers next. The panel separating the compartment for the table saw and the compressor must have been off a bit because that part of the top is not quite level from side to side, but it is level from front to back. I’m worried that this may cause issues when I add the table saw (which is on my list but not yet purchased). Do you see this as a problem when the table saw is installed?
Hi Stuart,
If I am understanding you correctly, you are saying that you top is slanting sideways? The situation isn’t ideal but as long as the top is flat you should be able to align the top of your table saw with the top on the bench.
Fantastic project. Unfortunately I can’t source 2.4 X 1.6 MDF or plywood sheet. Would you use 2 boards 2.4X.8 or 2 boards 1.2X1.6? Biggest I can source is 2.4 X 1.2
Cheers
I would go for the 1.2×1.6. The split can fall on the narrow piece between the miter saw and planer.
First, thanks for posting this build. It is brilliant. I can only access mdf that is 49″x97″ and would like the extra width like you have in your design. Do you have any recommendations for making a larger top from a smaller panel?
Hi Brad,
The question has come up before and I have suggested to others to consider joining the panels along their length. This would give you a panel large enough to build my version of the bench (by installing them sideways). I would place the seam between where the miter saw and planer are going to be to make it as small as possible but as I haven’t done it myself it is difficult for me to consider how this would impact the structural integrity of the bench.
Hope this is helpful.
Hi Jean,
I’m pretty sure this is a dum question, but how important is it too get the car exactly square? I’ve a completely beginner and started to try to make your bench this weekend. Even though I bought a planner I didn’t use it as I mistakenly thought the timber I bought was square, by the time of cut it and or drilled the parts and came to our it together, I could see that the pieces were warped slightly. I’ve stopped, and could get more timber, but there’s obviously, first in materials and time.
The other thing is ask, and I know you’ve been asked this loads and loads is, add I’m in the UK, the biggest MDF I can get is width 1220. I have two pieces. Which way would you recommend cutting it too match your size? I thought having the joint in the gap between the planner and the miter, buat I’m a beginner I might not get the table level and then all cuts would be off. Any thoughts? And thanks in advance, as I’ve recently asked you another question, I appreciate any help
Hi Anthony,
Getting the bench as square and level as possible will only increase the quality of the projects you build on in. When you work you might use the bench as a reference from time to time and if the bench is out then your project will be also.
As for splitting the top, I agree with adding the split in the space between the miter saw and planer.
I hope this info is helpful.
Hi Jean, thanks as always for your help. I went back and started again! It’s going s kit better this time.
Just so I’m 100 sure we’re agreeing on the cut the the top, this would be 2 boards of 1220 x 1600 and NOT 2 boards of 2440 x 800 right?
That’s correct.
jean,
Im located in the states and have bought the plans to this awesome table. i have completed the frame and am setting my top – i bought the largest that i could find which is 5’x10′. Finding im 2″ short on the width. if i cut the right width from the length im short the other way. I am hating the idea of disassembling it all to take 1″ off each side of all the panels. Any suggestions? we are considering ripping the 5×10 down the middle and then adding a 2″ strip in but unsure of the structural strength and attachment points. Will be covering with formica or something slippery when completed more than likely so seams aren’t an issue. Better thoughts?
This seems to be a common problem I get from people who are located in the States. It seems that most of the people overcome the problem by using two sheets and having the seam at the narrow space between the planer and miter saw cut-outs. Adding one or two additional stiffeners under the top at the seam might be a good idea also.
Hi Jean, thanks for the help. I’ve now gotten as far as stage 1 complete!
However, when building I had read that there wasn’t much difference between OSB and plywood, and used OSB for the inside panels. Now that I am starting to think about the next steps, I am worried about the OSB being able to handle the weight of the planner and mitre.
Do you think OSB should be ok? (mine is 18mm thick) or should I stop and swap out the cross sections for plywood? I did try to do my own research, but I am confused between the different strengths and properties of OSB vs plywood. Thanks again
I think the OSB should do the trick. Make sure all joints are glued and I think you should be good.
I meant not have been clear, but might be the same answer. This is for the cross sports where the rod would go, the 1600 x 800 ones. So the panels that the bushes would attach to. Same answer?
Hi Anthony, so for the late reply. I have been away. That’s correct. The OSB should work fine for those sections.
Thanks, and good timing, I was just deciding whether or not to change them out today. I will start on stage 2 then! 🙂
Hey Jean! I would like to send thanks from Texas for this build of yours, it is awesome! I will be starting the build this afternoon once I get my material. I wanted to comment about the tops measurements being different in the states if I may. I decided on 3/4” sanded plywood for the top and paneling and the largest I can find is 4’x8’ and though it’s not as big as yours I feel I can make it work just fine. My only concern at this time is my miter saw being a 12” saw. I don’t want the table to be super high and if I use the same method of storage you did it will be due to the overall length even when stored. If I pivot in the middle like your planer I feel like cord management will be an issue for this saw. Any thoughts? Again, fantastic job Jean!
The cord would need to somehow come in from the side of the rotating bed. I would try and put the cord inside the pivot pipe.
The dimensions of MDF I can find are roughly 4′ X 8′ where do you find boards in the dimension you listed?
Since building my bench I have come to learn that the size board I used is not available in all regions of the world. Many of the people located in countries that don’t hold the large boards have opted to make the benchtop from two boards.
Hi Mate,
What is the final height of the table…
Mine is about 900mm.
Hey Jean,
A few ??: if you had to join two pieces of 3/4”x4’x8’ plywood to make your dimensions, would you put the seam right down the middle or offset it to a particular side? I’m not going to install the compressor. Is it a good idea to put the router in its place and install it in the same way as in part 8?
I would put the seam across the width of the bench at the center between the planer and miter bed.
I originally wanted to put my router next to my table saw. It is a better spot in my opinion.
Hey Jean,
After reading the discussions and knowing your future workstation build will bee modular, I’ve decided to modify this one in two pieces, separating the drawer and router end. Looks like it won’t be overly complicated.
I’ve looked on the interweb for the bushings you use in the miter saw and planer installations. I find some bushings I can use but none exactly like yours. Please let me know the manufacturer of your bushings. Thanks, Jean.
Shalom,
Crash
The bushing I used I had made by a friend who has a lathe. I did not buy them.
Hola jean, acabo de ver todos los videos del 1 al 8 y me a encantado tu idea, podrías compartir la lista de accesorios que usaste para todo el proyecto por favor
Unfortunately, I don’t have a full downloadable accessory list available. I mention the tools used in the Part 1 – 8 series posted here. I also have a downloadable cutting list and build plan here:
https://woodworkjunkie.com/product/woodshop-junkies-all-in-one-woodworking-bench-plans
I noticed you have the plans available in metric and imperial, is it possible to buy it in standard? Thank you
Hi Oscar, as far as I understand imperial is standard. However, instead of expressing the values in fractions, in the plans it is expressed in thousands of an inch.
Hi Oscar. Is Imperial not standard?
Hi! Just purchased the plans, but i have to point two important things:
1) in the stage 1 of the plans you do not mention in the top.
2) there is no mention on the hardware used (screws bolts ecc.)
Hi Jean! Love your videos and very much appreciate you taking the time to explain your builds the way you do. I have been scouring the net looking for plans that incorporated everything I want, and this is by far the best one that I have seen. Like the others above, I am having issue finding a tabletop that big, and I intend to make this build 1200×2400. I am going to omit the compressor and thicknesser, so I should be able to work around the size limitations. I bought the plans even though they are all mostly free on your site just to support, However, I was a bit disappointed with the purchased PDF.
1. It seems as if the walkthrough here on the site is more useful than the PDF download itself. There are no illustrations or anything and the designs are a bit hard to understand. There are references to drawing numbers with seemingly no connection to the others. Just an idea maybe you could include the website explanations in the pdfs.
2. There is no mention of fasteners or what hardware you use to join all of these items
3. I know the plans mention that they do not include electric schematics or pipe layout, but I was hoping you could elaborate on the dust collection system, as this is the main reason I was drawn to your design.
4. What CAD software do you use, and would you be able to share that file?
5. The PDF plans do not include a cut list or parts list. I feel like this is the main reason I purchased the plans. If you are able to send a cutlist and parts list that would be very much appreciated.
Cheers and thanks again!
Hi Kyle,
The PDF plans were drawn with FreeCAD. Sadly, I don’t have a file format compatible with other CAD software.
There is a free cutting list on Metric and Imperial in PDF format on the shop front page.
https://woodworkjunkie.com/product/woodshop-junkies-all-in-one-woodworking-bench-plans
You can download it there or alternatively, you can send me a mail with your preferred measuring unit and U would be happy to mail the link to you.
The walkthrough was posted first and was intended to be used to copy the bench. After a number of people requested a downloadable plan I had to enlist a designer to redraw all my original plans and catalog them for better referencing. Those plans became the plans on my storefront.
I regret not including fastener info in the plans and will take it into consideration going forward.
Feel free to ask if there is anything you need help with.
Regards
Jean
Where the crap can you get a single piece of MDF that size in Canada? It’s the only bit stopping me from starting my own build.
Jean,
Thank you so much for this idea. I had been struggling with the same issue, and was looking all over for a fun design, and i cannot express how on the nail this hit. This design is everything i was looking for. And you explained everything so well that even a Novice like me was able to follow along very easily. I am excited to start this project!
A quick question, and I’m sorry if you’ve answered this one a few times, i tried to read all the comments and find the answer. Why did you choose1020MM back for the first partition? was that becuase it centered the thicknesser and Miter saw on the bench?
Thank you for everything!
I can’t really remember what was the driving force behind all the decisions I made when designing the bench but I can say that I re-considered the layout many times in an effort to optimize the functionality of each addition.
I have tried accessing the plans via the links in the comments, but the link does not go to a pdf, it goes to the All-In-One page that shows all of the parts. Is it possible to email me a copy in Imperial format? BTW, this design is genius.
Hi Jean,
Just binged watched all your videos after I came across the all in one workstation, fantastic design btw and I love the french cleat wall. My shed is smaller then yours however so the bench top design is great for me as I will be able to pull it outside to work. I am having some trouble trying to buy the plans, maybe one of the links is not working ? Any advice or help is much appreciated.
Having the same issue with not being able to purchase the plans, anyone know what the story is????
Hi Jean,
First of all i want to say that this is absolutely a nice design. But seems i can not download the cutting list. If i click the link then it redirects me to other page but i can not find the cutting list there. Could you send it by email to me ?
Kind regards,
Are these plans/cutting list still available? None of the links appear to work to get a PDF and no replies since 2020. This is an awesome design, it would be a shame if it’s defunct.
Thanks for the great work!
Hi Jean,
Fantastic design and a bench that would tidy up my workshop.
I have tried the link for the full set of plans but t just goes to a blank page. Any chance you could send me working link or email the plans?
Kind regards