

Making the most of a small shop – PART 8
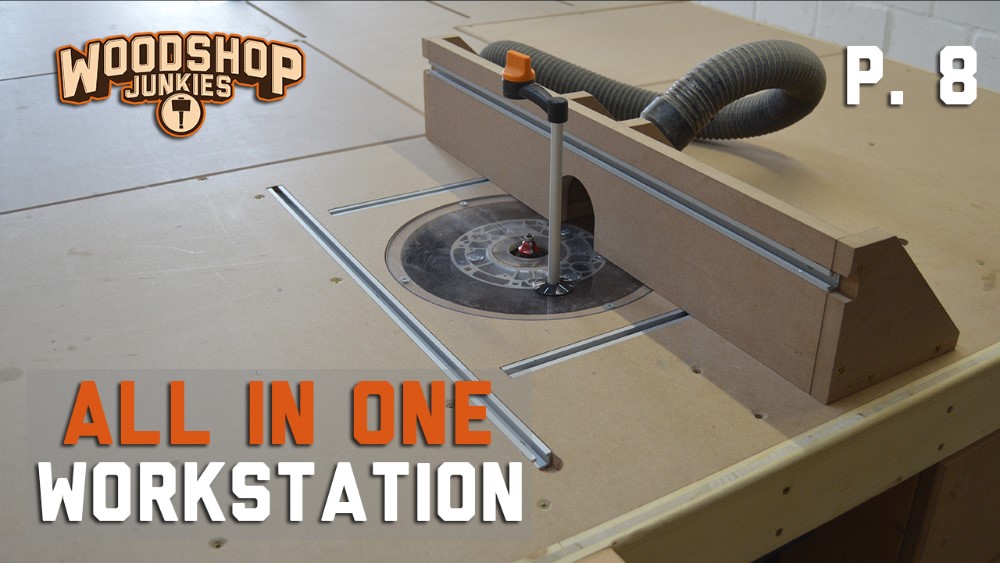
After months of planning and building, I have finally reached the last tool to be added to my All-In-One Woodworking Workstation. The router table.
Adding a router table to the bench would greatly increase its functionality and I probably should have added one sooner but I was holding out to make up my mind about the best router to use for the addition.
Shortly before making the final addition to the bench I made up my mind and bought myself the Triton MOF001. A router specifically designed for table mounting.
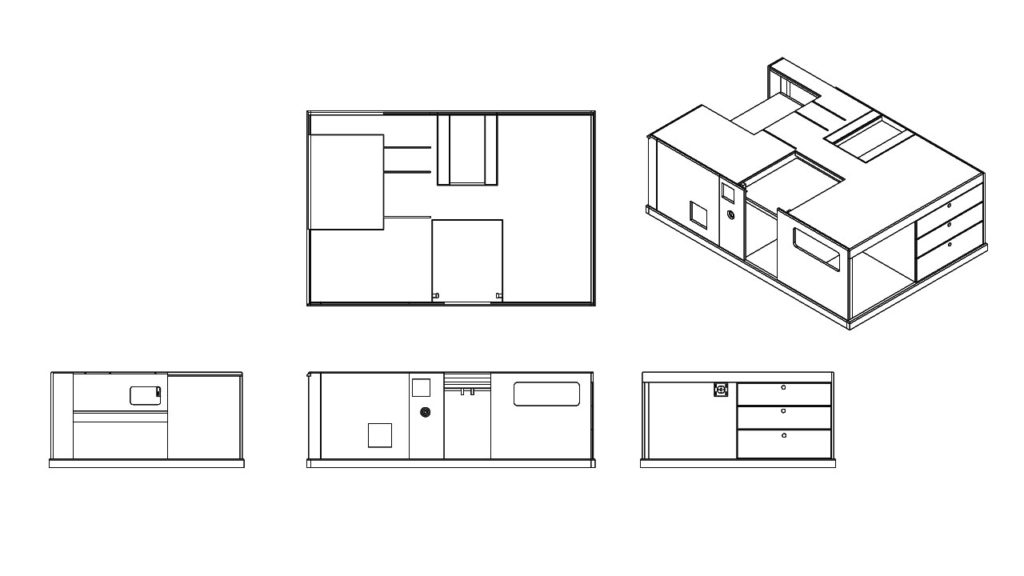
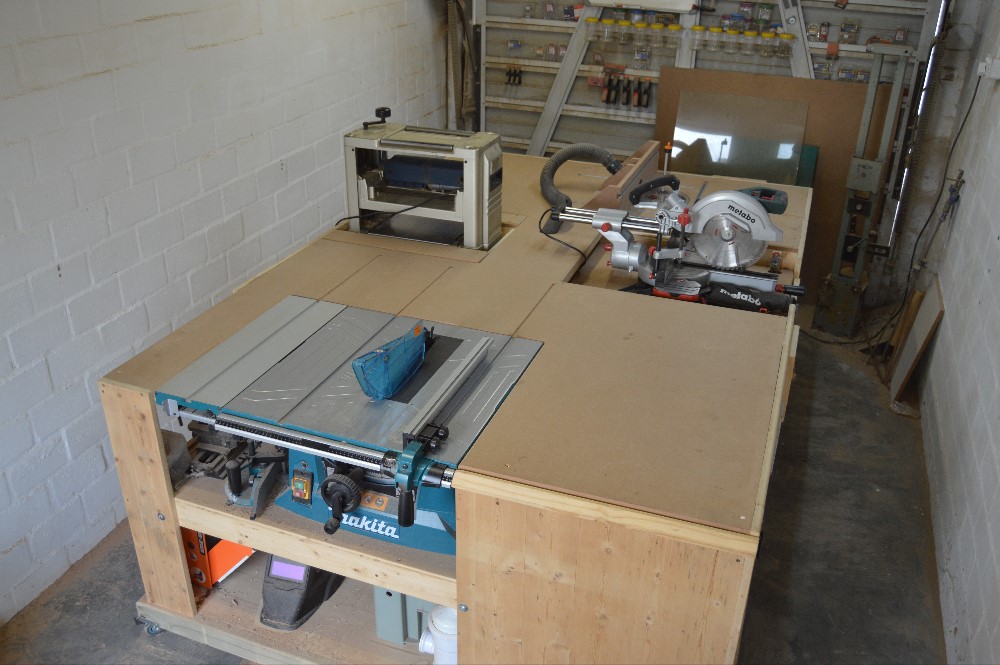
Installations already included in my All-In-One Woodworking Workstation:
- Table saw – PART 2
- Miter saw – PART 3
- Workbench with vice and power tool storage – PART 4
- Soundproof compressor enclosure – PART 5
- Rotate-to-store thickness planer – PART 6
- Central dust collection – PART 7
>>>GET COMPLETE PLAN<<<
Router table
A simple way to add a router to a bench top is by using a commercially bought router insert base plate but I was on a tight budget so I opted to make my own. I would then need to simply make a cutout in the bench top for my “homemade” insert and then assemble an adjustable fence guide.
By using the Triton router I would have the added functionality of adjusting the cutter height from above the bench top by using the height adjustment winder supplied with the router.
PART 8 – Cheap DIY Router Table Added To All-In-One Bench
The instructions that follow are intended to be considered along with the video instructions provided above.
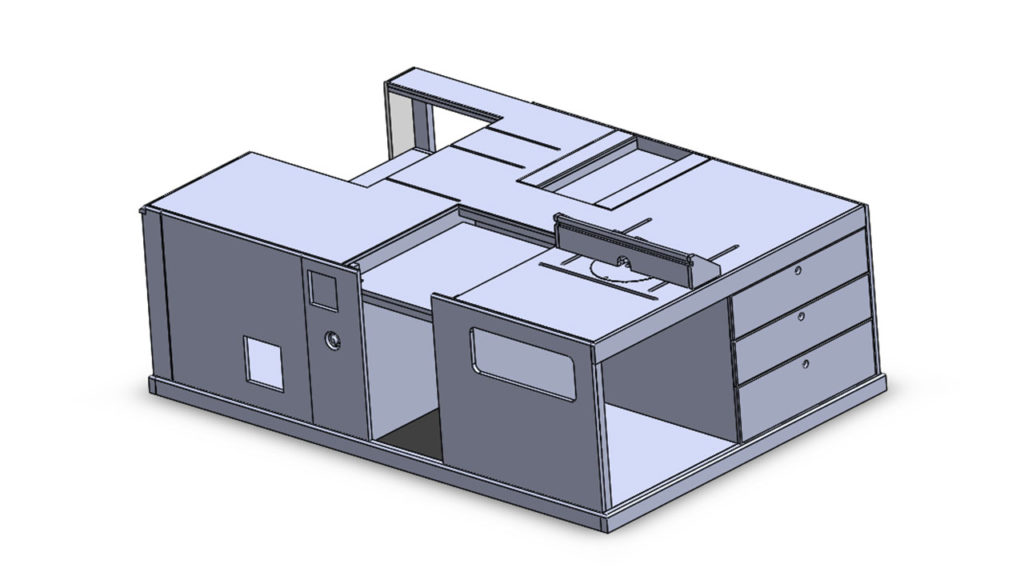
Step 1: The Insert
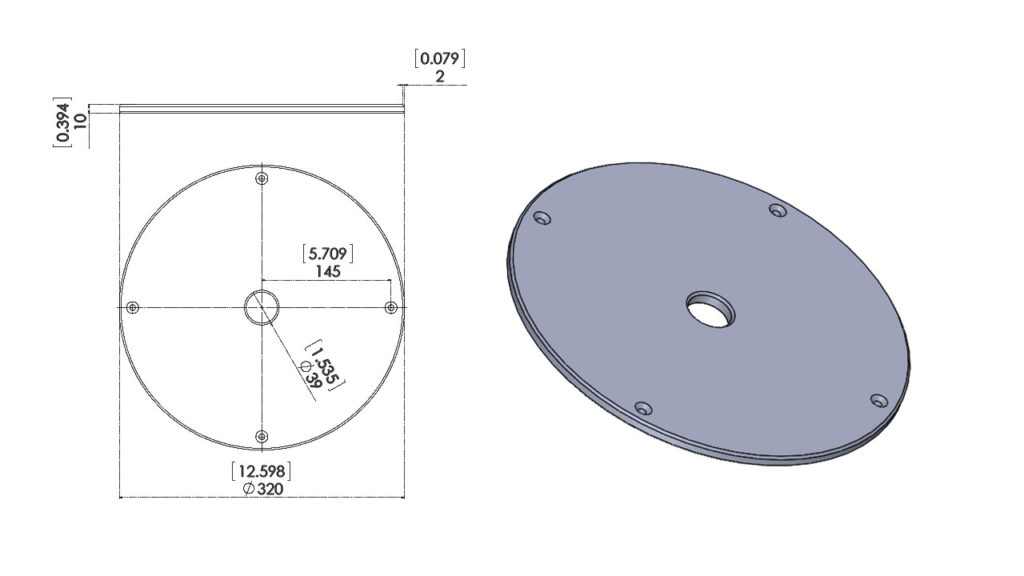
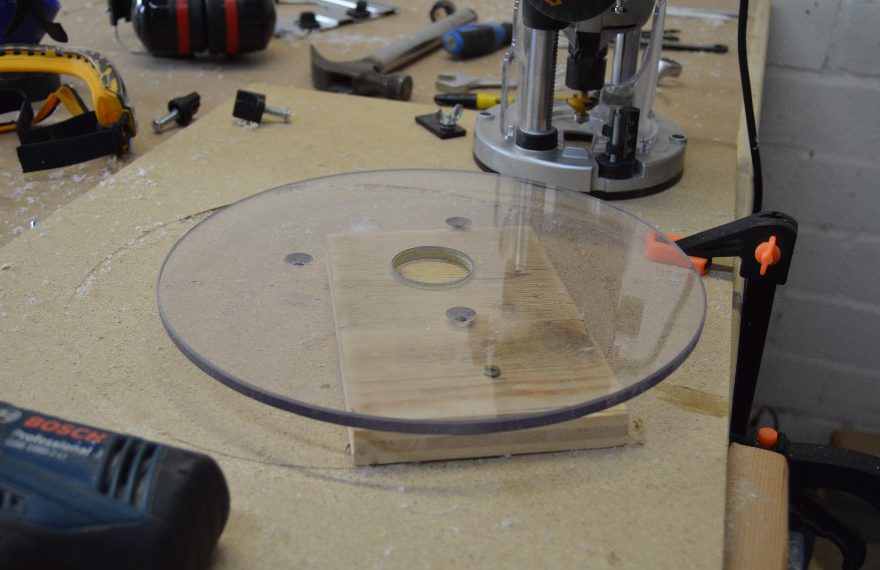
The first step in installing my router to my All-In-One Woodworking Workstation was making the table insert which I would be mounting the router to.
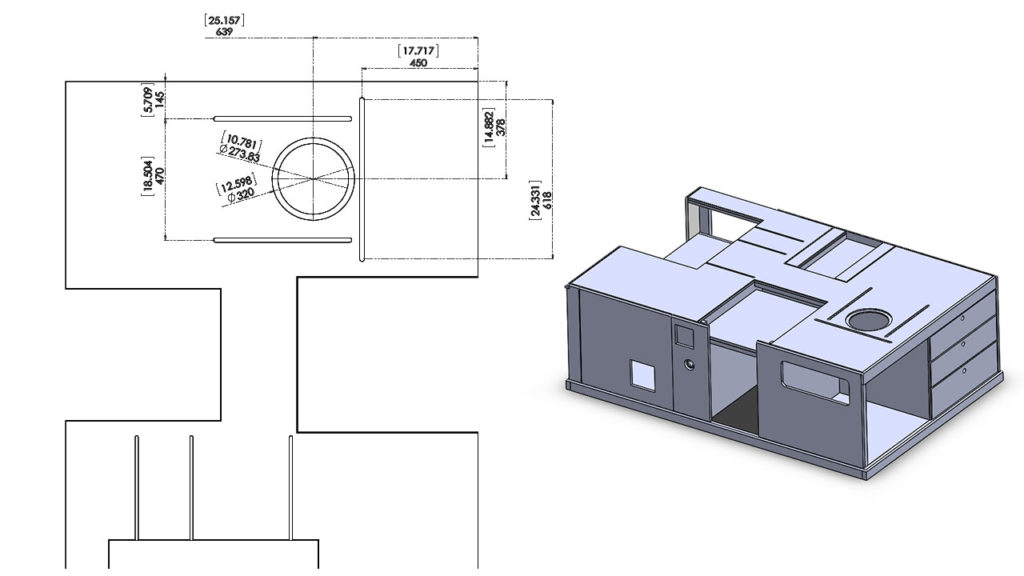
To do this I cut a 320mm(12-1/2″) circle from a piece of 10mm(25/64″) plexiglass using the circle jig supplied with my Triton router.
In the center of the round cut plexiglass, a cutout was made using a hole saw for the bit to protrude when the router is mounted upside down.
The router was then fixed to the circle cutout using counter sunk screws.
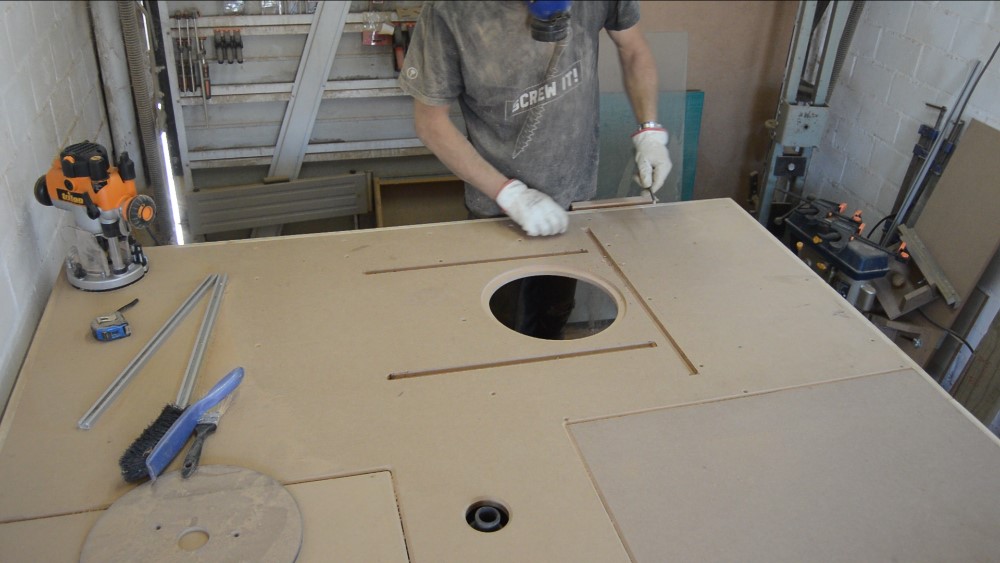
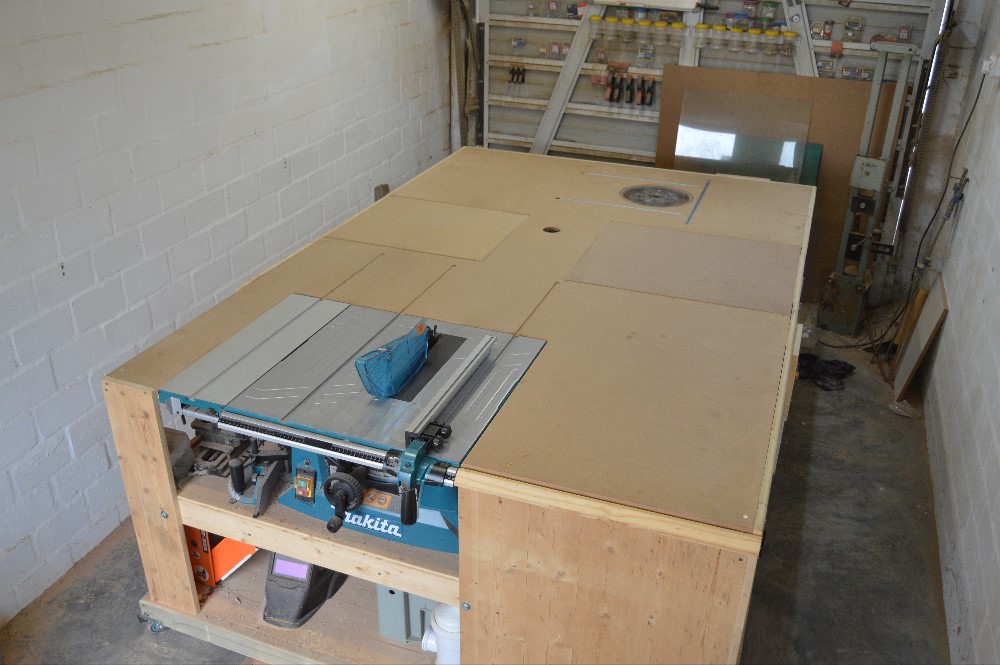
Step 2: The Top Cutouts
The next step was making the bench top cutout into which the insert will be installed.
To do this the router circle jig was used once again.
A circle was cut into the bench top to match the already prepared insert in size and depth.
After this, a second circle was cut all the way through the bench top but slightly smaller than the first.
This was to create a step that the insert would be fixed to.
With the insert prepped and its cutout made I needed to make further cutouts into which I would be installing store bought aluminium t-slots.
Two t-slots were installed for mounting an adjustable fence while a 3rd was installed at a 90° angle of the first two that would be used for feather boards and cutting jigs.
To make the cutouts a makeshift guide was used along with the depth restriction mechanism on my router.
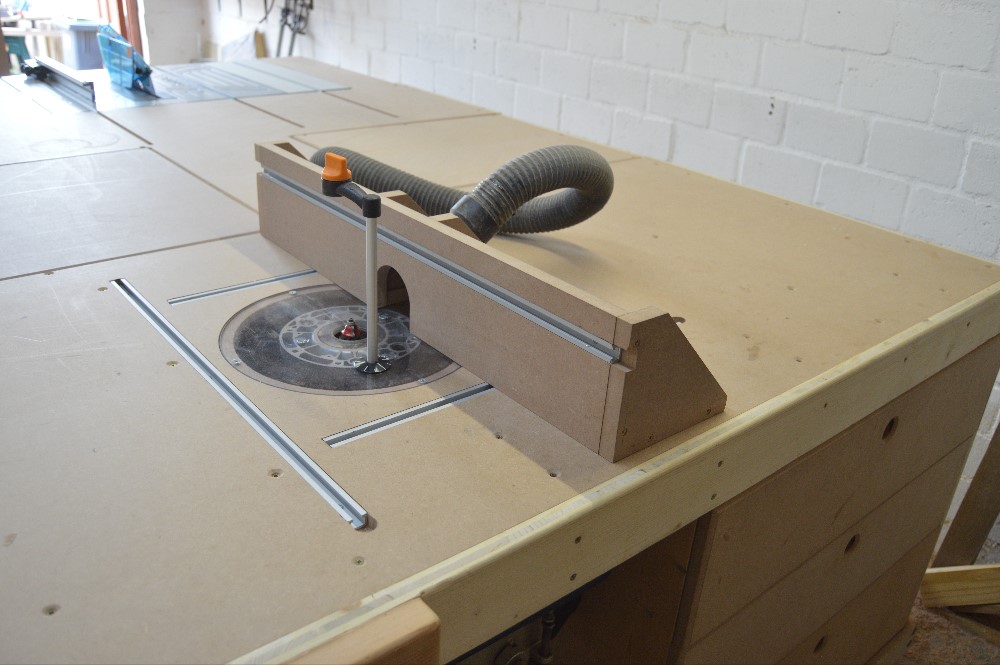
Step 3: The Fence
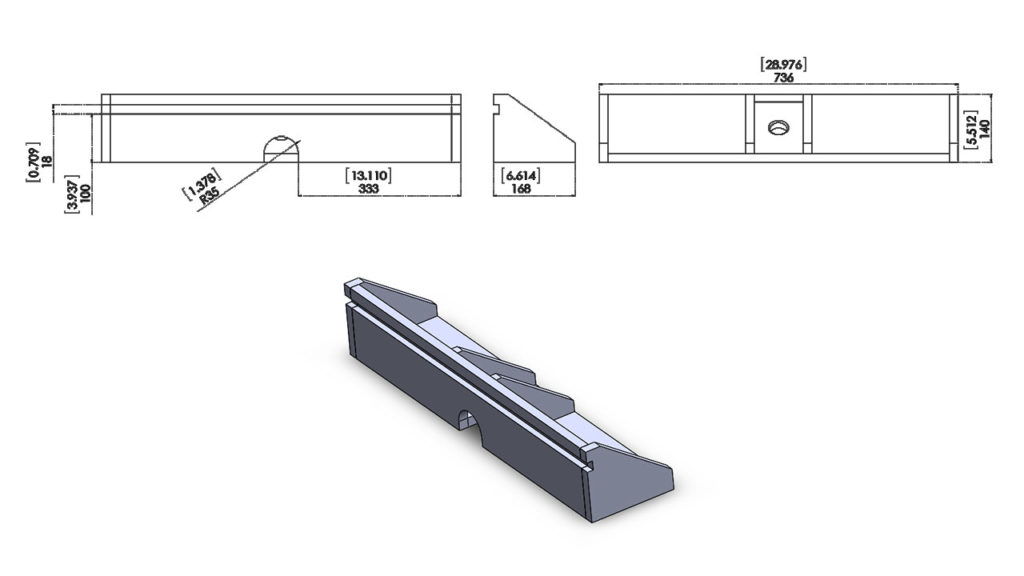
All the cutouts were made and it was time to assemble a fence.
Using 18mm(23/32″) MDF I cut all the component that would make up my router fence.
I included a port to attach my dust collector and a t-slot that can be used for jigs and feather boards.
Complete!
With the router installed my vision of an All-In-One Woodworking Workstation has been given life and though I still have big plans to make the most of my small workshop I think this bench was a great idea.
Hi,
Wonderful set of videos. I’m interested in possibly building an all in one for my shop. Other than what you’ve outlined above, do you have any detailed plans for the table? Please let me know.
Hi Chris
Many people have made the same request but I simply did not have the time to redraw the entire plan as it consists of about 80 components. I decided to pay an engineer to draw these plans on my behalf and I have recently received the full +/-100 page plan. The plans will be sold on this website for $9.90 in downloadable pdf form. I am currently waiting on some legal documentation after which I will make the plans live. You can follow my YouTube channel where I will announce when they are out.
Cheers
I can’t find the link for the plan to make all in one workshop . Do you can send me the link please
Hi there
Excellent video. Thank you. Where is Sa do you buy your spiral upcut bit? Been looking and can’t find any!
Hey. You can check BPM Toolcraft of Hardware Center. https://www.toolcraft.co.za/ http://www.hardwarecentre.co.za/
Hi Jean,
Have just bought the plans, but would really like a summary BOM (and cut list) if you had it?
Cheers
Peter
Hi Peter,
I am busy finalizing a cutting list. I will post it very soon.
Jean
Thank you for your great videos. I enjoyed the safety & detail you go to in all your work. I am new to your site but have fallen in love with your w/bench.
I will look further at your site/projects with enthusiasm & grab a T to assist in any way. Will get back to get your plans at the same time.
Ciao mate & well done.
Michael
Hi Micheal,
Thank you so much for supporting the channel. I will keep doing my best to get good content out.
Cheers
Jean
Hi Jean, I am at the stage of putting the router into the table but noticed you mentioned you where originally going. to place it where the compressor is. I am either going to put a smaller compressor or no compressor in so I am interested in possibly placing the router next to the table saw. Was there any particular reason that you decided against putting it in this space. Cheers Scott
Hi Scott,
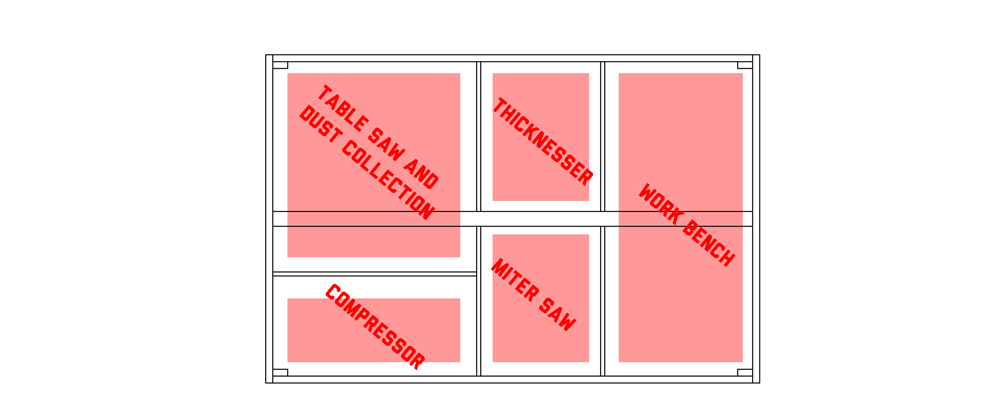
Ideally, I would prefer my router next to my table saw. I moved it because I was considering a smaller router when I designed the bench. I then purchased the Triton and the larger size of it resulted in me not being able to fit the router above the compressor.
New to woodworking, and enjoying your videos. Can you expand on why you would prefer the router next to the table saw?
I will be purchasing a smaller table saw (dewalt dwe7480) and (i think) the porter cable 895PK router. Also, a planer by PC (PC305TP) and a miter saw (dewalt dws715) that i hope to mount like the planer (completely flipping over). Hoping there’s no issue with this setup!
Hi Brian,
The biggest reason for me wanting my router mounted next to my table saw is because it would allow me to make a fence that can be shared by both machines.
That makes sense, and was what I was thinking about as well. If you did it over again, would you put your compressor elsewhere (and set it up a shared fence)?
Any other items you would arrange differently if done again?
Thanks for the great info and videos!
I am currently redesigning my bench. The idea is still the same but I have reconsidered many of the things I did when I built my current bench. I also have a few improvements in mind.
Mind sharing a preview of the things that you feel needed a redesign? I’m sure you are planning to do more videos in the future addressing these… but (after a week+ of designing), I am building my workbench this weekend. Would be handy to know what pitfalls to avoid, or what to wait on.
The biggest change is making the bench modular. I love having the large work surface but I would also like to be able to split the bench up into 3 smaller benches to free up more floor space when assembling projects that require it. I would be able to latch the benches together to get one large bench like my current one or have the 3 smaller benches up against the walls to open up space in the middle of the shop. I am aiming for the effortless changing between a horseshoe layout to an island layout.
Jean, love the bench. I ordered the plans last week and will be adapting the size and dimension. What was the dimension of your top that you used? I am trying to see if I can re adjust dimension to a 4ft x 8ft final top. I also saw your comment about splitting into 3 sections, which I think would be a great idea.
My benchtop is about 5.2x8ft.
Hi Jean, loved watching the videos and your easy style. I have decided foolishly that your bench might be my first project! Like Brian asked and before I buy your plans, I was wondering if there were anymore fundamental changes you would make if you were to make any changes apart from making modular? I am sure I remember you mentioning something about maybe not including the compressor at one stage, but it was a few months ago when I watched your videos all the way through?
Hi Anthony,
The biggest change is the modular design and yes, I will be leaving the compressor out of the new design. I am also looking at adding my dust collection in a way that would allow me to attach it to the bench or machines from overhead meaning that I won’t have the vacuum/dust collector onboard anymore. I am playing around with machine placement and other small additions like “off-cut box” and gas struts for miter bed.
I really enjoyed this video series and tossed you a sub. One thing that I liked is your approach was very low cost and accessible. You used the tools you had. A lot of these projects you see gleaming new never used brand name tools, expensive hardware and fine woodworking ethic – but either it doesn’t look like it ever gets used or its overpriced. In your videos, I saw half the materials and hardware was stuff I’d have hanging around in spares or could source cheaply. Also you do it in stages which is appealing for a weekender. THIS is how you build a DIY bench IMO.
Did you ever publish the plans? Probably wouldn’t be useful since everyone has their own tools. I’m just going to draw one up this weekend in Solidworks and get to it.
Thanks! Yeah, the plans are here on the site. https://woodworkjunkie.com/product/woodshop-junkies-all-in-one-woodworking-bench-plans
As you noted, they need to be modified to suit the purchaser’s tools.
Hi Jean, I’m interested in purchasing your plans but when I follow the link you posted above I can’t seem to find any purchasing links. When I go to the “Shop Plans” section of your site the section seems to be empty as well. Is there another way I could purchase these plans or have they since been taken down?
Thanks for the help.
I am currently experiencing a problem with my storefront. It may be down for some time. I am really sorry about the hasstle. I am working on getting the plans back up asap.
Wondering if you have a list that shows how many sheets of wood and how many boards used so I would know what to purchase?
Thank you and I love the plans. Can’t wait to get started.
Here is a downloadable cutting list: https://woodworkjunkie.com/wp-content/uploads/2019/08/Metric-Cutting-List-All-In-One-Bench.pdf
The part numbers on the cutting list correspond to the downloadable plans.
Any idea how many sheets of plywood are required for entire bench?
Good day
I’m not sure if I will get a response but I will try well I love your all in one. Workbench I also purchased the plans and downloaded both sets how ever I’m not great at the convention of Imperial and metric is there any way there is a plan in feet and inches if I have to purchase it again will I am new to the hobby and I would love to build this workbench as my first big project I have already purchased all the appliances and some of the materials
Hi Daniel,
Unfortunately, I have no experience working in feet and inches. The imperial version of the plans is inches. Converting the decimal to fractions isn’t something I would be able to do because I don’t know what the standard used fractions are.
I am very sorry I can’t be of more help.
Hi Jean,
Thanks for the series, I enjoyed watching it.
I have the same router and I am busy planning to do a similar installation, but in a router table. You used counter sunk screws to fix the router, what size are they, and where did you buy them?
Thanks
Fellow Safa
If I remember correctly, they are standard M6. You can probably pick them up at most hardware stores. I got mine from my local hardware store.
Hi Jean!
Hope all is well over there. I was curious if you’ve made any progress on the new modular design? I’m about to be moving into a home with a 2 car garage and want to use one side for my shop, but still want to be able to have space when needed.
Regards,
Josh
Hey Jean,
Just wondering: if your Triton router can plunge the full thickness of your MDF, why not mount it directly to the MDF vice on a piece of plexiglass? Would it limit your depth adjustment?
BTW, bought a Triton and it came w/out a 1/4″ collet and plate attachment knobs. It’ll take a month before they arrive from UK (to Florida). 🙁
I figured out why. When in the fully plunged mode, the collet is locked into position for ease of bit changing and the ON/OFF switch cover is locked in the closed (OFF) position. Received the 1/4″ collet 2 weeks early.
Hello Jean –
I am in the U.S. I finally found what I have been looking for! Your awesome workstation! I am experiencing issues trying to access the storefront and purchase the plan. I was able to click on the link in the comments for the cut list however. Is there anyway to navigate around this issue? Perhaps paypal and a pdf through email? I too had the idea of modifying the workstation so that the dust collection could hook up externally. Reading the comments, I see you’re already working on that as well as the air compressor being external. Are those plans available? Thanks for designing the perfect station, and posting about it!
Hey Ryan,
The storefront went down recently due to some server issues. I have decided to shift the plans store to a separate domain dedicated to posting my plans. Unfortunately, the site is very much in the starting phase.
Jean, a fellow Saffer in Stellenbosch here. I love your stuff and would love to know when you think the modular bench idea will be available? I.E is it worth me waiting? I have a small, square shaped workshop (3.5 x 3,6m) so modular sound like exactly what I need.
Hey Paul,
I would love to be able to give you a ETA on the revised bench but sadly I am still in the design phase. I can’t really say when I will be ready to start building it.
Great content, cant believe i have only found it all now. Based in Durban so empathise with the continuous struggle to get decent tools at realistic prices…