

Making the most of a small shop – PART 5
My All-In-One Woodworking Workstation has come a long way from being just an idea and has already made life in my small shop more pleasant and functional.
Unfortunately, I still needed to deal with some bulkier items cluttering up the floor space.
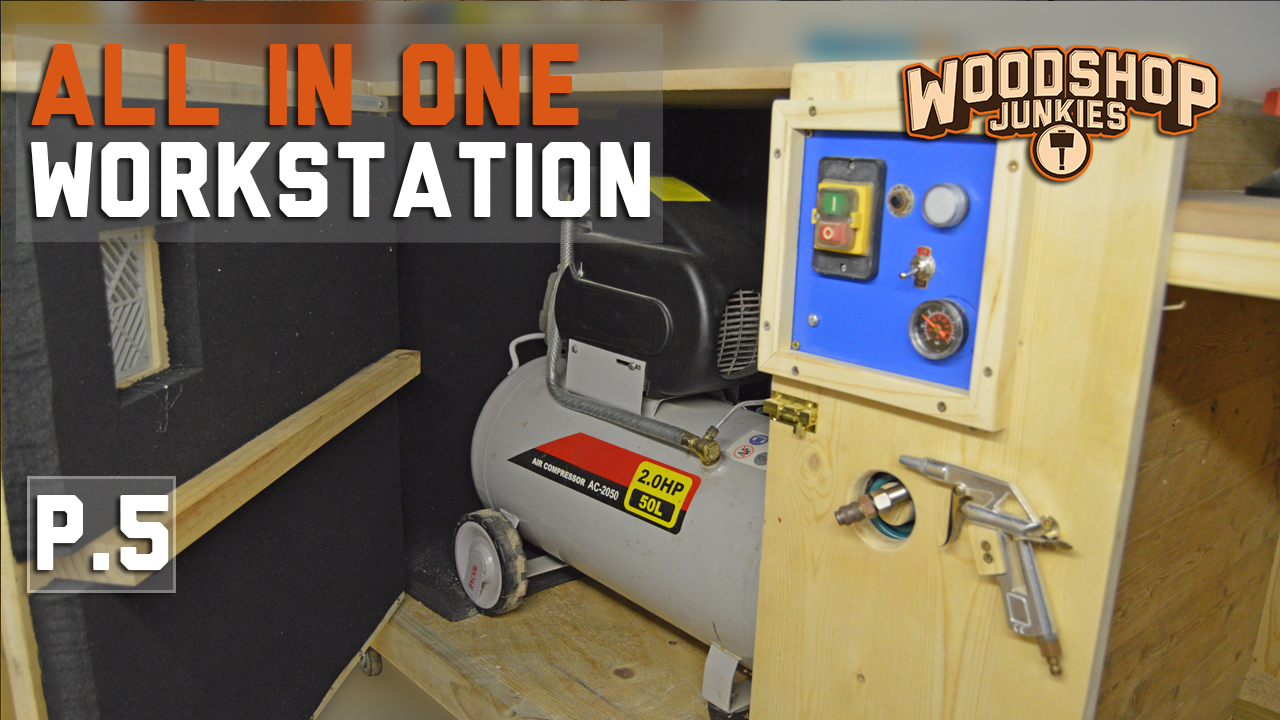
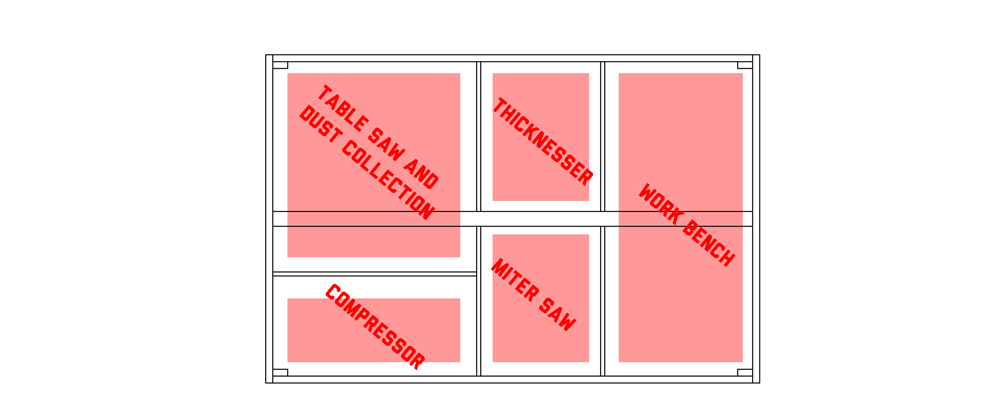
One of these items was my small 50L compressor.
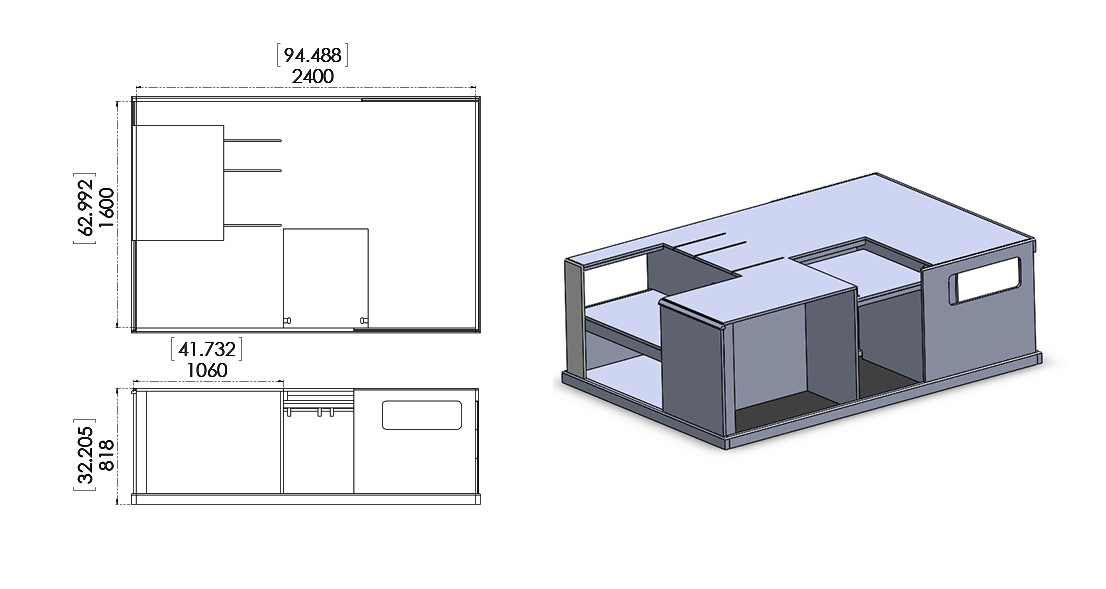
Complete bench:
- PART 1 – Frame and top
- PART 2 – Table saw
- PART 3 – Miter saw
- PART 4 – Workbench area
- PART 5 – Compressor
- PART 6 – Thickness planer
- PART 7 – Dust collector
- PART 8 – Router table
>>>GET COMPLETE PLAN<<<
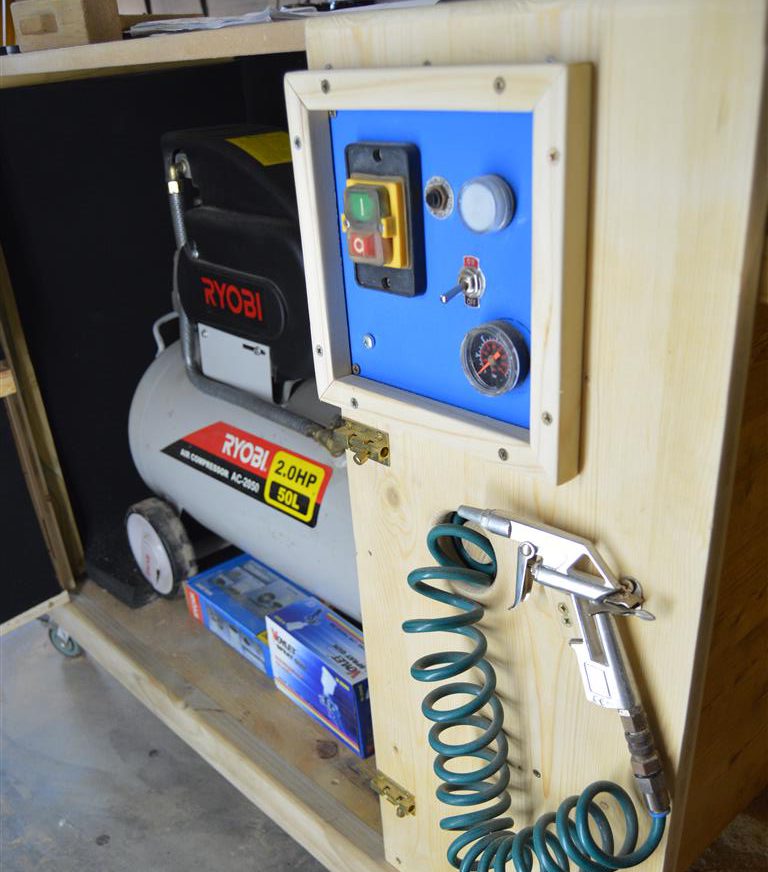
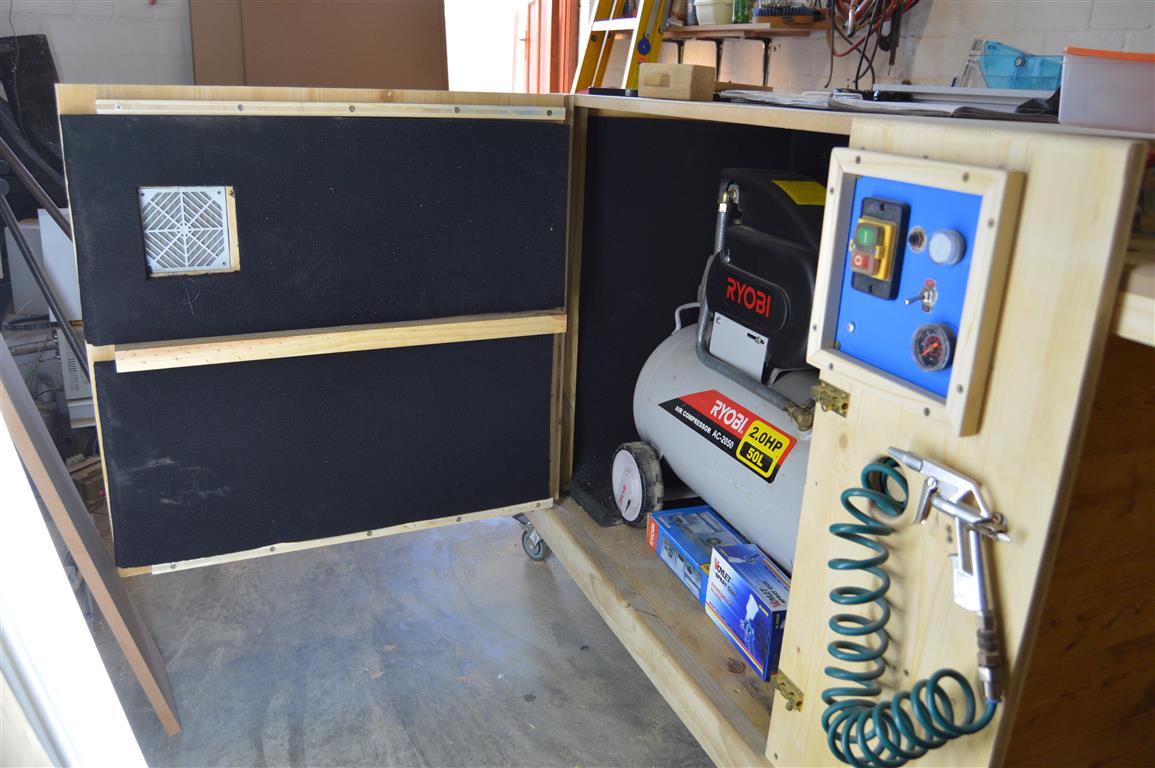
Soundproof compressor enclosure
A compressor might not be an “essential” tool for woodworking but having a compressor at your immediate disposal does have a number of advantages.
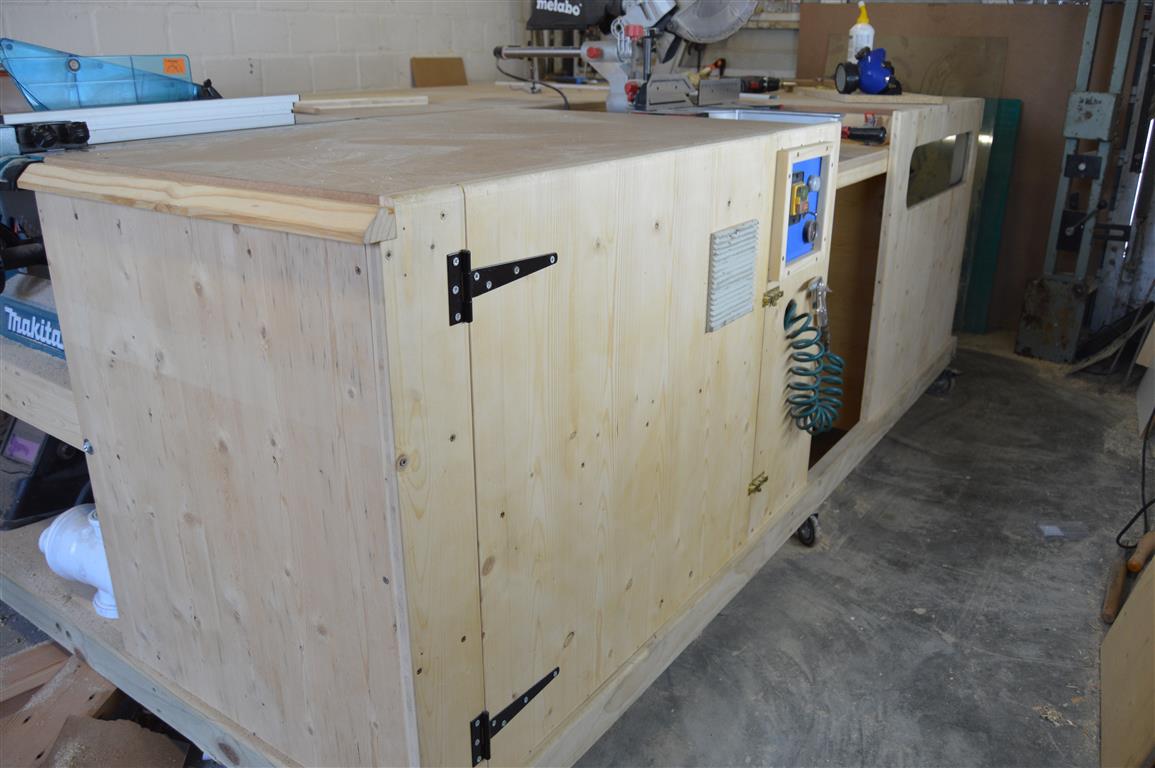
Above and beyond these advantages, I just really wanted to get the thing out of my way. This is why I decided to build it into its own cabinet as an addition to my All-In-One Workstation.
Enclosing the compressor into its own cabinet meant I would be able to add soundproofing. Something I’m sure my neighbors would eventually thank me for.
The enclosure did, however, pose a potential nuisance. I wasn’t looking forward to having to open and close the box everytime I wanted to use the compressor. That’s why I decided I would build an external control panel that would allow me to start and use the compressor from outside the enclosure.
PART 5: Soundproof compressor enclosure
The instructions that follow are intended to be considered along with the visual instruction provided by the video above.
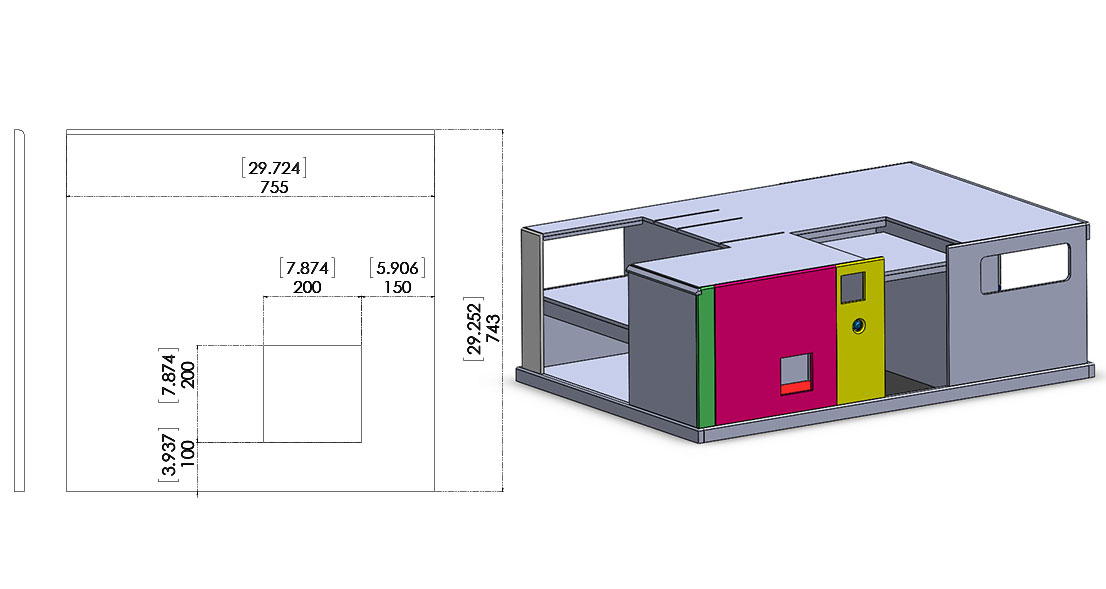
Step 1: The Base

My first step was to add a base to the area I allowed for the compressor. This was done in the same way as the bases in the previous steps. By installing the base on top of planks fixed to the inside of the enclosure panels.
Because the gap was too large to fit one solid door, two small planks were installed to the right of the cavity that would allow me to install a panel to enclose that segment of the box.
The remaining area will be big enough to allow the compressor to be removed from the enclosure if the necessity arises.
Step 2: Side Panels
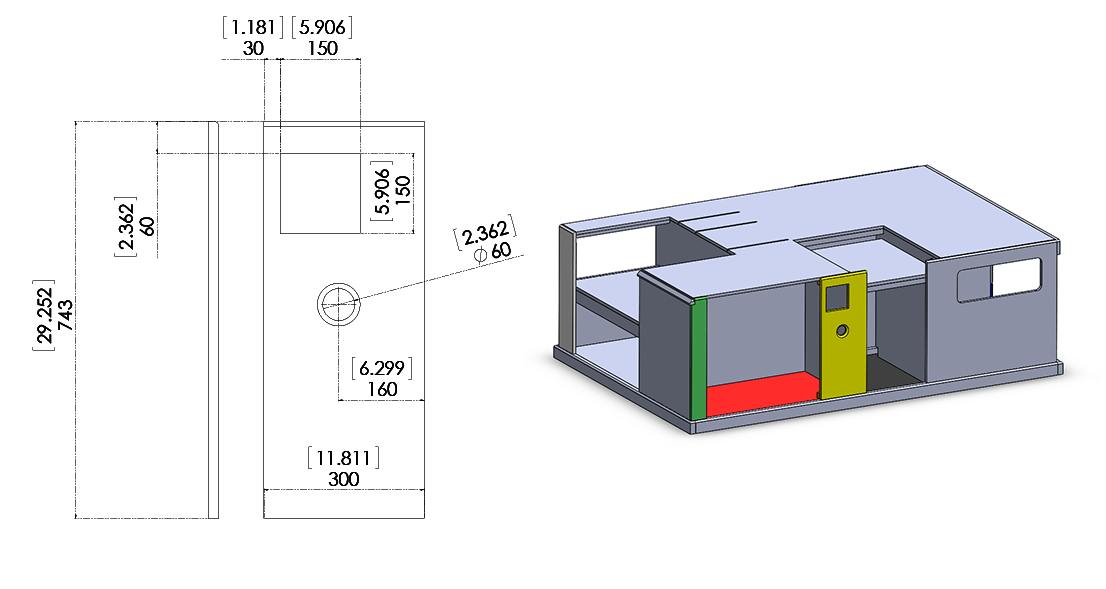
With the base installed the side panels were fitted.
The small panel to the left was just large enough to close the bench corner post. Onto this panel, I would later fix the hinges for the door.
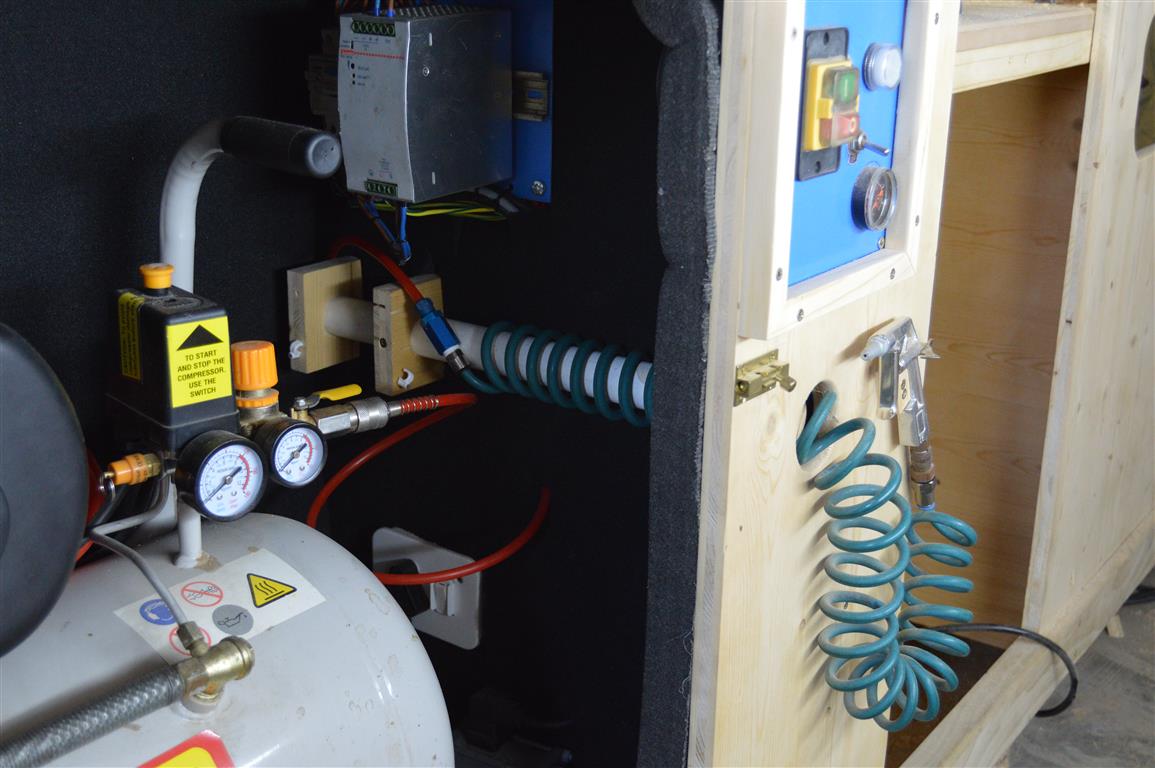
On the panel to the right two cutouts were made. One was to install the external compressor controller interface while the other would be used to feed the air hose from.
The hole for the hose was cut only slightly larger than the coiled hose I was using.
A switch was installed to the interface cutout that was wired to a female power socket. The socket was installed on the inside of the enclosure.
The compressor would then be plugged into this socket and switched to its ON position.
This would allow me to start and stop the compressor by switching the external switch ON and OFF.
In addition to this, a pressure gauge and indicator light was also installed in the cutout.
Step 3: Hose Feeder
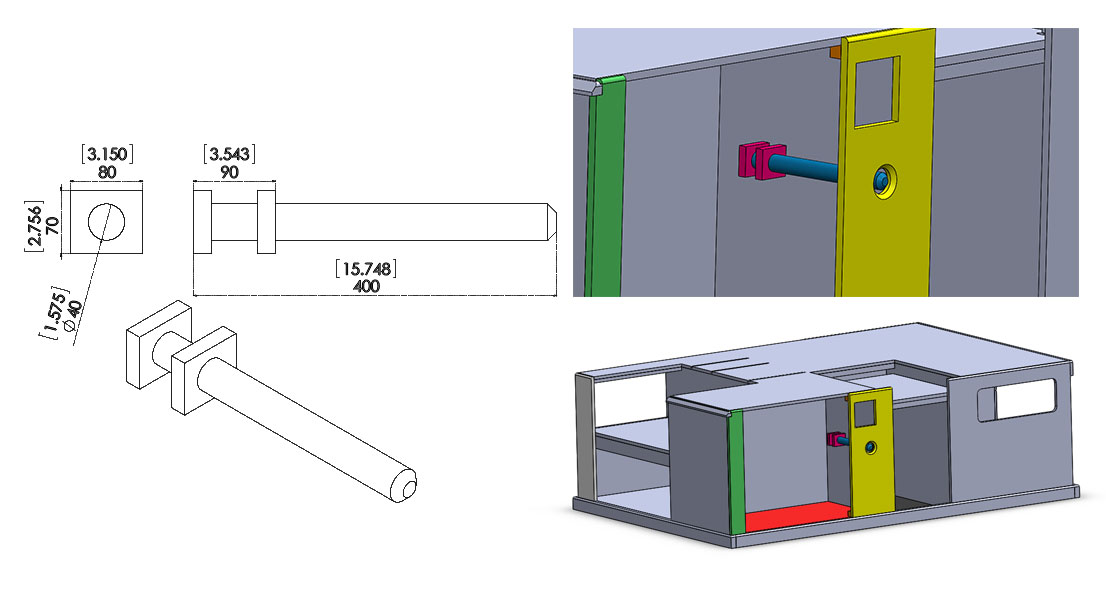
 To keep the hose stored neatly inside the enclosure when it is not being used, a rod was installed over which the coiled hose could fit.
This meant that the opening between the rod and the face panel was just large enough to feed the coiled hose out.
The hose end was mounted on the outside of the box for easy access.
As a result, the compressor can be turned ON from outside the enclosure using the control switch.
When the compressor has reached the desired pressure the hose can be fed from the hole and be used.
After using the hose it can be fed back into the hole and stored on the rod inside the enclosure.
Step 4: Door
 To complete the compressor enclosure a door was added.
To allow the compressor to suck the air it needs to fill its tank, a cutout was made in the door into which a louver was installed.
Step 5: Sound Proofing
The final step was adding a layer of soundproofing foam to the inside of the enclosure.
At this stage, I only added the foam to the sides. I left the top clear as I am still planning on adding a router table extension to the bench top.
Other parts in this series:
Note: My compressor is not a piece of equipment I use all that often. If it was a tool I used on a more regular basis I would not have installed it in such a small space out of fear of overheating.
I love this idea!
I know you said you don’t use your compressor often, but I had a few thoughts/questions that might apply for others::
1. Seems like the vibration when the compressor is ON could transmit through the cabinet & maybe affect other operations. Did you consider not including a floor panel do the compressor would be supported by the floor slab, instead of the caninet?
2. With no exhaust ‘port’, I wonder whether just the volume of air available through the small air intake opening can also provide adequate ventilation to prevent the motor from overheating?
3. I didn’t see on the video how you set up the tank drain facility & it’s actuation switch. Can you provide more detail about that?
4. Did you consider ways to vertically mount the pvc pipe that holds the air hose? Seems like, if vertically oriented, gravity could help make it easier to store the hose after use.
Again, this is a tremendous idea & these are only thoughts that popped into my head as I watched the video. So I won’t be surprised to learn there are good reasons notcto use any of them
Paul
Hey Paul,
The compressor does generate vibrations that are noticeable in other parts of the bench. It doesn’t affect working on other parts of the station but it is quite annoying. I am currently looking into making a small secondary base that I can mount on vibration absorbing rubbers.
When the bench is completed according to the original plan I’m going to start looking at all the great input I’ve been receiving and see how I can improve the bench.
The vibration attenuation is on that list.
As for the overheating of the motor, that is a concern of mine. I figured I would closely monitor the compressor and then decide if it is necessary to add a panel fan along with another vent to allow a bit of airflow inside the cabinet. Unfortunately, the compressor has not been used much since its installation so I haven’t been able to determine whether it is necessary. (Probably is though)
I will try and add the wiring diagram with some more photo’s of the start/stop/dump controller to the post soon.
A verticle mount for the air hose is a great idea and one I did not consider. I’ll look at adding it to the list of mods on the completed station.
Thank you for all the great feedback. I always appreciate peoples feedback.
Cheers
Jean
I built something like this and just bought vibration pads from the local home depot that have drastically reduced the vibrations
I really like the fact that you took the time to make drawings and offer them on your website for free, even though I still think they should be paid for, considering how amazing the bench is.
Is it possible to have the complete material list that was required for this project? I could probably go through all the plans and figure it out, but if you have even a rough estimate, it would help a lot! I know we do not live in the same area and we do not have the same material availability, but I can work with that. I just want to have a rough estimate of how costly this can be based on the materials list… I am seriously considering making this bench, with a lot of modifications obviously (because we do not have the same tools and such; for example, my compressor is built upwards, more like a stereo speaker, and also because I think having it at around 40 inches in height would be idea for me, being a 6ft3 guy.)
The materials list would be obviously, excluding the special items (gauges, controllers, etc)
I hope I am not asking too much! I think its the only thing missing from your articles.
Thanks a lot !
Hi Eric,
Because so many people have asked for more detailed plans I have contracted someone to make more detailed drawings along with cutting and material lists for each stage. I simply don’t have the time to do it myself. These plans are close to finished but unfortunately, I will be charging for these new plans as I needed to pay someone to draw them.
The plans are likely to go live around the middle of next month.
Jean
Thank you for your answer and sorry for the double post, it wasn’t showing the message even after I had left the website and came back to it so I typed another one.
I am not really bothered about the plans themselves as I will need to do a lot of changes to the bench itself, so I will need to draw it by myself (I don’t know how my exact title would be said in english, as I am french canadian, but I guess it would be a mechanical engineer technician specilized in 3D design) but the idea and the partitioning would be almost identical. That is why I wanted to know the cut list, I do not feel like juggling around with ideas if it will cost me 500$ in the end.
Thanks yet again Jean! I really enjoy your builds and I will probably be making variations of the pivoting drillbits holder at the end of the workbench but for drillbits, router bits, bits and maybe even replacing the drilled 2x4s by a small wooden box to host small things (maybe sandpaper for the assembly portion so I can just grab and stick to my various sanders) if i do so.
Hi! I am considering building a similar workbench (modified to fit my needs and my tools, obviously).
I appreciate the effort you went through in making those plans available to us FOR FREE!
I would like to know, do you have an estimate or a proper materials list for this build? I haven’t seen it in the articles and I would like to have an estimate on how much it could cost me over here in Canada.
Thank you !
(This is the 2nd time I try writing this message, hopefully both of them don’t appear later!)
Hi there, I have been reading all of your comments about plans ready to go live very soon. Are they available somewhere that I have missed? I apologize if this question has been answered already. I have looked everywhere for a build like this, but to no avail until I stumbled upon yours. I’m very anxious to get started!!
Hi Jennifer
The plans have been completed and were about to go live about 3 weeks ago when there was a small legal hiccup. It caused a bit of a delay but it should be ready within a week or so. I want to make all info available at once which will include 8 free tutorial type posts on how I went about building the bench that include some drawings and also the video instruction. I will then also make available a detailed 95 page paid version of the plans. You can keep an eye on my YouTube channel as I will make the announcement there.
Hello, Illinois USA here. I am doing a complete redo of my small workshop. This table is part of my total solution and is just fantastic! Any new word on plans? I have been over the top waiting. You are an amazing craftsman and would love to have your size MDF in the states. Thank you again. Much appreciated.
Hi Eric
The posts on the website have been updated to include all 8 parts of the bench build along with diagrams and photos. The 100 page paid and downloadable version of the plans have been completed and were supposed to go live about a month ago but unfortunately has once again been delayed due to unforeseen circumstances. For that I am very sorry as I know there are many people waiting for the plans. I am currently recording a video to explain and apologize for the delay and to announce the plans going live on this site. The downloadable plans will be sold for $9.90 and contain the dimensions off every wooden component used in the bench along with the dimensions of the assemblies completed during each stage. I hope to make the announcement over the weekend.
Once again, I am extremely sorry for the delay and genuinely appreciate your patience and support.
Hi Jean,
Absolutely love your ideas! 🙂 Do you perhaps have a wiring diagram for the control panel / circuit used on the compressor installation?
Hey Craig,
I don’t have one but you can get in touch with me via email and we can make a plan. admin@woodworkjunkie.com
Hi Jean, nice work and great accent, thanks for your time in sharing your adventures ?
I’ve been doing a bit of research into making a sound “proof” box for my compressor and I’d like to drop a few tips (you probably know them already)
Sound required mixed densities for maximum performance. The foam and plywood you’re using is great because they are “absorb” different wave lengths. But neither are dense enough for the lower range. Try to find some mass to use such as rubber sheet or layers of flooring vinyl. Place it behind the foam and glue it loosely to the ply so you have some air gaps which help reduce sound transferring to the ply.
Mount the compressor on a sand filled tray. Sounds (pun) strange, but sand will absorb most of the vibrations that result direct contact to the bench. This form of isolation was used in high end photography and laser/measurement instruments. Seal the sand tray with a lid that doesn’t touch the sides of the tray (think draft-tape) then mount the whole tray on vibration pads. Mount the compressor on the lid.
Duct the inlet and outlets of the air vents in a zig zag. And line the Interior with foam. Sound doesn’t like going around corners.
Thanks for the pointers! I will definitely look into it a bit more!
Love this bench and your videos are great! I’ve bought the plans because I think this is just the thing to replace the big table in my garage (that is just a table and kinda beat up too). It’s not a tiny garage but most of it is currently my storage unit for a lot of building supplies for my new house that I’ll be starting to build soon so I love how this fits so well in your little shop.
One question I have about the compressor is WHY do you have it set up to dump the air out of the tank each time? Does it reduce wear and tear on the compressor or something? I don’t own one myself yet but that also means I really don’t know what the recommended maintenance on a compressor is aside from occasionally getting some moisture out!
Many people say that it is OK to leave a compressor charged. In my case, however, I don’t use my compressor often. According to the tool manual dumping the tank after use reduces the chance of moisture build-up that can rust the inside of the tank.