

Freestanding wine rack DIY – Build tutorial and plans
We know there are many wine lovers out there who don’t enjoy the luxury of a large wine cellar to stockpile all their favorite vintages. As a result, we end up packing our favorites into crammed cupboards leaving little or no space for our enormous collections of plastic containers and the fondue set we got 10 years ago as a housewarming gift and have never used.
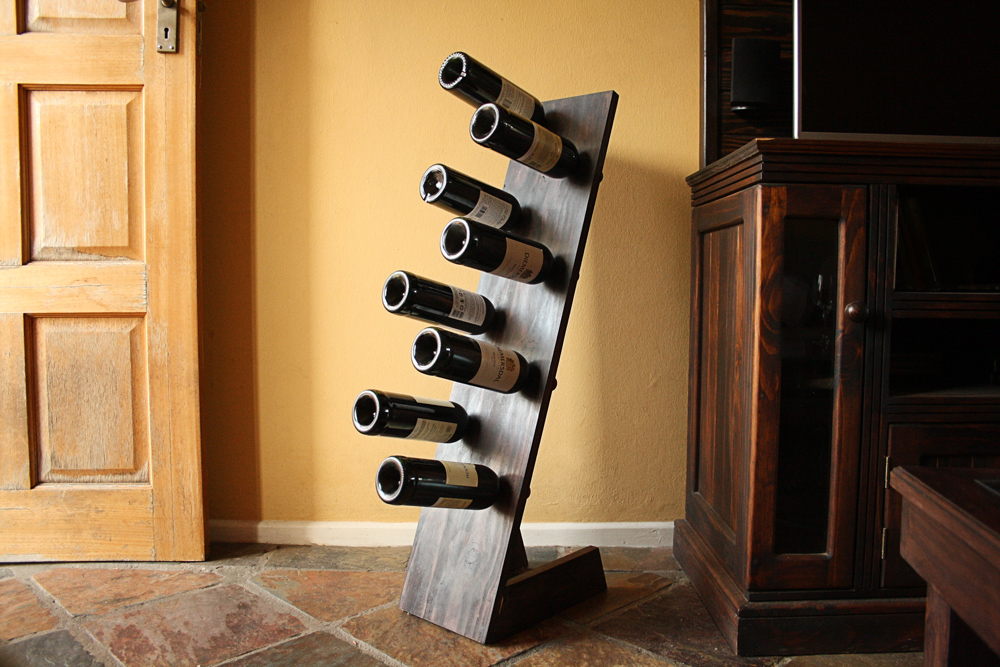
To combat this serious dilemma Woodwork Junkie brings you the very simple and quick to make, freestanding wine rack.
By no means will this rack give you the storage capacity of a full-on wine cellar but it will clear up some cupboard space so you can hang onto the fondue set for a couple more years, you know, just in case.
How to make a wine rack
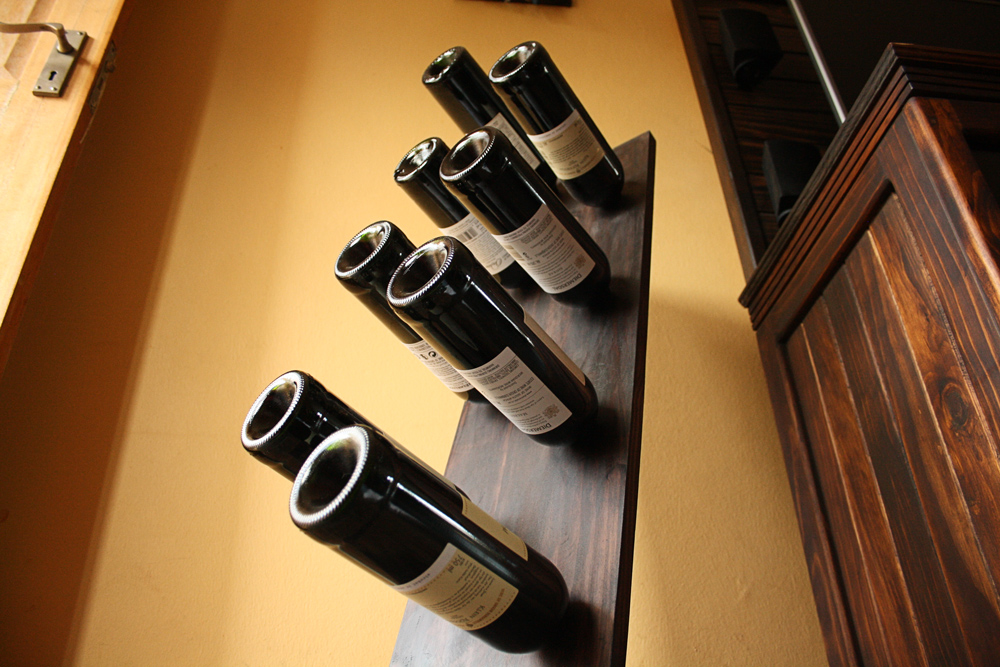
This freestanding wine rack can hold 8 bottles and is a quick and easy project that can be made in less than 60 minutes using two pieces of lumber and a couple of basic power tools.
Power tools you will need:
- Saw for cross cuts (Miter or circular saw)
- Drill/Driver
- Power sander (Optional)
The material you will need – mm[inches]:
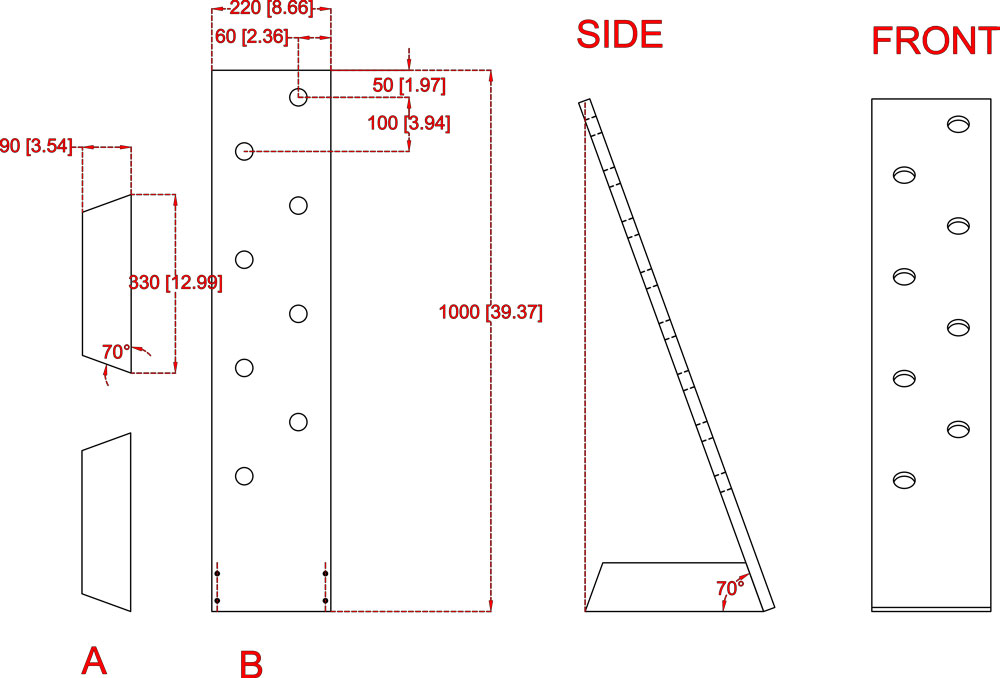
Using a miter or circular saw, size the wood as per the cutting list above.
For the face of the wine rack (B), you can use a plank in the range of 180 – 220mm wide cut to a length of 1m[39.37″].
The two foot-pieces (A) will be cut from a 90mm wide plank at a length of 330mm[13″].
In addition, the edges of components A should be cut at a 70° angle in relation to the edge that would ultimately form the base of the stand. This can be done by marking the planks (A) and cutting with a circular saw or cutting with a miter saw on a 20° setting.
Note: The pitch of the freestanding wine rack in relation to the hight at which the bottles will be placed is crucial in ensuring that the rack does not become front heavy and topple when the wine is placed in the rack.
For the tutorial, we used stained processed pine, but the woodworker can opt to use a wood more suited to their taste if they so desire.
Alternatively, they can cut expenses down to a minimum and go for a more rustic look by using salvaged or reclaimed wood.
Prepare the Face
After sizing the lumber as per the cutting list proceed with the following steps:
- Measure 50mm from what will be the top of the larger plank (B) and draw a line across the width of the plank at that point. Continue drawing lines across the width of the plank every 100mm[3.94″] thereafter for a total of 8 lines. These lines represent the different heights at which the holes will be drilled to hold the wine bottles.
- When all the horizontal lines have been drawn you will mark the 8 points where the holes will be drilled to hold the bottles. This is done by measuring and marking 60mm[2.36″] from alternating edges of the plank so that the drilled holes will form a zig-zag pattern.
- Using a drill with a 32-35mm[1.25-1.37″] hole saw, drill the holes as you have marked them on the plank/face.
Fit the base
Now you are ready to bring it all together.
The foot pieces (A) are fixed to the face (B) using countersunk screws. This is done by drilling a hole big enough to accommodate the head of the screw, halfway through the thickness of the plank. After this, drill the hole all the way through using a bit big enough to accommodate the screw shank only.
Then use screws to fit the foot pieces. (Using glue, together with screws, to fix the two surfaces will result in a more solid joint)
When the foot pieces have been fixed, the hole can be filled using wood filler or dells.
In the case of dells, glue the dells into the holes and saw them off flush with the face of the wine rack.
Sand and treat
Sand the wine rack by hand or using a power sander with a medium grit (+/-150) sandpaper.
Because we used pine to make our rack, we decided to use a dark stain to treat the wood.
If you are using a hardwood or even reclaimed lumber you might want to use a light oil or varnish only as to emphasize the natural features of the wood.
The wine rack is now ready to take its new place in your home.
Final thought
 This is a great project for a beginner woodworker. It’s quick, easy and low cost to make while not requiring a lot of expensive power tools or woodworking equipment.
The rack itself does not take up much space and serves as storage/display for up to 8 wine bottles. In addition, the rack is lightweight and can easily be moved around if necessary.
This looks Really cool and although I was terrible at woodwork at school and haven’t really attempted anything since, your video really was easy to follow and I think I might attempt to build this later in the week so I’ve bookmarked it for then.
Is there any wood that you wouldn’t use for this project?
Hi Matthew
We used a cheap softwood and stained it but using a dense hardwood will deliver better results.
Also, for a rustic look, you could use reclaimed lumber.
In these cases, I would advise treating the rack with a clear oil or varnish only.
Good luck.
Jean
Hey, awesome video!
Going to give this a go for sure!
I think 60 minutes is a little bit of a push for me lol but I will certainly try.
Hi there Kevin
This really is a great project for beginners but while it is entirely possible to build this rack in 60min or even less, beginners should allow themselves to spend as much time as they require to make their projects.
Thanks for stopping by.
Jean
This looks fun! I have definitely run out of room for my wine bottles and would love to get some up on a rack like this one. The video was well done and had a good pace. I could follow it even though I’m about as far as you can get from a woodwork master. Any idea how heavy this stand is without the bottles? It looks like it can be moved pretty easily. Thanks for the great idea.
Jackie
Hey Jackie
The rack in the tutorial is made from a softwood (Pine) which is a very light wood but because of the racks minimalistic design, it will still be quite light even if made from a more dense hardwood.
Moving the rack around is indeed effortless.
Jean
This is a cool project for my daughter. She did architecture in college and likes to work with wood. I saw a side table that she built and it was beautiful. I know she will enjoy building this wine rack, especially with such easy directions from the video. I will share this post with her.
Hello Carol
I hope your daughter enjoys the build. Feel free to contact me if you have any other questions.
Thanks for stopping by.
Jean
Hello Jean, what a nice project! I’m gonna try it! just wondering the thick of the pine you used to support 8 wine bottles. thanks for sharing!
Hi,
I can’t believe I neglected to include the info in the post. I will add it soon but in the meantime, for this project, I used standard PAR pine.
22mm (1 inch) thick.
Enjoy
Jean
thanks a lot 🙂
Thanks for the plan and info, going to try this, this afternoon with some recycled railway sleeper wood