

Making The Most Of A Small Woodworking Shop
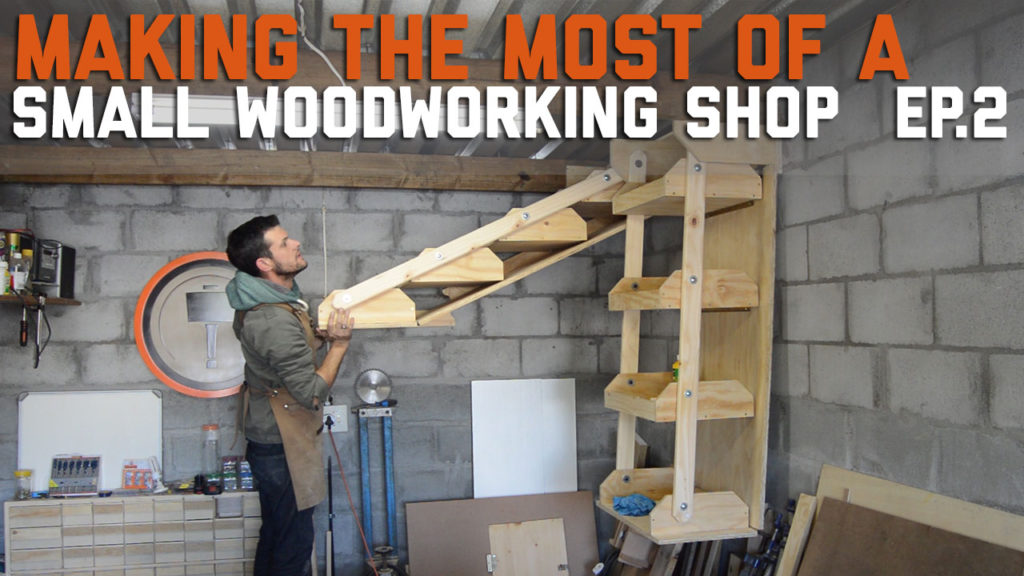
After recently moving to my new (but still small) workshop, I have found myself faced with a lot of random odds and ends cluttering up my already very limited floor space. Things like power tool cases and attachments that I really don’t use that often but still need to keep around for the odd occasions that I might find myself in need of them.
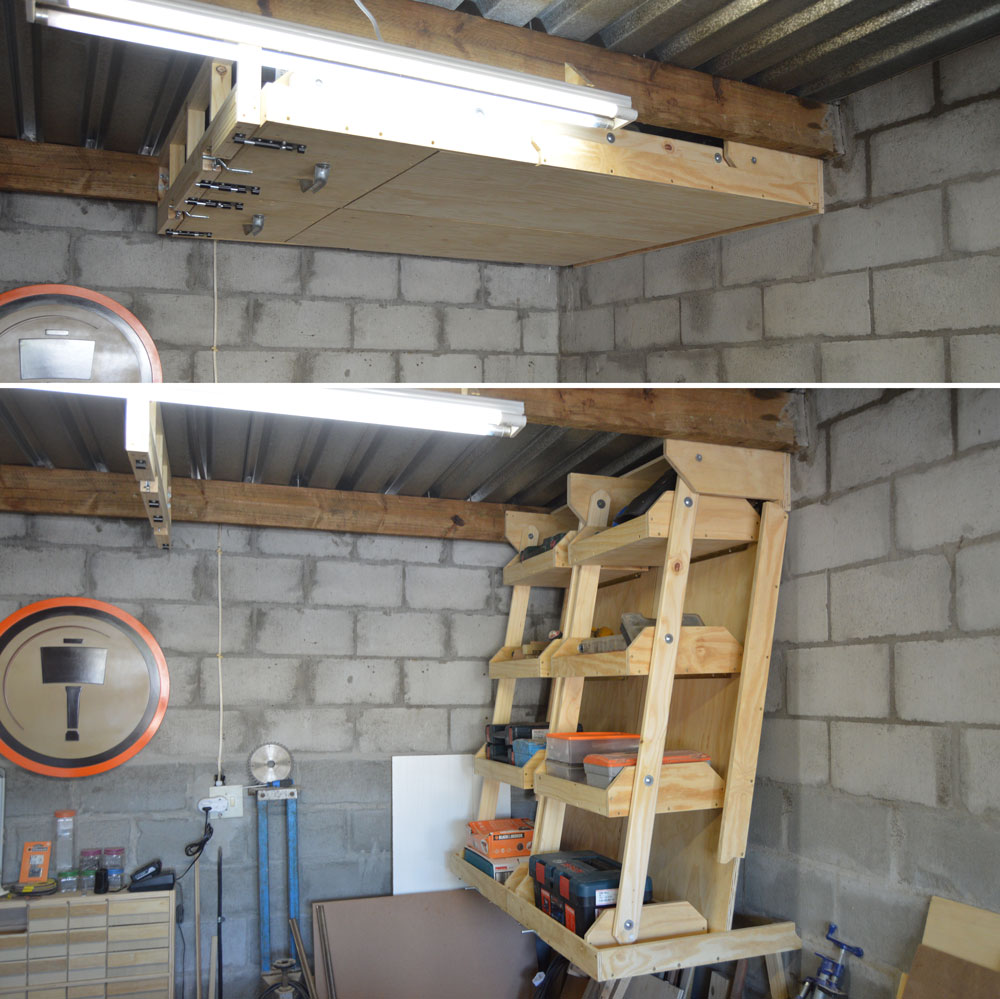
An overhead roof storage shelf seemed like the logical solution as it would give me the ability to store these not-so-often-used objects well out of my way.
What I didn’t like about such a shelf is the fact that they often require objects to be crammed behind each other in rows. The result of which would be me having to unpack large portions of the shelf when I find myself in need of something stored at the back.
My solution was to compartmentalize such a shelf and with the addition of a simple pivot system, give it the ability to swing down for simple access.
Swing Down Roof Shelf
The shelf needed the ability to be changed from its stored position to its opened position fairly easily while the bin compartments needed to stay horizontal while the shelf is being folded up and down.
To achieve this all the bins were mounted on hinges and linked together using secondary pivots. This allowed the horizontal orientation of the bins to be unaffected while the angular position of the entire shelf is changed.
Caution! Beyond building this shelf for myself, no real testing has been done to determine the load-bearing capabilities of the shelf as a whole or of each individual component.
The shelf I built is a prototype and further development is needed to ensure a well functioning but more importantly, safe mechanism.
Therefore, there is a degree of risk of injury involved as the shelf and its contents would be suspended overhead. If you decide to copy this shelf you do so entirely at your own risk.
Folding shelf – The concept
For the purpose of this explanation, I will first make use of a block diagram that represents a single tier shelf.
The idea was to suspend the entire shelf from the roof and to give it the ability to swing up into a stored position via a pivot axis created at the mounting (roof bracket).
The problem at this point was that the swing arm would change from a vertical position to a horizontal position, the shelf/bin would in turn change from a horizontal position to a vertical one.
The first step in overcoming this problem was to also add a pivot axis to the shelf/bin at the point where it fixes to the swing arm. This would allow the shelf to fold at an angle different to that of the swing arm.
To keep the bin level while the shelf is being folded, a second pivot point was created on the shelf and on the mounting bracket. The spacing of the 2 pivot points on the shelf/bin needed to be copied exactly on the mounting bracket.
The result of which was the shelf always staying parallel to the mounting bracket when the swing arms change angles.

The final step was to offset the pivot points on the horizontal plane while still keeping with the above-mentioned spacing rules. This was to allow the shelf to fold up all the way into the roof.

To give the bins the ability to stay level while the shelf is being opened or closed, each bin needed to have two axes at which they could pivot.
One pivot axis would be used to fix the bin to the main assembly and so give it the ability to be folded at an angle different to that of the main assembly.
Pivot spacing

Considering the above diagram.
As can be noted by (A) and (B), the spacing between the pivot points on each bin and also the roof bracket needs to be identical.
The spacing (C) of the bin pivots on the rear swing arm needs to be copied on the front swing arm.
Also, the distance (D) from the primary pivot on the roof bracket needs to be the same for both swing arms.
The distance (C) needs to be slightly larger than the width of each bin. This is to create a small space between the bins when they are in their stored position.
My version
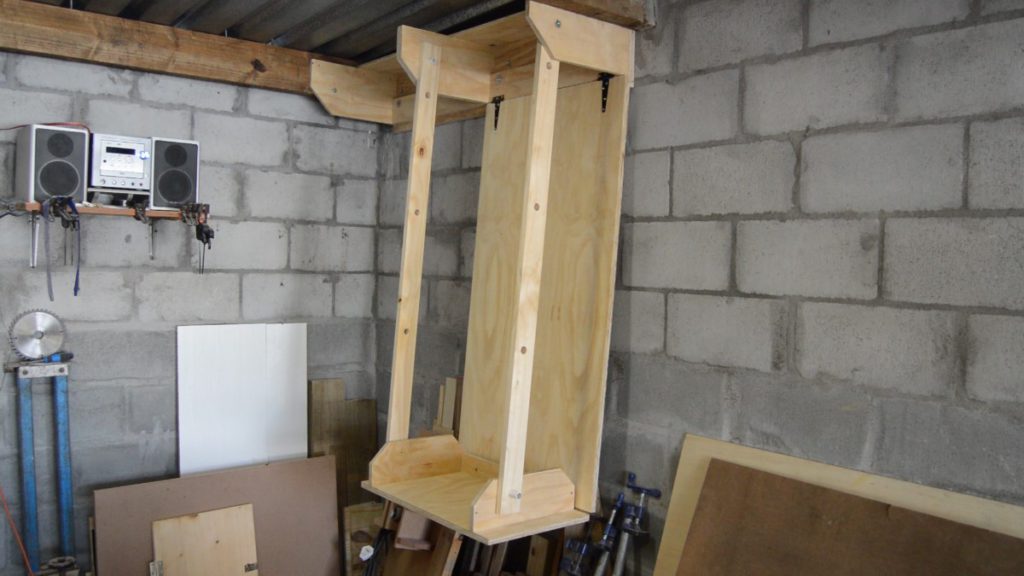
My folding shelf consists of three main components.
The static roof mount bracket, the swing assembly, and the latching bracket.
- The roof mount bracket is the only component that is fixed to the wall and roof. It is primarily responsible for carrying the weight of the entire shelf. It is for this reason that extra care was taken to ensure it was strong enough and secured correctly.
- The swing assembly is mounted to the wall mount bracket using hinges and can be further sub-divided into 3 sub-components. The backboard, linkages, and bins.
- The shelf latching bracket is what is used to latch the fold-down shelf in its stored position. The bracket needed to be mounted securely and able to carry the weight of both shelves and their contents while storing.
Roof mount bracket
I made the roof mount bracket wide enough to snugly fit between my shop’s roof beams which are 1300mm(+/-52″) apart.
This would allow me to not only fix the bracket to my cement brick wall but also support it by fixing it to the roof beams.
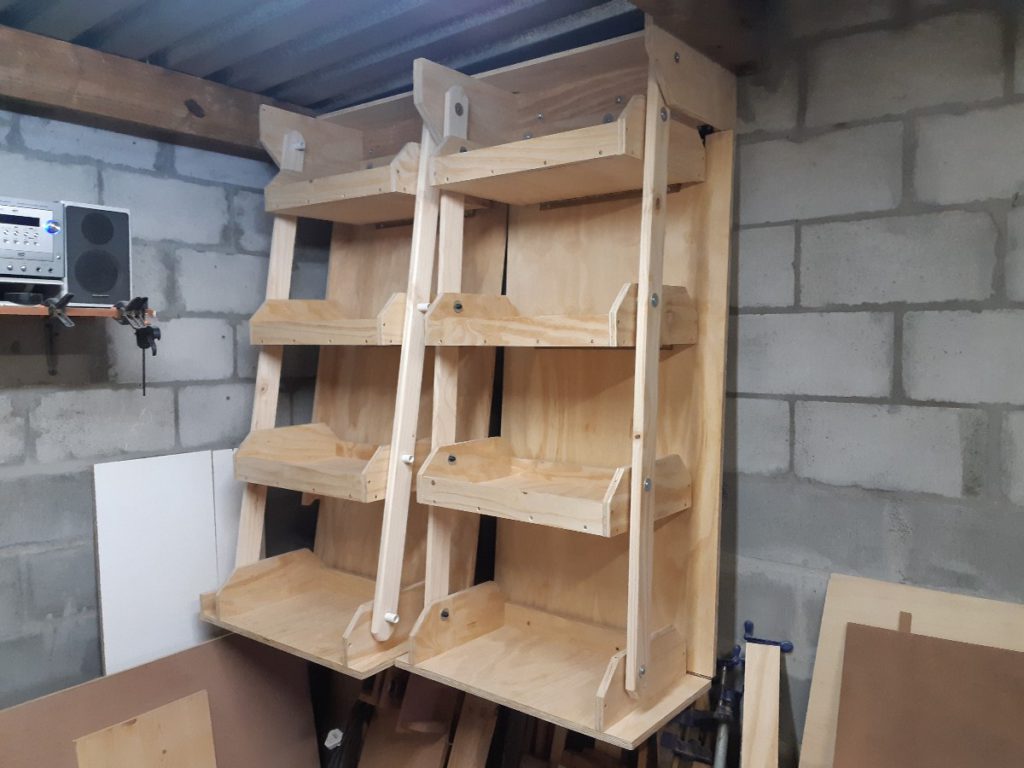
To reduce the weight of the folding shelf I decided to split the roof mount bracket into two sections and instead of installing a single folding shelf roughly the width of the bracket, I added two independently operating sets.
The purpose of the bracket was to act as the fixed suspension point for the shelf. The front and back swing arms would be attached on pivots to the bracket.
For the rear swing arm, a solid backboard was used and was fixed to the bracket using T-type hinges.
The second swing arm was secured using dowels installed into a recessed cutout made into the roof bracket side panels.
The spacing between the pivots would then be copied for each bin allowing them to stay parallel to the roof bracket when the swing arms are being moved.
Swing Assembly – Backboard

The 18mm(3/4″) plywood backboards consisted out of two parts. A longer segment that would accommodate three of the four shelves and a shorter segment that would only accommodate the last/bottom shelf.
The two segments were fixed together using a piece of piano hinge that was orientated so that the hinge pivot axis would be located toward the top of the boards.
The backboard assembly was then fixed to the roof mount bracket also using hinges. The strength of these hinges and ensuring they were secured correctly was very important as they would carry roughly half of the suspended load.
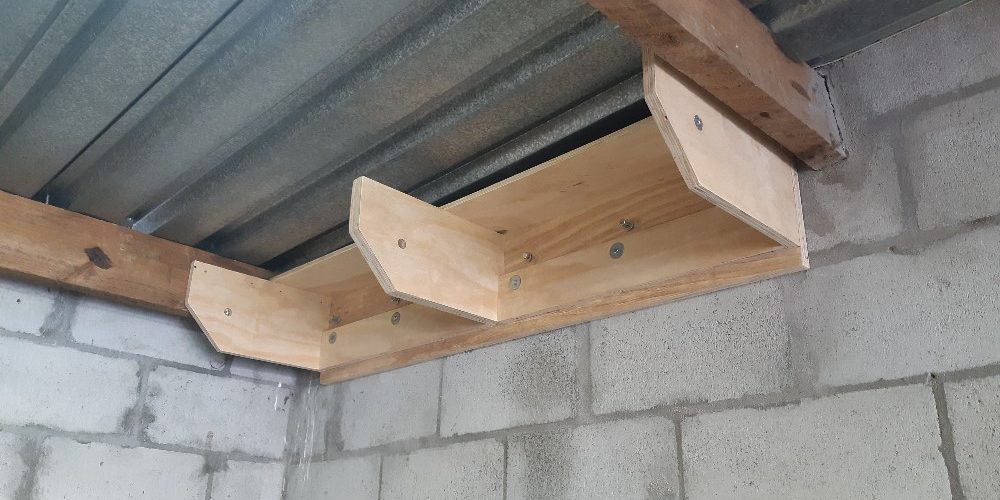
The backboard would act as the rear swing arm with the added feature of creating the illusion of a ceiling when the shelves are closed/stored and so conceal the contents of the shelves.
Note: The hinges I used to build my prototype may be underrated for the load. I am currently looking into a more robust hinge and securing solution.
Swing Assembly – Linkages
The secondary/front swing arms were installed in the form of linkages.
The linkages were planks that had 20mm(3/4″) holes drilled with a spacing to match that of the rear pivot points on the backboard.
Later I would install 20mm(3/4″) dowels into these holes and attach them to the bins in a way that would allow the dowels to rotate inside the holes when the shelf is being folded up and down.
Swing Assembly – Bins
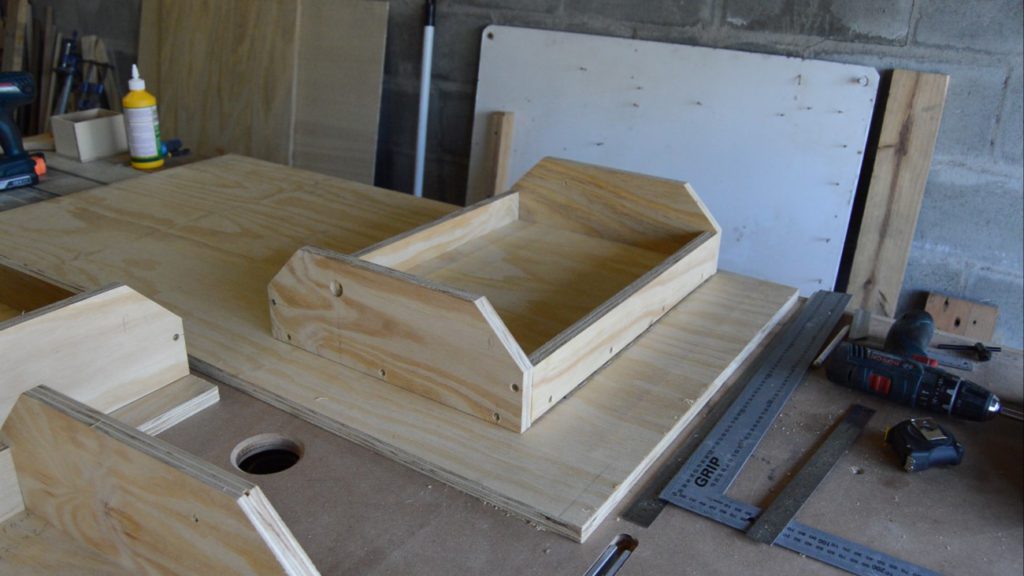
The bins were assembled to be slightly narrower than the space available between the installed linkages. This would allow me to add washers to act as spacers between the linkages and bins when installing the linkage dowels.
A piece of piano-hinge was attached at the rear of each bin which would be the point where the bin fixes to the backboard.
For the second pivot point, a 20mm(3/4″) cutout was made at a depth roughly half the thickness of the plywood.
A dowel was then installed into the cutout made in the bin side panel and a center hole was added into which a bolt would be installed to secure the assembly.
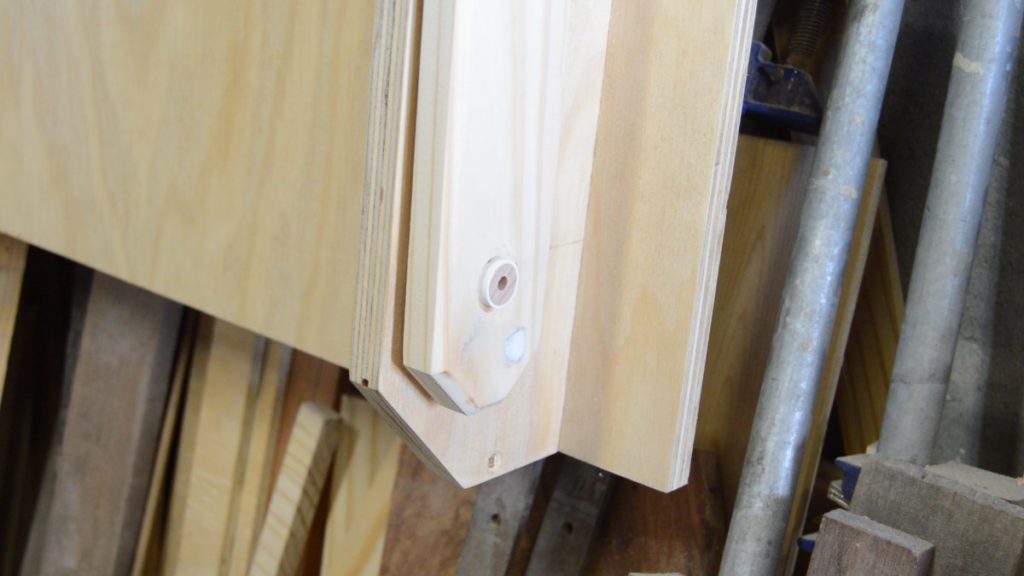
Between the bin and the linkage, two washers were added to act as spacers. These were to prevent the linkage and the bin from grinding up against each other when the shelf is folded up and down.
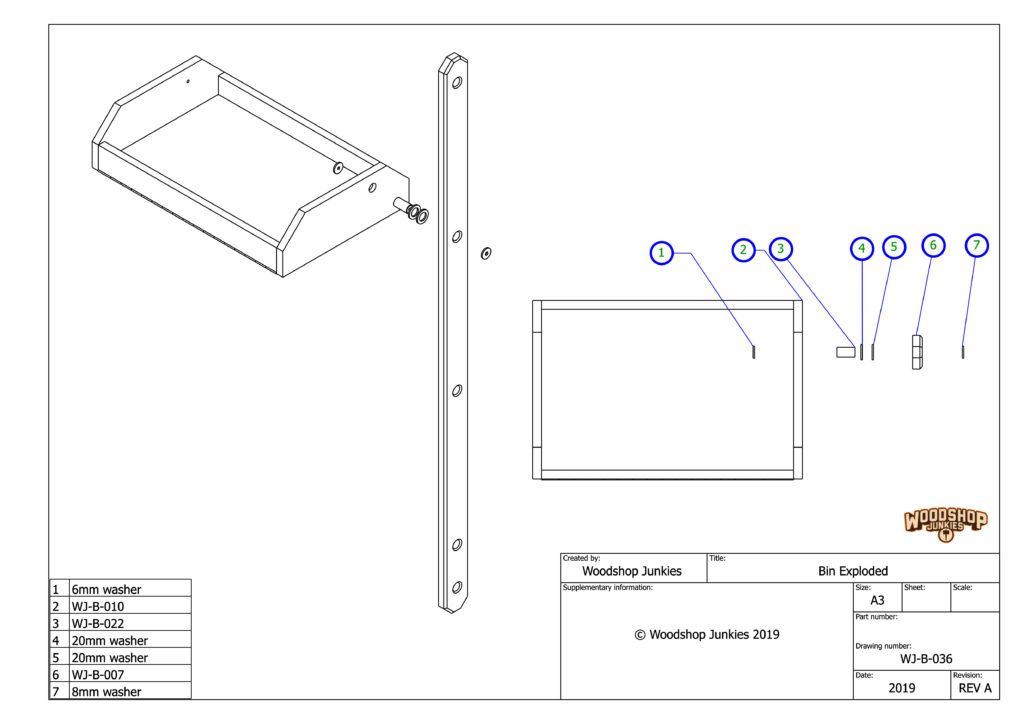
The assembly was then secured using a bolt. The dowel was made to be slightly longer than the assembly so that it would protrude beyond the linkage. This meant that when the bolts were installed, the force from the bolt was applied to the dowel and bin side panel while the linkage was still free to move.
The bins were then fixed to the backboard with the same spacing as the holes on the linkages.
The spacing needed to be far enough apart to accommodate the bin when it is in the stored position plus a small space between the bins that are necessary to prevent the bins from colliding when they move past each other during folding.
Shelf Latch Bracket
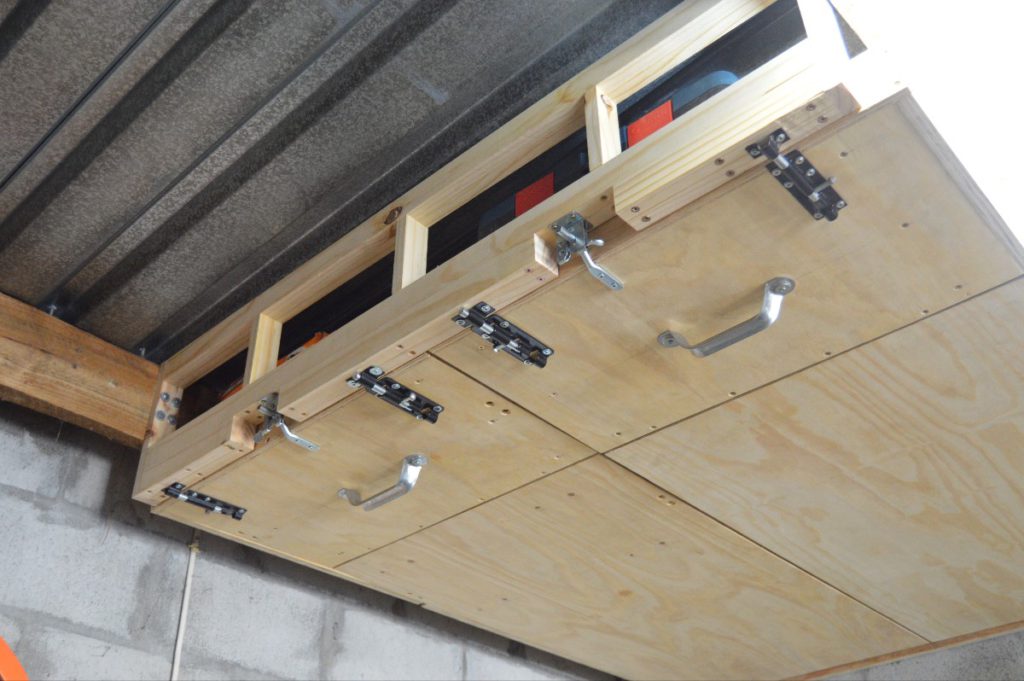
To latch the shelf in its stored position a simple bracket was installed between the roof beams.
The bracket needed to be secured correctly to allow it to carry the weight of the loaded shelf.
Bolt latches were installed to keep the shelf in its stored position but as I mentioned in the video, this is a safety risk as the latches alone are not supposed to carry the entire weight.
An additional tension mechanism needs to be installed to support a portion of the weight of the shelf. This will reduce the force required to hold the shelf in its stored position, reduce the risk of the shelf dropping down uncontrollably, and reduce the strength and energy required for me to open and close the shelf.
I am currently considering a number of possible solutions and will be posting that information when I have decided on an affordable option.
Really clever solution. I am inheriting a Triumph 1959 TR3 and looking at ways to increase my garage space – want to store light weight occasional stuff such as holiday decorations and sleeping bags. We will design to fit standard storage totes which are 23″ long x 16″ wide and 13.25′ high.
My son is in college – Mechanical Engineer major – we are looking at load to calculate hardware such as hinges and gas struts. I will let you know if we find anything worth sharing.
https://aussiebrackets.com.au/
Sorry, meant to add this to my last email. I am looking at aussie brackets in conjunction with your pivot concept. It might eliminate the need for Roof Mount and Shelf Latch. Still need gas struts thought.
love your site and channel.. these are pretty much the idea I had in my head about fully utilising the space in my ceiling, but I evidently didn’t put neatly as much thought into it as you have.. Like two arms makes a world of difference (& sense) but it eluded my (now scrapped) plans. Actual dimensions and quantities of the boards cut would be much appreciated as that’s usually where I need up royally in any woodworking project I undertake.
I have the plans and want to make them available. Before I do however, I want to explore the safety aspect of the shelf and implement a soft open device.
Hi, What is the weight of the fully asembled shelving unit..
Would 1500N gas lifts suffice as an adequate safety measure?
I would imagine so but I can’t say without doing the modification myself. I have a plan and I have started sourcing material so hopefully, I can do mine soon.
Hello Jean,
Were you ever able to add any gas struts to your build?
Not yet but I have designed a strut/pulley system that I want to install when I get a moment.
Hi, just saw your video and it is awesome. I would find some time in my schedule to draw this one on 3D and once I have the 3D assembly completed I can assign the wood properties and let you know how much it weight and perhaps the 1500N gas lifts Wachut mentioned will work.
Hope to come back with something. Best regards, Daniel.
Quite interested in these plans as well! I just bought those for the All-in-one-workbench and like this idea about the folding storage, but for use in my R/C car shop; not the wood shop. By the way… I really like your videos and find your detail just about perfect! Thank you for the great channel!
Hi did you do the plans for this could really do with them for dimensions for hole locations as I am struggling to get it to work properly
Great project
Thanks
Hi
Are the plans available for this project yet please
Jean,
I would appreciate a copy of your Plans as well. I plan on incorporating a pully system as a lowering device.
I also want to add a safety system to support the weight. I want that info to be available to people before posting the plans.
Jean, loved the plans. See if this helps: you attach steel cables on both sides of the structure (using round hooks or something like that), which go to a pair of pulleys on the ceiling (same distance or a bit more from the wall as the height of your swing arm). These run on the ceiling to another pair of pulleys behind the whole unit, close to the wall. From there, a round hook in the center, aligned to these last two, between them, sliding down both cables to a single gym-like adjustable set of weights (so that you can adjust the counterweight to the current load of the drawers or simply to your liking). A wooden “backpanel” between the “drawers” and the “counterweight system” should hide the whole thing. The cable ought to be long just enough so that the weight rests on the floor while your unit is in the ceiling. That means you probably won’t be able to attach the cables to the very end of the structure, but more likely close to the middle or 2/3 of the length of the swing arms.
Thanks! I’ll definitely explore the idea.
I just watched your video and I think it’s perfect to get non shop items out of my shop as it’s a shared storage area. I definitely agree that a system to help support the weight to get it up as well as help control getting it down is necessary especially since one my mounting point will be higher than I can reach and longer than what you have built. One thing that comes to mind and is very available to me is the spring mechanism for folding attic stairs. I think this in conjunction to a pulley added to the ( bottom in open position) so I do not have to stand directly under it. Will work.
Hi.
I love this project. Being in a very similar position as you with a single garage, I would appreciate if you can share the plans when you have done all the necessary and are happy.
Kind regards from Pretoria.
Hi Hanno
The plans are drawn up but I don’t want to post them without making sure people understand that there is a potential danger to this project. I will do so when installing the “soft-open” mechanism.
Hi just watch your video and I like it alot and if I could get the plans I want to do that in my small work shop and I would like to add a safety device to it if you do publish the plans could you send them to me please keep up the good videos
Hi Richard,
You can follow my socials as I will announce it there when I post any plans.
This project. Is awesome! Waiting for the plans Jean. Thank you so much.
Hi Jean, great concept. I am about to move into a retirement village and I will only have a small single car garage identical to yours, which will be my workshop.
Cheers Peter Bettes
Will my being “subscribed” get me updated notices about your projects – ie. “Roof Storage tension mechanism” ? Thanks, Tom W
Hi Tom
Any new content I create gets shared on my Youtube channel and Facebook page. By following those socials you will get notified when new content is posted.
…… also, I forgot to ask why the first storage bin doesn’t have a front piece? It seems that there would be the possibility of items protruding and interfering with the frame. Just a thought.
…alright – I see that you added a front facia trim that acts as the front of the first bin….sorry about that…duh
Hi,
Brilliant idea mate. I also am really stuck with storage problems. I would be very grateful for a set of plan’s
When you have a chance.
Kind regards
Joe
Are their detailed plans we could purchase from you that are of the same dimensions as the one you used for your build?
I am looking at installing a safety swing mechanism to the shelf. When I do I will make the plans available in full.
This idea is superb. Want to copy this myself. Did you get any closer to making the plans available?
Unfortunately, no. I have managed to design the safety mechanism I intend on adding and as soon as I do I will post the plans.
Your video and ingenious storage solution are both exceptionally well thought out and awesome! Well done! I have a one-car garage of which my wife and I renovated last year and now am presented with need of ingenious storage solutions. Your solution would fit the bill for me, and I was wondering if I might obtain plans, please? Sign me, Robert, United States Navy Veteran, Disabled
Unfortunately, there are no plans at this time. I want to ensure that the shelf is safe to use before distributing the plans. When I have installed a safety mechanism to my shelf I will post the plans. Sadly, I can’t say when I will be able to do so. It is definitely on my to-do list, however.
This is brilliant. Fantastic way to make use of your small space. I think a pulley system with counter balance weights would be perfect for this. I did find one tiny issue with the build in that you obscured some of your lighting with the shelves hanging below the light. That may make the back of the garage slightly darker.
That’s true, yes. You will notice in my latest videos that I dropped the light down a bit so it sits lower than the storage when folded up. It is a temporary solution as I need to do a complete re-do of my lighting layout.
Hi Jean,
Ingenious! I love this. When the plans do become available, will they be sold online? Or is your intention to offer free downloads of the plans?
Robert.
Hi Robert,
Because my time is extremely limited I find it very difficult to draw these types of plans to my own standard. Therefore I often end up paying someone to do it on my behalf. I then charge for the plans to recover cost and yes, make a small profit. It will likely be the same in the case of the storage solution.
Thanks Jean. I am new here and wasn’t exactly sure how you’ve set things up. Thanks for the reply, and I look forward to seeing the plans in the future!
Hi again,
What is the best method of keeping track of the plans when you do publish them? Is there an email list or something I can subscribe to so as soon as you publish the plans we all know.
Clearly plans for this project are in demand 🙂
Indeed. Due to the laws around privacy, I have decided to stop collecting email addresses for a newsletter. When I post new plans I announce it on my Youtube channel and on my Facebook page.
It seems to me that a garage door torsion bar and springs, just like the one that opens your garage door, would be the simple, inexpensive solution. The torque is adjustable, (depending on weight), and travel is adjustable by cable length. Just a thought.
Hey Ted,
Funny enough, I am currently leaning in that direction. I am looking at short torsion springs so they can fit between the roof beams. I haven’t finalized the mounting design, however.
you could potentially add an attic stair return mechanism. it would be “over center” so would assist with lift and also reduce need for your secondary latch (non-bolt). The spring can be an extension spring or gas strut. Can tune in force with extension spring and replace with gas struts as they can add in a dampened close feature. The issue will be reduction of the width for the shelf to add the mechanism and spring. Extension springs and be solved for correct force and it will be adjustable.
The mentioned torsion spring used on garage door also a nice idea.
Also, a pull ring spring loaded bolt latch thru a pull would help with locking in the up position for taller roof.
Be glad to help out with some calcs if you would like
Thanks for the offer, Torrey. I will keep that in mind.
Hello I think this is an ingenious idea are there any detailed plans with dimensions.
Not at this point, unfortunately.
Jean, thank you for taking the time to respond to the inquiries about this project, I know you are busy and being responsible with your design for safety reasons.
I am looking forward to a solution to arrest the descent of the shelves. I think gas struts are good however the load must be considered to calculate what struts to use.
The simplest would be a counter weight with a cable. I as teenager I made a suspended canoe rack in the garage ceiling, for the counter balance I used a 1/8 inch cable with several pulleys to route the cable to a cinder block that was the counter weight.
On the drawing I see WJ-B010 what is that part?
That is the bin assembly. The part numbers are from the complete drawing I have and aren’t very useful without it. I have not made the drawing public for many reasons as I have mentioned.
I have considered this a few times. My only concern is the space needed for a counterweight to function correctly. I am currently experimenting with a concept that I hope to install soon.
Very Cool Shelf Solution!
I’m from Germany and was searching for such a solution for my tiny House i build. Its just Perfekt!
Just wanted tp say THANK YOU FOR SHARING!
I watched almost all of youre Videos and Like youre growing Skills and Abilities 🙂
KEEP ON ROCKING!
If you have a plan for Download you can sell it Very good in Tiny House scene!
In Germany there a many people building “Zirkuswagen” or “Bauwagen” and we got
many Spots were People life in “Zirkuswagen”-Communitys.
I will tell everyone from Youre great Idea and they should support you 🙂
Cheers Mate
Great idea and I will follow your Facebook page for updates. For a safety mechanism, I was thinking something similar to what is used to assist the folding attic stairways. These have to help hold up a good deal of weight as there is usually no locking mechanism once they are in the folded and up position.
Ciao volevo prima di tutto farti i miei complimenti per il tuo lavoro che è eccezionale, è possibile avere le misure per costruire il salva spazio per il garage .
Grazie
Awesome design Jean – I’m going to have a crack to reverse engineering your design to get all the cuts required.
With all the current COVID-19 lockdowns at the moment, there’s plenty of time to try and tackle this.
Like you, I’m operating out of a single garage, and I need to get rid of a large shelving unit that’s taking up WAY too much space; so this is perfect for me.
Did you get it sorted with plans ? Could do,with them to get this to work,
Regards colin
I k ow you’re still working on this and that plans are not yet available, but I must suggest that you try and get it done and always try and have plans available when a new video drops. I have no doubt you’ll see an increase in plan purchases if they are available with a new video. Many of the viewers of your video won’t follow you on social media and will quite possibly never see the “I have plans available now” video when you release it. All lost revenue for yourself which is a great shame as this idea is bloody excellent and I absolutely will be using it.
I love this design concept Jean, and was inspired to put together a design for my own small shop. I plan to build it soon, but haven’t worked out the gas or spring or pulley assist mechanism. A short video explaining your interim solution would be really helpful. I add my voice to those requesting an update! Btw I’d be happy to share my plans. It’s designed to make two 8′ tall units with 4 shelves each, from three 4’x8′ plywood sheets.
Did you do plans ? Could really do with them ..
Regards
Colin
Hi Colin,
I haven’t made plans available yet. I feel that the project needs refinement (with regards to safety) and therefore I have held back on the plans.
G’Day Jean
Fantastic solution for making use of the overhead space. Have you ever been able to publish the plans? I would be more than happy to give you $ for the plans.
Regards Sean
(Australia)
Dear Jean!
Thanks for providing excellent content. I am now fully up-to-date with your channel and hope to see much more from you in the future.
I am about to become a homeowner for the first time and with my home comes a small garage, much like yours. I wanted to make the foldable shelves, like you did, as they are a brilliant idea. And my wife approved (she watched your video) and that – the wife approving of a hobby, that my friend, is nothing to sneeze at.
I seem to remember you did introduce latches to your design to make it safer? Anyway, I would be happy to purchase the plans from you as they are and ensure to not hurt anyone with them. That would be very helpful! Otherwise I will have to spend hours learning sketchup and designing the whole thing myself, based on your video. And the world does not need a bumbling idiot like me attempting to recreate your designs :).
I never finalized the plans I drew up because I was hoping to circle round to the project and finish it off. Because of that, the ones I have won’t do you much good, unfortunately.
Thanks for replying, and I respect your decision.
Kind Regards.
Do you have the plans and cut sheet for this project? It is absolutely what I need in my shop and while I have some time off I would like to finish my shop and this project is the focus of my attention to complete my storage issue in my rather small but humble work area
I see a Lot of people asking about the gas springs. Is there any follow-up to this?
As soon as I know, I want to build a whole bunch of these!
Thanks!!