

How to make a farm-style dining table
Dining room tables bring families together.
They are the boardroom tables of our homes where we joyfully discuss the ins and outs of our day while breaking for only short periods at a time to take another mouth full of mom’s top-notch cooking. We share, we laugh, we love…OK, maybe I’m overselling it a bit but I am sure we can all agree that dining room tables do indeed bring families together and even if they didn’t they still make a beautiful addition to any home.
Where functionality meets style the result is wood, solid hardwood to be more precise, but adding “solid” and “hard” to the name is followed by adding another $300.00+ to the retail price. By adding DIY, however, we can slash a good amount off of the asking price.
In this easy-to-follow tutorial, I will be making plans available for this beautiful solid hardwood farm style dining room table that can seat 6-8 people comfortably.
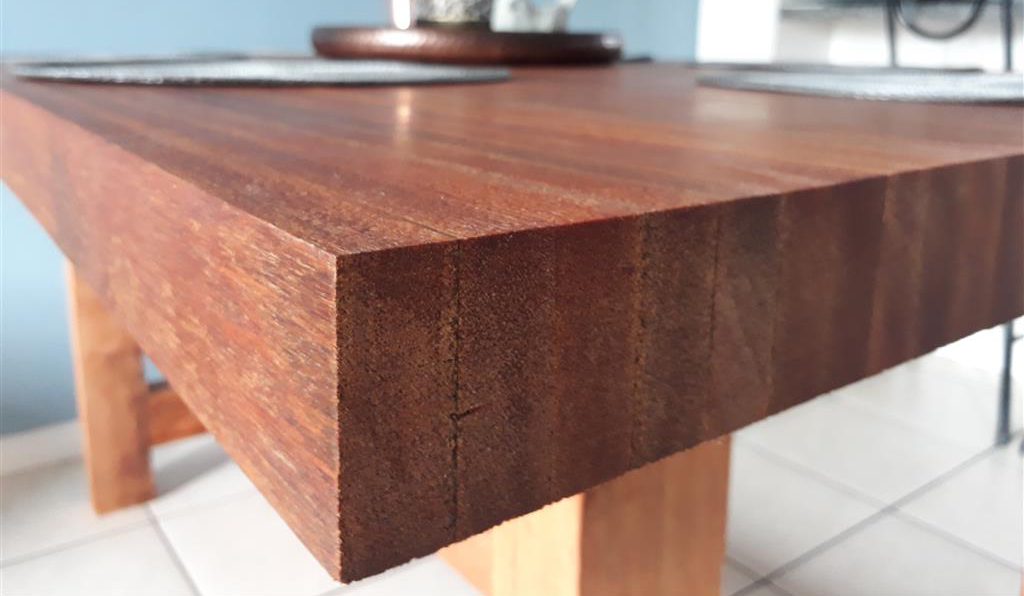
This table was built using lumber salvaged from old wooden doors but using processed lumber will yield similar results.
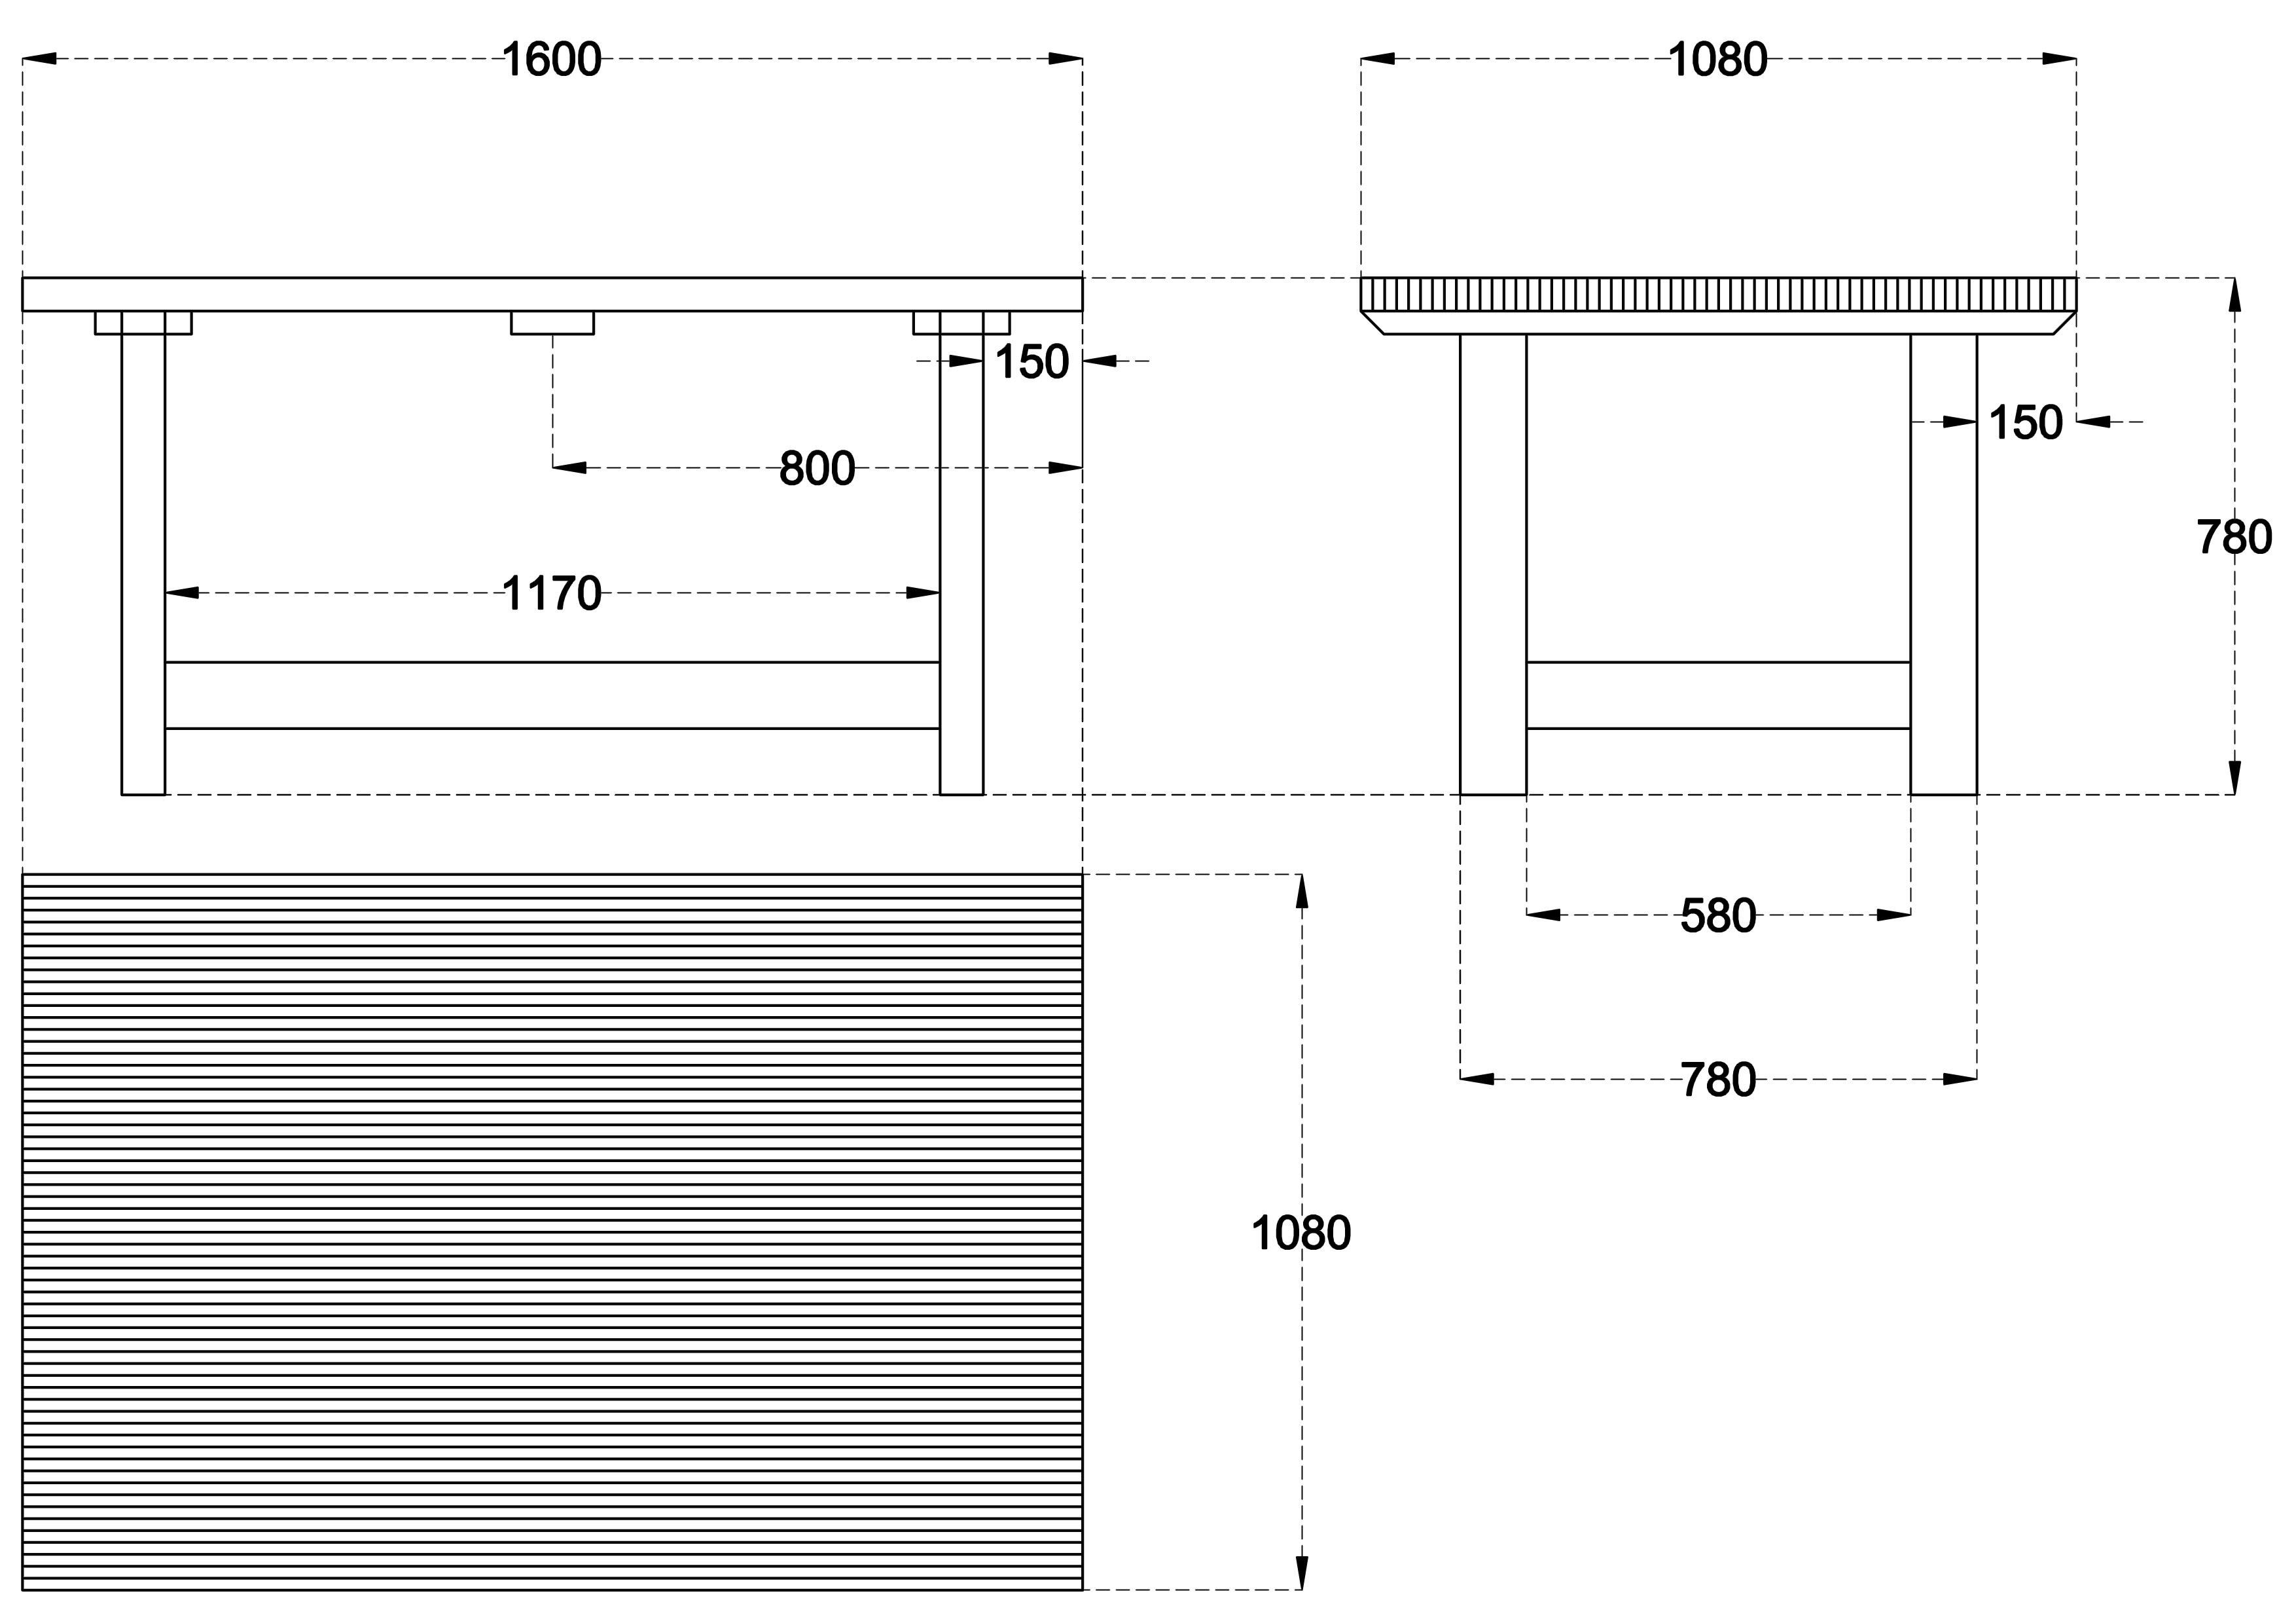
What you’ll need – Lumber Cutting List

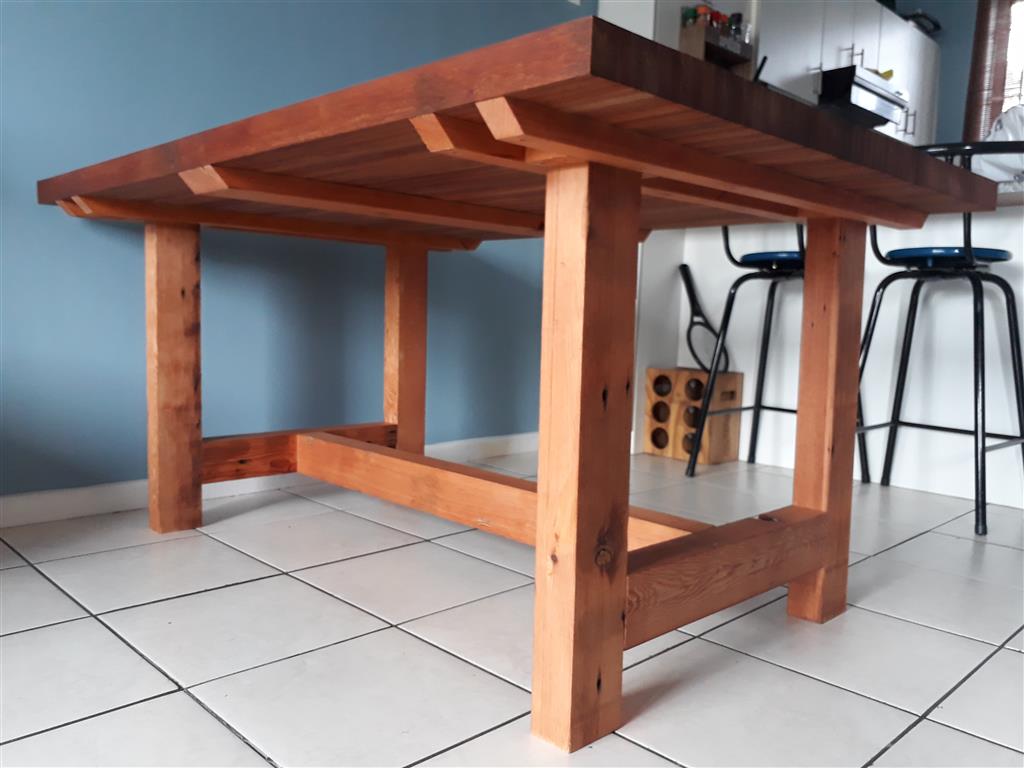
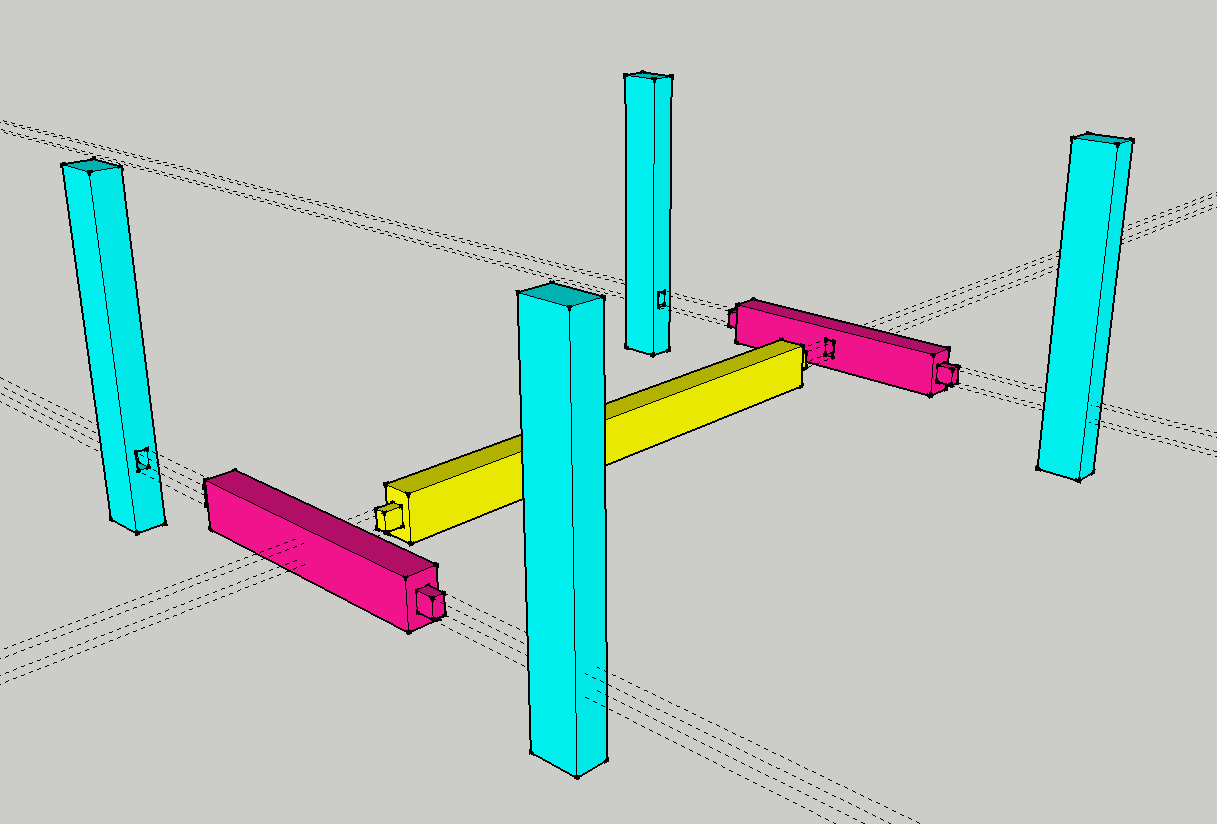
Base assembly
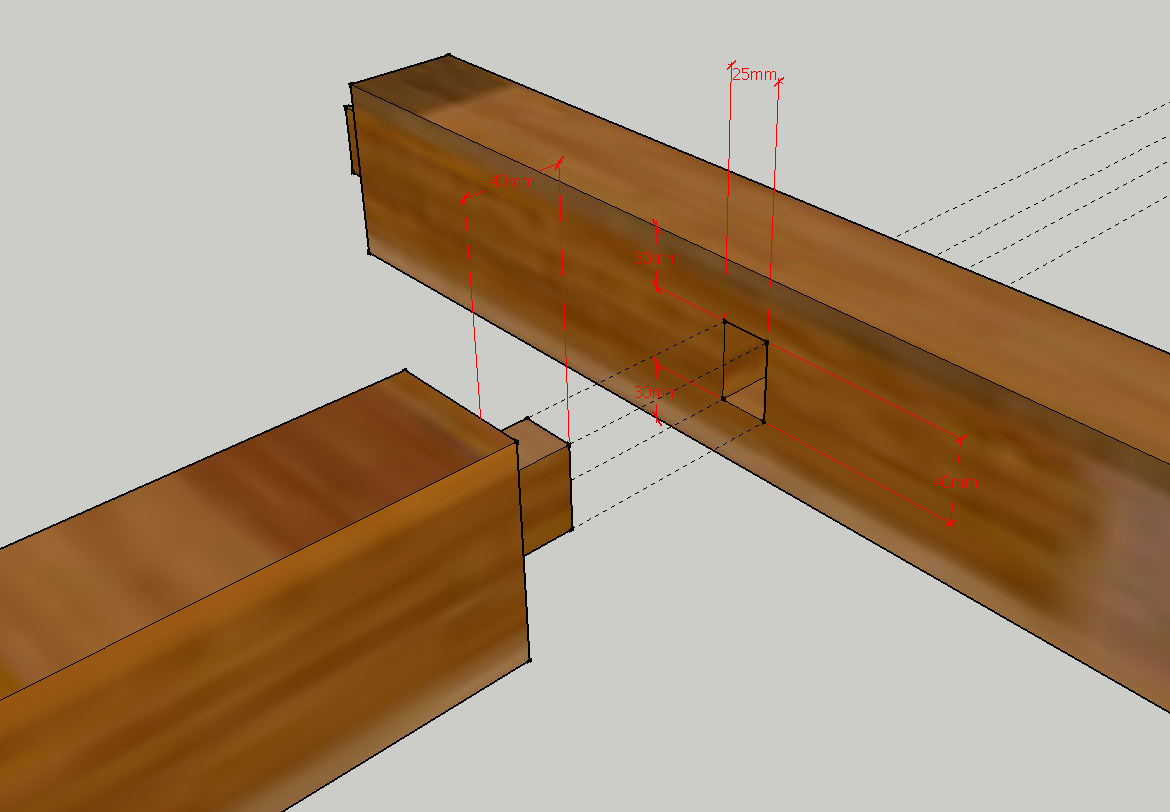
The base is assembled using mortise and tenon joints and is made up of components A, B, and C.
The joints are cut at a depth of 40mm, glued together and clamped to allow to cure.
Fit temporary braces at the top of the base using clamps or screws to ensure that the base stays square while the glue is curing.
Tabletop assembly
The tabletop is made by laminating all (60) of the D components together.
You can use wider planks for the table top to make the process less labored. i.e. using 32mm (instead of 18mm wide) would mean you would only have to glue 30 planks together instead of 60 while using 64mm wide planks would result in only gluing 15 planks together.
Allow the glue to cure and then, while the top is resting on a flat surface, sand down what will be the bottom of the tabletop using a belt sander.
After the surface is sanded, fit the braces to reinforce the tabletop and turn around to sand down the top side.
Use a circular saw to square out any unevenness that may have occurred at the edges due to the gluing process.
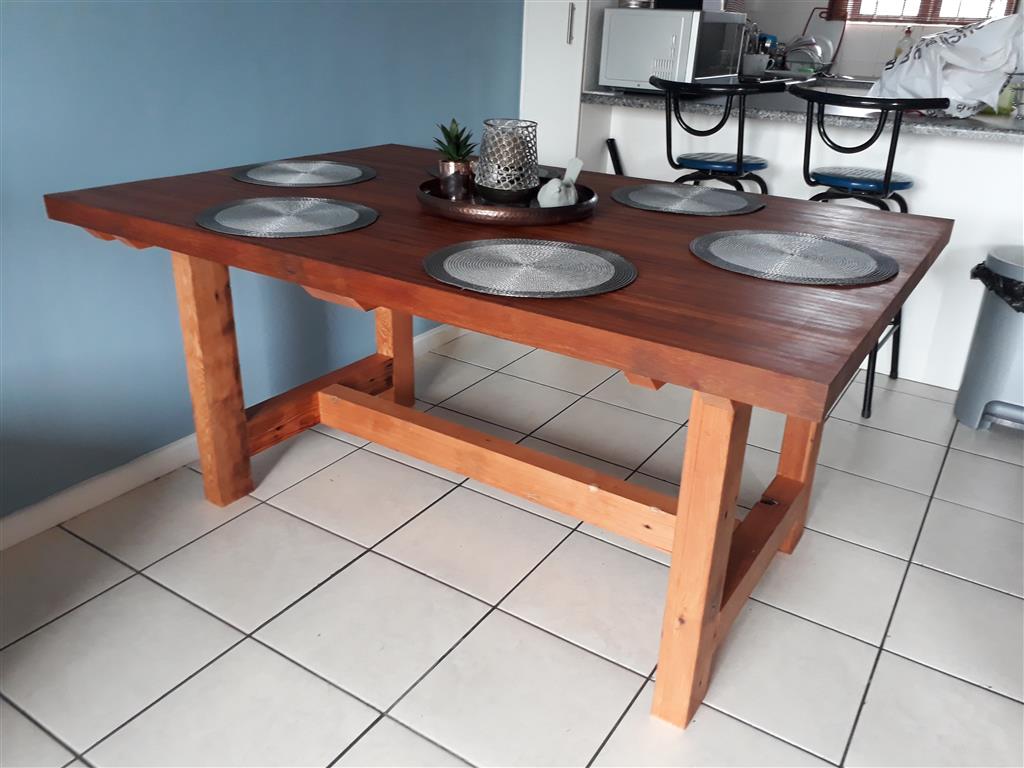
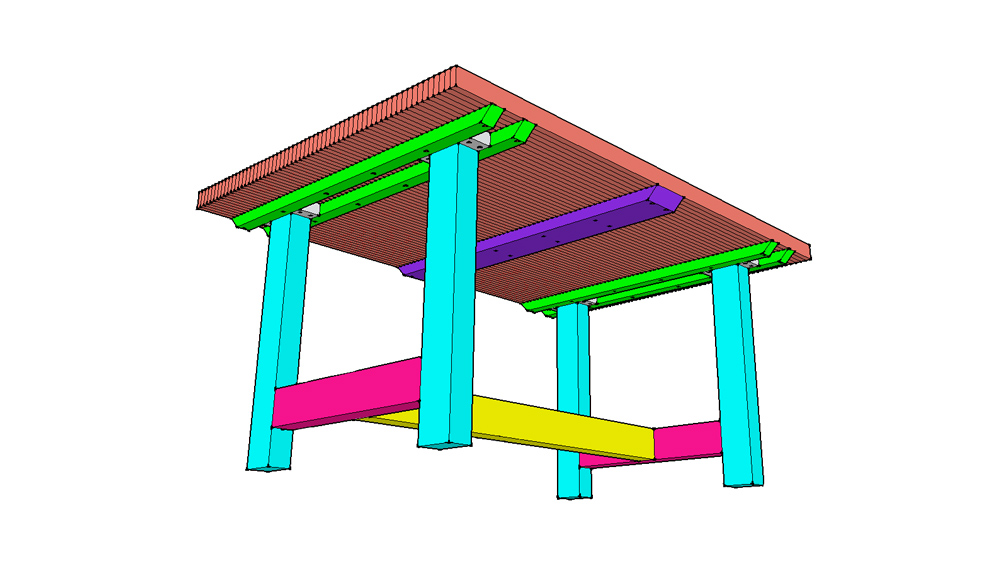
Assemble top and base
To finish up the table fit the assembled tabletop to the base.
If everything lines up correctly the top should just slip into place.
Hey Jean,
Beautiful woodworking! I have the perfect spot at home to put one of these tables. Pretty sure with your free plans to build it I can make it happen. Thanks for the lay-out.
I have a good friend who just retired and is moving to Texas. I passed this to him as well. He is much more of a woodworker than I am and I’m sure he will make this a project for himself.
Thanks so much for sharing!
Hi there Mark.
I’m very glad that you found value in this post.
This was a fun project and delivered great results for me. I hope it does the same for you.
Jean
Hey Jean, awesome article! I’ve been working with wood for a few years now, and my wife’s been bugging me to rework our old table..with this article I might just make an entire new one for her instead!
Hi Marty
Personally, I very much enjoy restoring older furniture but making something new is also very rewarding.
Best of luck with whichever one you decide to go with.
Jean
Wow that was a great tutorial, such tables are very expensive in my country, and I really can resist getting such a table to my home, doing it myself makes me sure of a good quality used wood instead of hoping to be lucky in finding the perfect one, I’m looking forward to a tutorial about making wooden boxes that can be placed in the middle of the room topped with a runner and some candle holders.
Hey Rawan
Great idea, I will definitely look into doing something along those lines.
Be sure to stop by again soon.
Jean
wow. the detail here is incredible. We own a a-frame wood house in florida, very rustic, and just spent way too much on a ‘farm table’ from a retailer. My older son would have really enjoyed this post and making us a kitchen table!! I will follow you so i don’t miss out on posts going forward. thanks so much.
Great to have you here Hillary.
Be sure to let us know what you think when we post new content.
Jean
Love that table…will build one myself!!!
Extremely brilliant the way you color coded the parts to show where they went.
Very nice website!!!
Hello Jean, what a great little table this turned out to be. I have a large family and would have to have a larger table. Would it be possible to have a table about 10 feet long doing it the same method you all used? Since you don’t have a double-sided electric planer large enough to plane both sides of the glued product, did you just simply sand it all? How long did that take?
What wood would you recommend? Could I use long 2×4’s for the top? What if I ripped them in half to save weight, would that be strong enough for a top?
Do you recommend placing screws in the wood along with the glue?
Hey Bob
Wow, thats a lot of questions. I like it.
You would definitely be able to make the table longer with this design. You would be laminating the top in a way that the wood runs along the length of the table. Just remember to add the braces at the bottom of the tabletop.
Yes, the table in the video was sanded. Starting with a 60 grit on the belt sander and ending on a 150. I used a straight edge across the table top to check for height deviations and correct it. after that, I finished the table with a 200 grit on the orbital sander.
The sanding did actually not take that long. Altogether, I’d say about 2 hours.
The would you use is entirely dependant on personal preference but personally, I am a big fan of darker hardwoods.
2×4’s should work great but ripping them in half would be a good idea. The table in the tutorial had a 1/2-2inch thick top and it was very heavy.
Wood glue on such a surface should be more than good enough but I would still definitely suggest placing braces at the table top base.
Jean
Hi
Great table & easy to follow plans.
I have some wood in the garage that i didn’t have a use until today !
Looks like I have found my winter project ?
Cheers
Paul
Hey Paul
Yeah, Great idea.
Go out and build something. There’s few greater feelings.
Jean
Hello Jean, great article. Solid content. The layout and presentation of your website looks great as well. The assembly part is really important here. It’s well described.
Great job and good luck
Felix
Being the DIY type of gal that I am, I started looking up some drawings and directions for making a coffee table. I am also in need of a kitchen table. I like this one! I had first started looking in the furniture stores, but man they are expensive and heck I am a single mom, I have better things to spend my money on, than pay a fortune for a table. This is simple, yet modern looking to me and something I am going to go ahead and make! I am curious how much you spent on the supplies for this table?
Hi there
Beleive it or not but this table didn’t cost me a sent apart from consumables. Don’t know if you got around to watching the video but the table was built from wood reclaimed from discarded garage doors.
Jean
What a great post. As a collector of Teak furniture, I love the craftsmanship and dedication for someone who is a woodworker. Living here on Vancouver Island, there are many woodworkers here using reclaimed wood or fallen timbers. The work has always intrigued me, and this post displays the ease but complexity in creating beautiful works of wood.
As a Handyman I feel utterly inferior, as a wood worker ? Forget about it. However, if I would ever try to be someone other than a computer guy, your “How to” instructional is awesome – easy to understand and straight forward. I’m sure my girlfriend would appreciate the effort. And it makes you feel accomplished – I like that ! Thanks for the idea, Jean !
Thanks for stopping by Rico.
Best of luck if you ever do decide to build something. As you say, it makes you feel accomplished.
Jean
Hey Jean, nice to find another post of yours online.
Thanks for the detailed table plans. It surely is a very nice furniture piece.
I’d love to make one myself, but I have two constraints. One is time and the other is work-space.
My single garage at home is pretty much occupied as storage space and believe me, all my tools are in there as well.
I have subscribed to your newsletter.
Cheers 🙂 …from Cape Town
Hi there Cobus
I know exactly what you mean. I am also limited in space. If I had my way I would turn my entire property into a workspace and just keep a space to eat, sleep, and brush my teeth. Unfortunately, the misses won’t have any of that nonsense so I’m also stuck with my little old single garage.
Hope you find some space to enjoy the beauty that is woodworking.
Jean
New to the website, love it so far. Just wish the dims were Merican! All my tapes have whole numbers with sixteen black marks between them. Btw…what’s the deal with the black diamond? I’m guessing truss spacing.
Hi Craig.
I did, in the beginning, add both Metric and Imperial units on all the diagrams. I would be sure to consider adding both on future builds.
I’m afraid I don’t know what you are referring to with regards to “black diamond”. Could you maybe be a bit more specific?
Jean
Hi Jean
Can you perhaps post the plans for the jig, you guys used to glue the tabletop together, or point me to the link whre it is posted
Hi Nardus
Sadly, I don’t think I have the plans anymore but I’ll take a look.