

How to steam bend wood at home

The most effective way to bend wood is done by using steam.
Steam bending wood involves subjecting a piece of lumber to steam for a certain period of time allowing the steam to penetrate the wood. Doing so will result in the heat loosening up the fibers between the grains. This then makes the wood pliable, allowing the woodworker to shape the wood in a jig.
The process of bending wood using steam is not at all new to the world of woodworking and all you need to give it a try at home is a simple DIY steam box.
The two main components that make up a steam box system is the enclosure/box, in which you will place the piece of wood that needs to be bent, and a steam generator.
In this tutorial, I will show you how to bend wood by bringing these components together to make a simple DIY steam box.
What you’ll need to make a steam box to bend wood at home:
-

Steam generator – A steel drum used to boil water. An enclosure – I used a length of PVC pipe so I don’t have to go through the hassle of building a wooden box.
The pipe/enclosure needs to be long and wide enough to accommodate the wood you intend on bending.
More importantly, however, it also needs to be able to handle the heat build-up from being in contact with steam. - Two end caps to close the ends of the pipe.
Depending on the pipe you use, there will almost certainly be a cap available for purchase to blank of the ends of the pipe.
If you decide to build a box from wood, however, you can simply close one end and add a hinged door to the other for access to the inside if the box. - An empty steel drum with a closeable lid for boiling water. (An alternative to boiling water in a steel drum would be using a wallpaper steamer to generate the steam needed for wood bending).
-
Flanged pipe fitting to attach the pipe to the steam generator. A length of 32 – 50mm (1 – 2 inch) flexible pipe that will be able to handle the heat from the steam.
Silicone or rubber pipe would yield the best results.
The pipe will be used to get the steam from the generator to the box. - Two flanged pipe fittings (the same diameter as the pipe being used to transport the steam from the generator to the enclosure) – These will be used to attach the one end of the pipe to the PVC end cap and the other to the lid of the steel drum.
- A heat source to heat water in steel drum to boiling point. (I use fire but a hot plate or gas burner will do just fine)
Alternatively, a wallpaper steamer/stripper can be used. In that case, however, the steel drum becomes obsolete.

Preparation
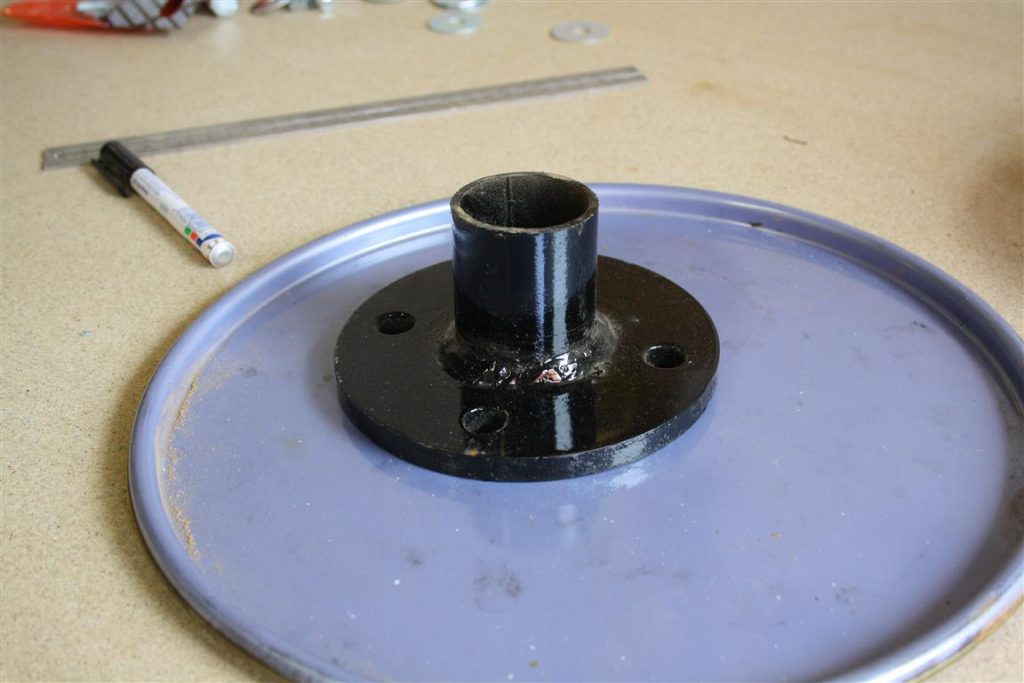
Before assembly of the steam box, one of the PVC end caps, and also the drum lid, needs to be modified to be able to attach the pipe to it.
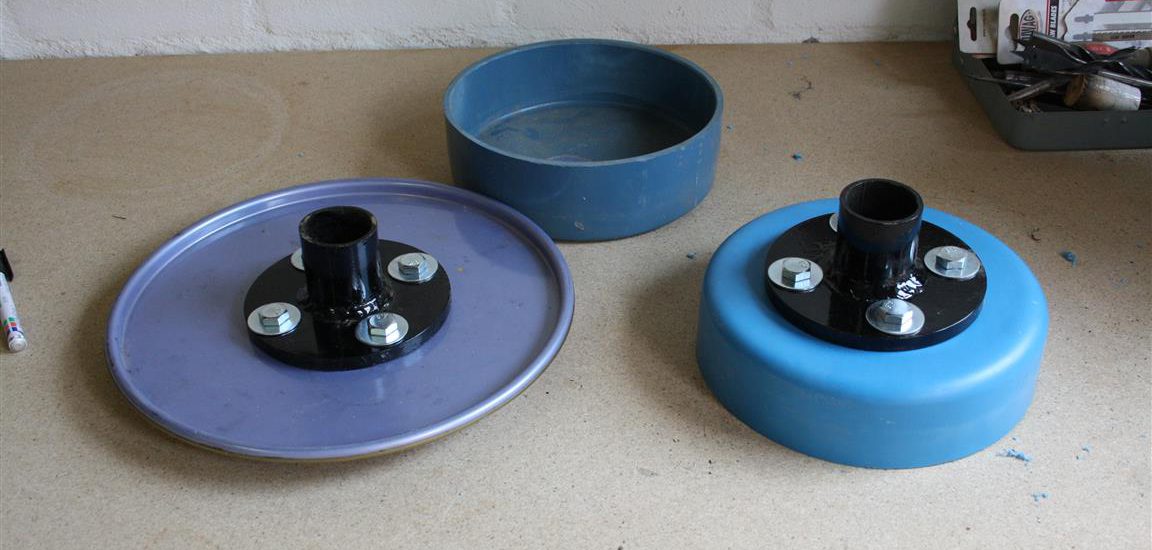
This is done by drilling a hole in the cap and the lid that is more or less the same diameter as the pipe that will be used between the steam generator and the steam box.
After doing so attach a flanged pipe fitting to each one of the two.
The pipe can then be attached to the pipe fitting using hose clamps.
Further preparation involves adding steel rods or wooden dowels through the cross-section of the PVC pipe (steam box enclosure). This is done to serve as a rack on top of which the pieces of wood will be placed when being steamed to allow the steam to reach the entire surface of the plank.
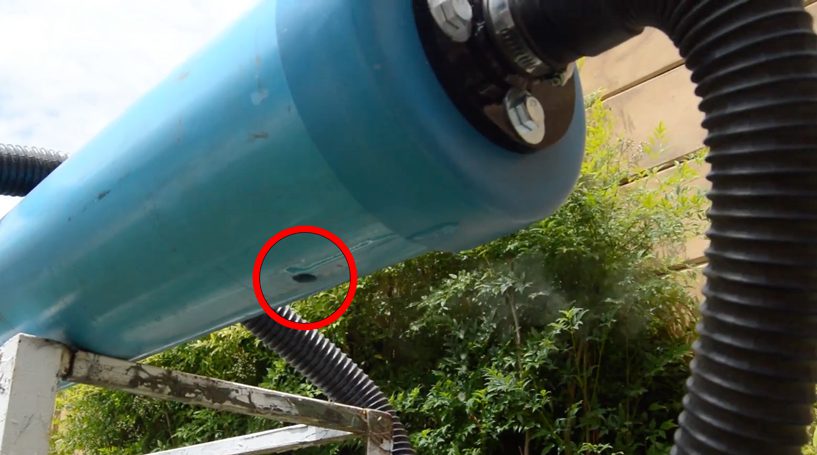
IMPORTANT: The system should not be sealed (airtight). Add a hole to the underside of the PVC pipe to relieve pressure and let out accumulated water.
Steam can generate a large amount of pressure and if it is not being released the pipe or any of the other components can and likely will burst or explode.
Using the steam box
 Add water to the steel bucket (steam generator).
About 5 liters (1.3 gallons) of water will be more than enough to generate steam for an hour or more.
You would want to use less water so the water can reach boiling point faster.
Apply a heat source strong enough to bring the water to a boil. A fire, hotplate or gas burner will all do the job if you decide to not use a wallpaper steamer.
Place the lid on the bucket with the pipe attached and the other end (with the end cap) on the PVC pipe. Leave the other end of the steam box open so you can monitor when your system is producing steam.
Once you notice steam exciting the other end of the steam box/pipe, you can place your wood on top of the dowels inside the pipe and close of the pipe with the remaining end cap. (Wear gloves to prevent burning when reaching into the steam box)
How long to steam the wood
The general rule for steaming wood is an hour per inch though different species will have different steaming times while some species of wood can’t be bent at all.
In the case of extremely dense wood, it is hard for the steam to penetrate the wood.
Pre-soaking the wood that is to be bent for 6 – 24 hours can also decrease steaming times and make for more effective bending.
Bending the wood using a jig
After the wood has been subjected to the steam in the steam box for an adequate amount of time it needs to be transferred to a jig in which it can be bent and clamped in its desired profile.
During the bending process, the wood on the outside of the bend will stretch which can cause it to splinter.
The ideal jig should limit the possibility of this happening by supporting the entire length of the bend on the inside and outside.
Cutting a male and female (positive and negative) pattern of the desired bend and then sandwiching the steamed plank between the two will limit the potential for splintering.
Alternatively, when using one pattern to bend the plank around, a steel strap can be clamped to the surface on the outside of the bend. This will limit the outer surface from stretching and so limit the potential for splintering during the bending process.
After the wood has been clamped to the jig it can be left to cool down thoroughly.
Different factors contribute to the cooldown time needed to adequately cool the wood. Therefore I would advise leaving the bentwood in the jig for at least 12 hours.
Things to remember when steam bending wood
- Not all wood can be bent.
- A small amount of spring back is to be expected.
- Brace the entire length of the bend on the inside and outside.
- Use wood where the grain runs along the length of the wood. Grains exiting on the edges create weak points that can break when bending.
- Do not use planks that have knots in them.
- It is very important to add a pressure release hole to your steam box.
- Use the appropriate safety gear for handling hot surfaces and working with steam.
HI Jean, very interesting concept you’ve done there. I once tried, but failed, to bend a wood for a house equipment project. I ended up breaking the wood and buying an expensive manufactured one. With your guide and video, it now made me believe more that it can be done. I knew someway it can be done as I tried a lot of ways, including wetting the wood thinking it will be more malleable. I didn’t think about steaming, which is actually more amazing. Thanks for the DIY, I now can proceed to the several ideas I had in mind without breaking my wallet. Super thanks, bro =)
Hi JR,
It’s a super pleasure bro. Glad the info was helpful.
Don’t hesitate to ask if you have any more questions.
Jean
This is a project that my husband would just love. He loves to ‘tool’ around with his hands. I would like to know how to ‘tool’ around as well.
Btw, perhaps I over looked it, what would be the reason to bend wood? I’m asking because I am totally ignore of process and the reasons why.
Hi Lane,
Besides the practical application of bentwood in the production of things like canoe’s, furniture, light fixtures, wine barrels, etc. it also gets used when making decorative fixtures or even art pieces. The possibilities are truly endless.
Jean
Like many, my first collapsible hose failed in about 12 months. Clear Flow is clearly made much better. But it must be made by “Kinky, Inc.” Whenever I use it I must search for the kinks blocking flow three to four times as it expands. Even moving Clear Flow around the yard can result in kinks. Thus I gave it a new name” Kinky”.
Sorry for any mistakes, English is not my mother language 🙂
Everything I have read tells me to use Air Dried wood for steam bending not Kiln Dried
How long does the wood remain malleable for, after removing from the steaming box?
The moment you remove it from the steamer it starts cooling down and stiffens back up.
Working fast is key. You want to get the wood into the jig straight out of the steamer.
Thanks for the video, I’m going to use a handheld “conair turbo steamer” to try and unwarp some wood vent covers. I’m planning on clamping the vent to a 2×4 or a work bench and then using the steamer to try and help bend to back flat.
Success is a simple matter that is repeated over and over again
Once steamed, bent and dried, how will this affect the stability of the wood in relation to Moisture Content?
Will steaming improve the wood’s stability – i.e. will it still expand if the moisture level increases again or not affect it? – or will it be MORE susceptible to expansion & shrinkage?
I know you’re supposed to find green hardwoods (like newly cut white oak) for bending. I’m just curious though if you (or anyone on this forum) has ever tried to search through the piles at home depot for a decent piece, rip cut it into strips, and then tried to steam bend it. If so, I’m wondering if anyone got it to work?
Hello Jean
I just bough woodworking manual I am 80 yr old female but want to make things
I came across this yours wonderful Technique
Your video made me think, Will I be able to thews bending wood for DIY garden shade dome style roof.
VB