
Easy build wooden guitar stand
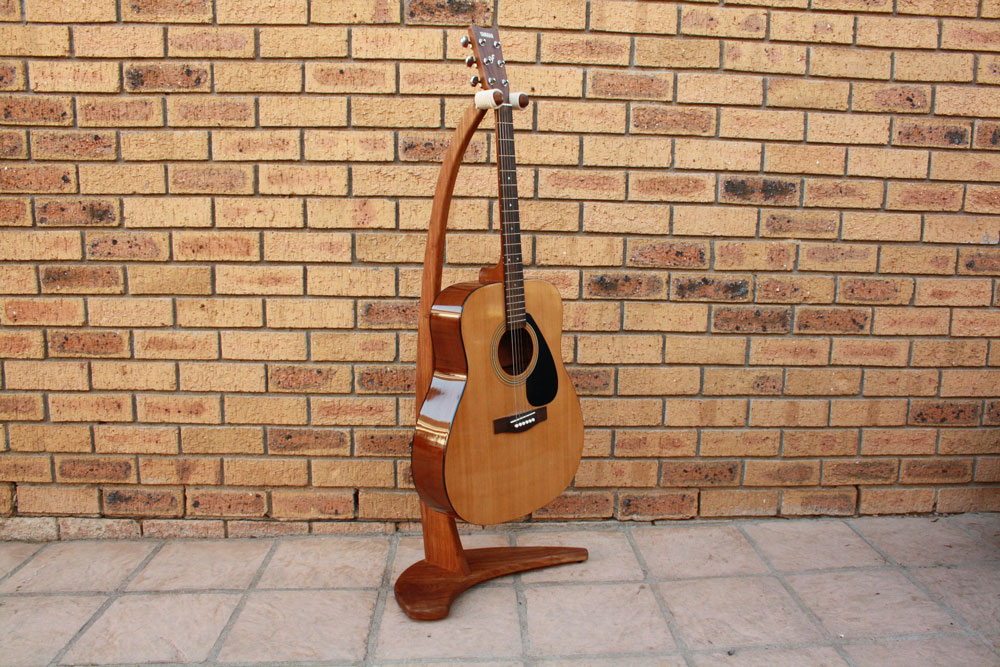
The Woodwork Junkie easy build DIY guitar stand is a great beginners project that only requires basic woodworking power tools.
Make one for yourself and display your guitar in style or build a stand and sell it to make a few bucks. Either way, this is a simple project that can yield beautiful results. Great for woodworking enthusiasts of all skill levels.
Tools and materials you’ll need
- Jigsaw
- Drill
- Router
- Power sander
- Glue gun
&
- A piece of hardwood with an appealing grain (at least 1-inch thick) – For the tutorial we used Kiaat.
- Wood glue
- Wood screws
- Cotton rope
- Sandpaper – Coarse and fine grit
Keep in mind this stand is designed to be built with a dense hardwood.
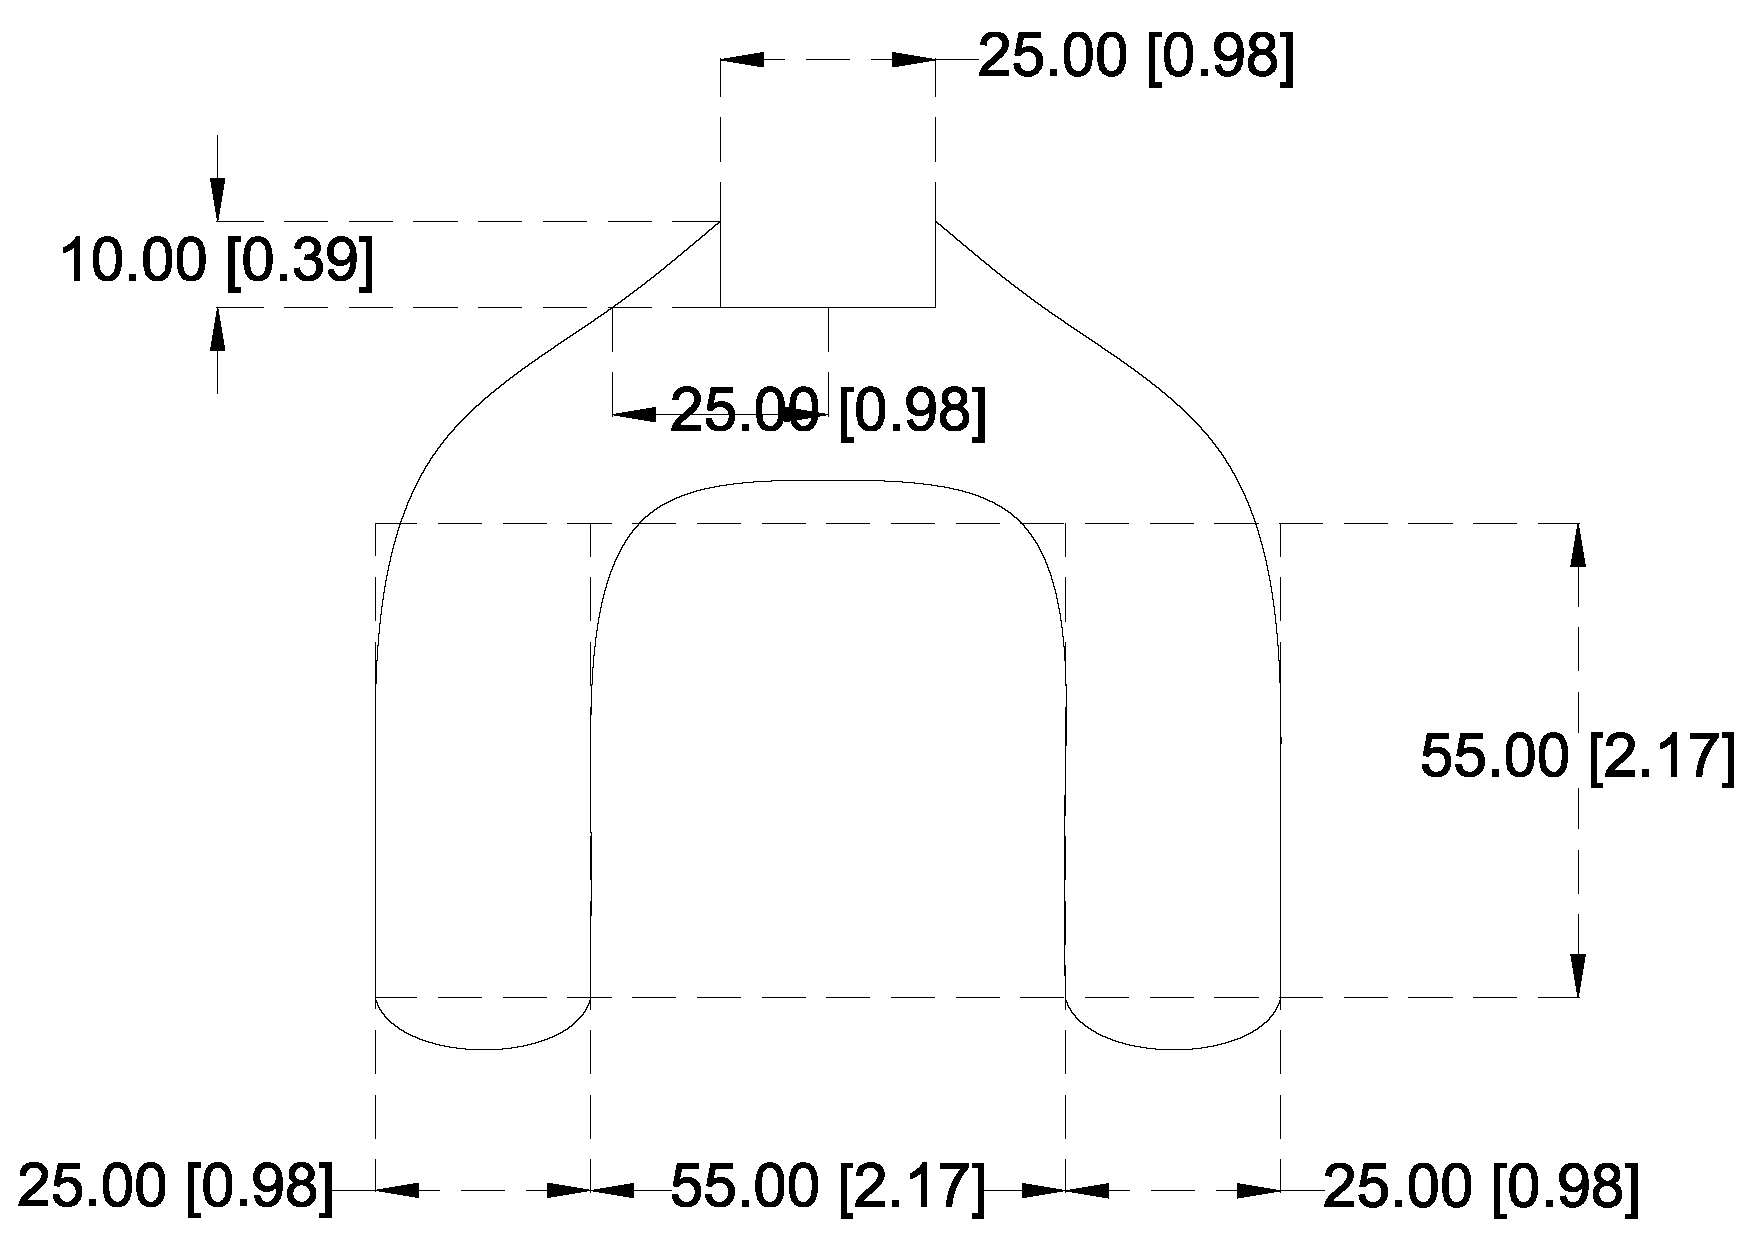
Step 1 – Plot out the cut marks
Use the diagrams provided below to plot out strategic points on your workpiece. These points will be used to guide your free hand when drawing the curved edges.
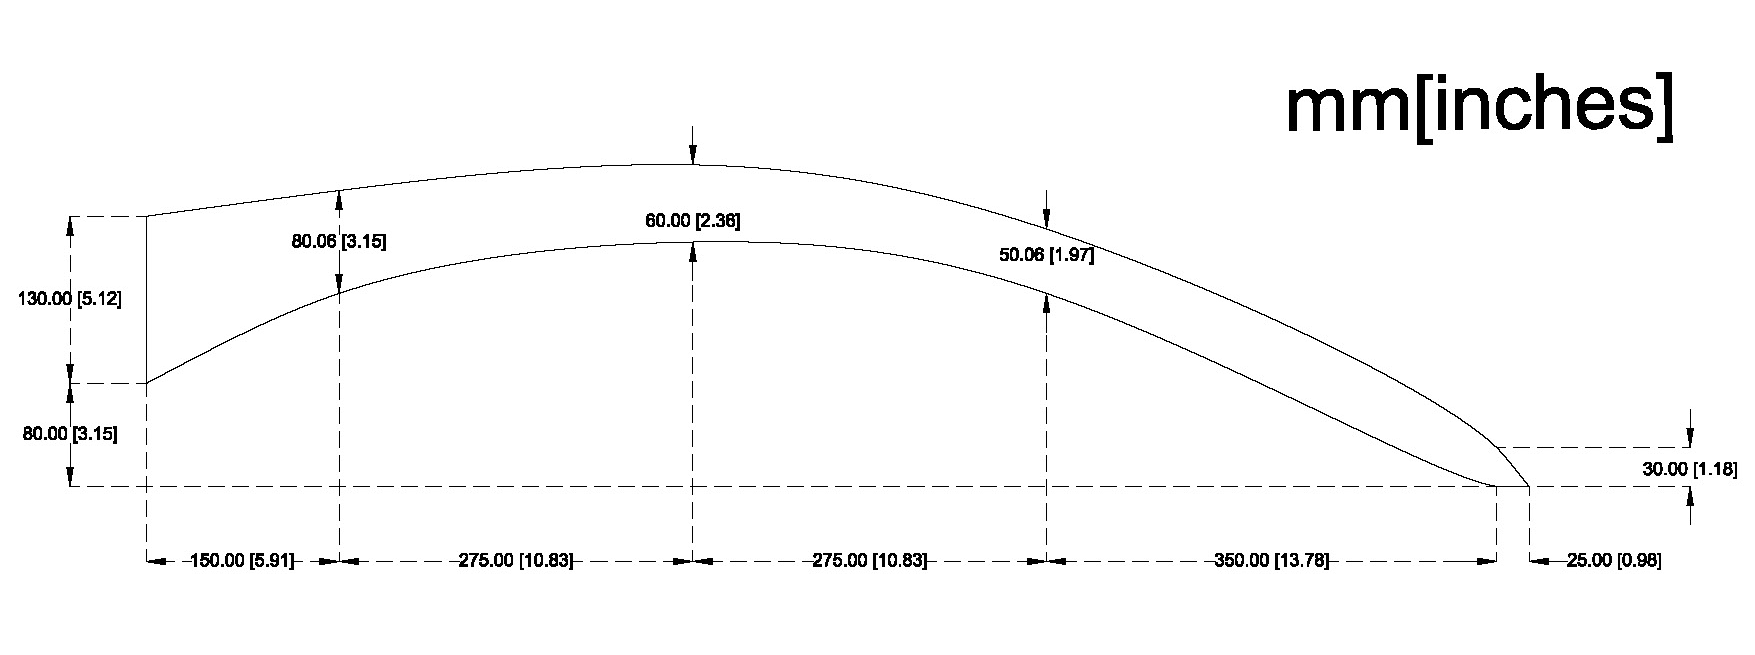
Neck plot – Component 1
Base plot – Component 2
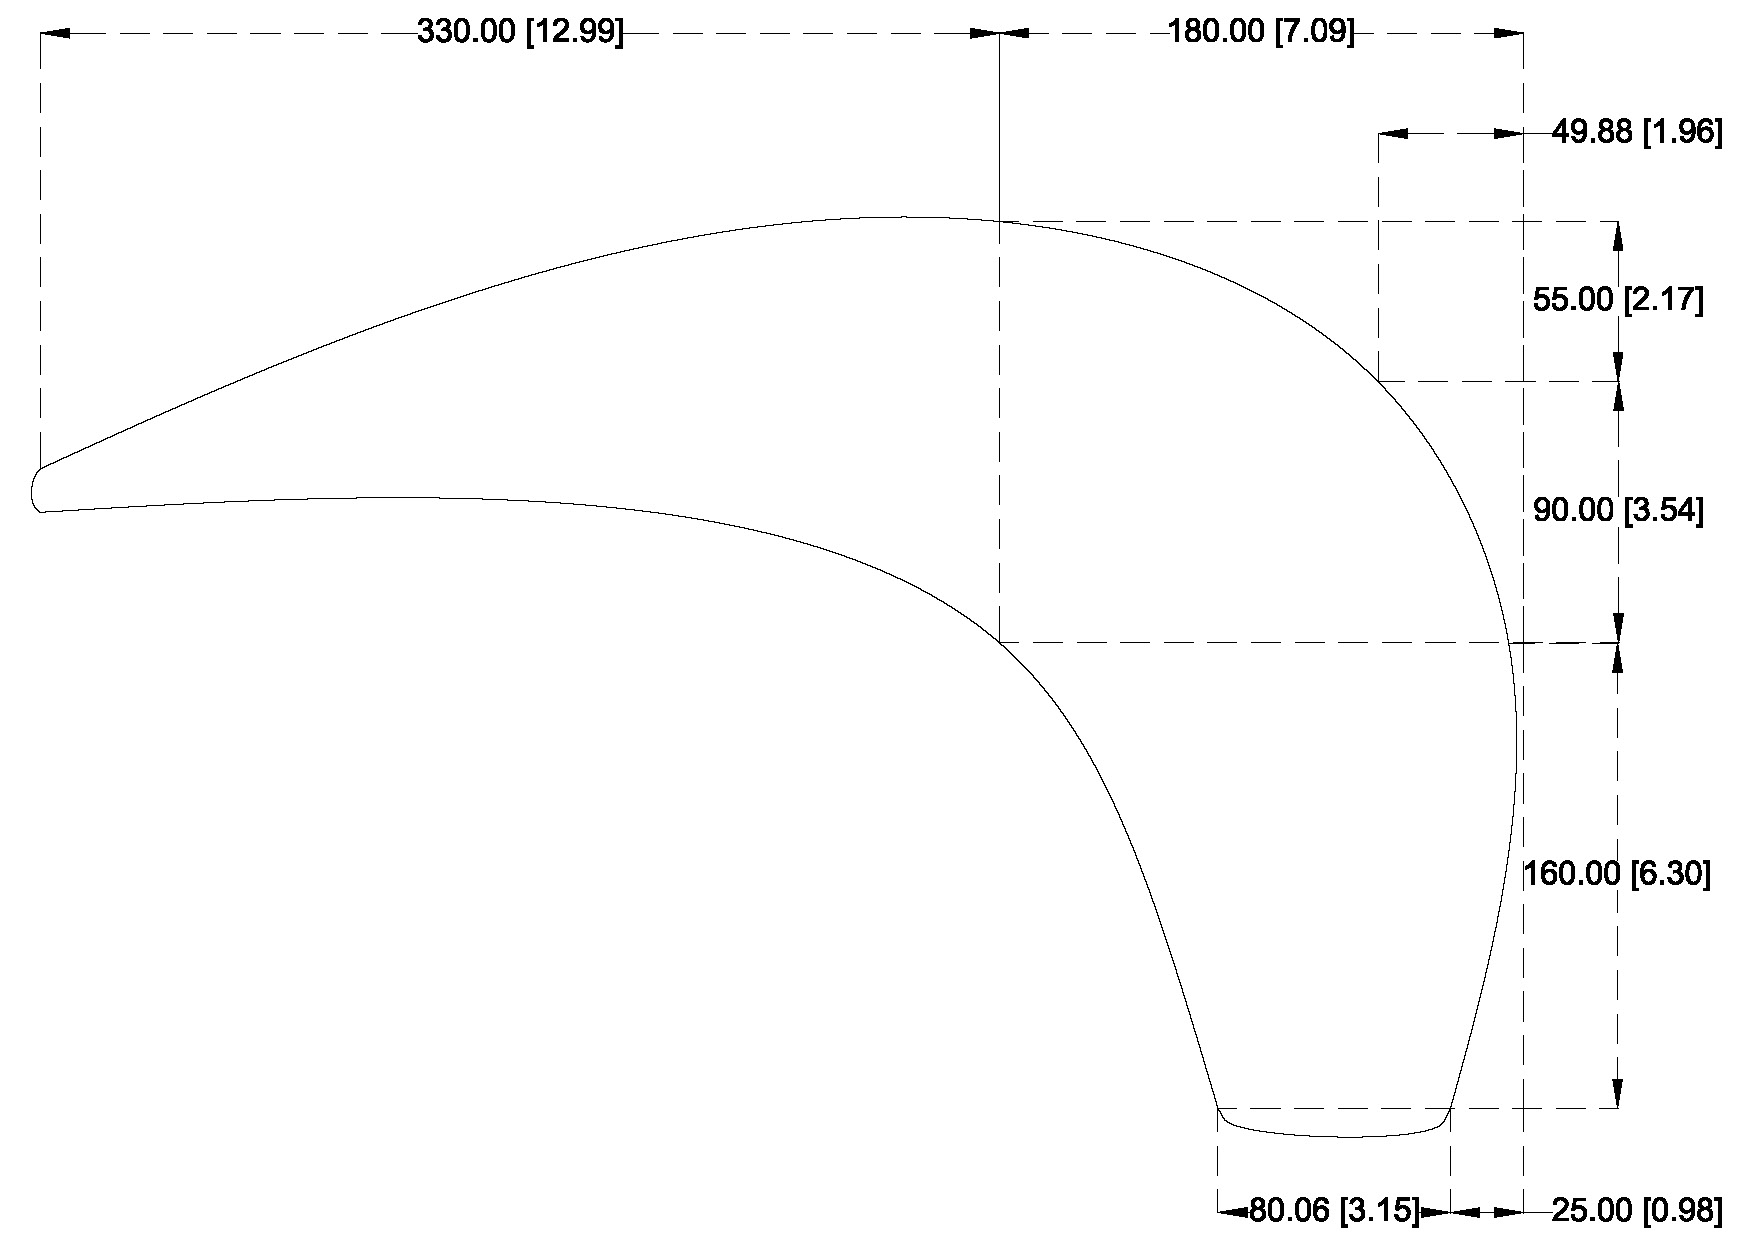 Cradle plot – Componant 3
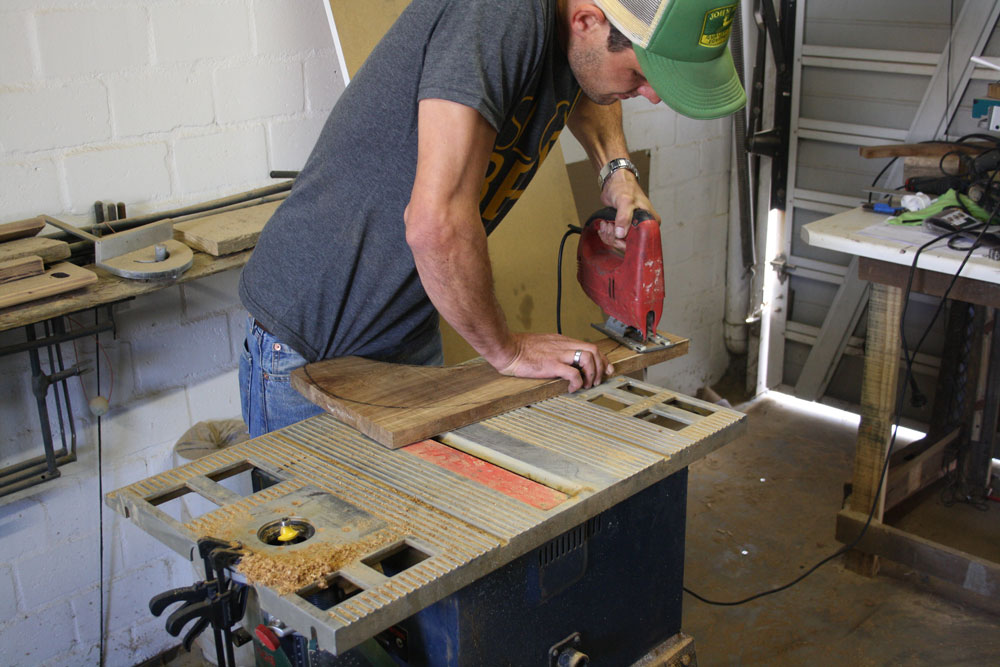
Step 2 – Cut out
Using a jigsaw, cut out the 3 components to the stand along the curved guidelines you have drawn on the stock.
The recess on the cradle where it fixes to the neck can be removed using a chisel.
Step 3 – Smooth out the cut
With a power sander and a low grit sandpaper (60-100), smooth out the cut marks on the edges as to produce an even, gradual curve.

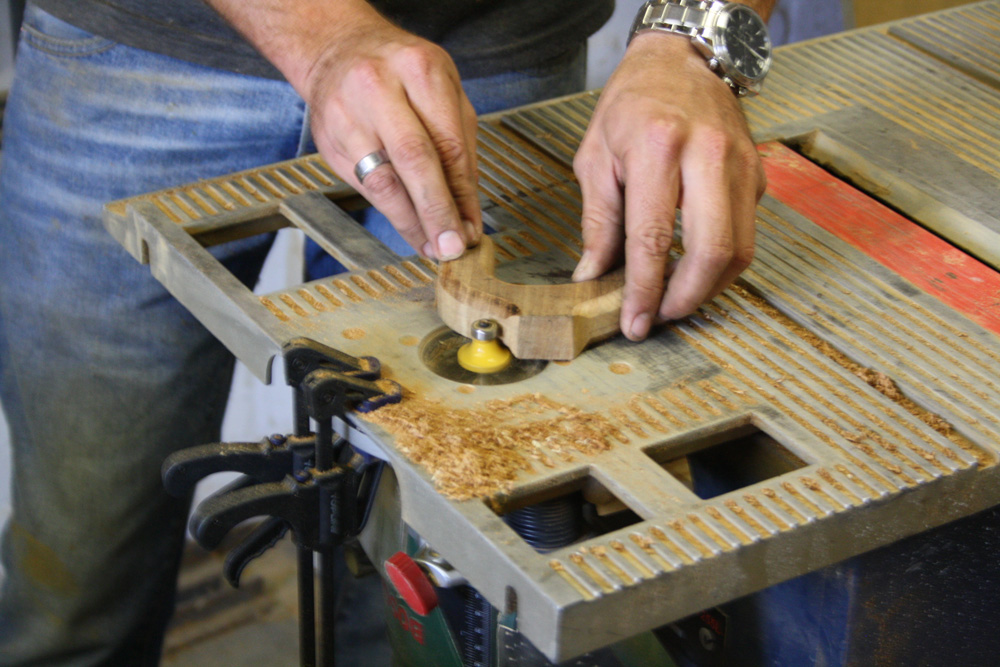
Step 4 – Router the edges
With a router and a roundover bit, cut a rounded edge around the top side of the base.
Cut a rounded edge around all the edges of the neck except the surfaces that will be fixed to the base and the cradle (refer to the diagram of the assembled stand).
Also, router all edges of cradle except area to be fixed to the neck.
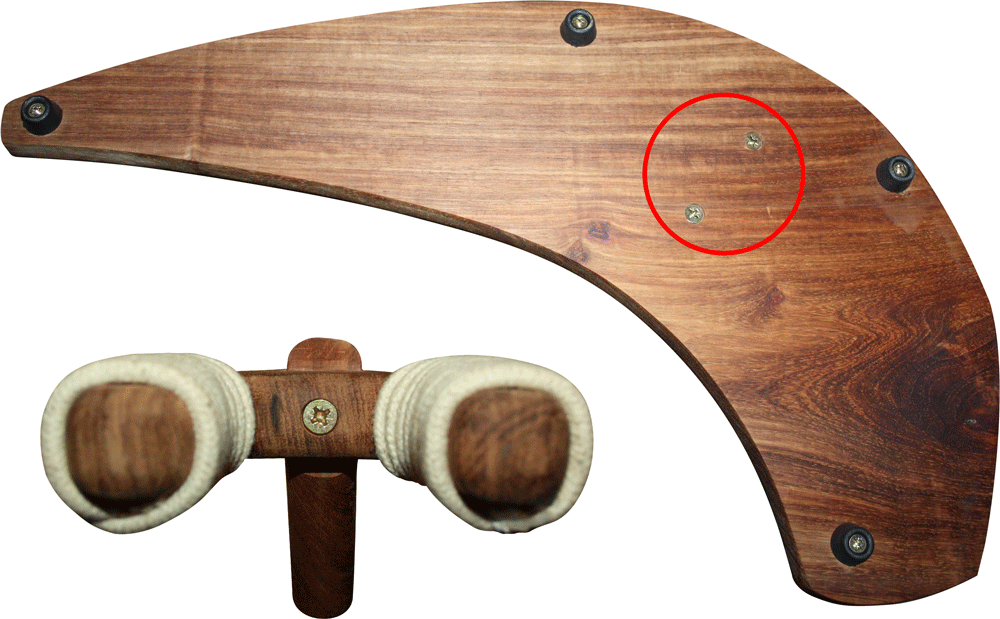
Step 5 – Assembly
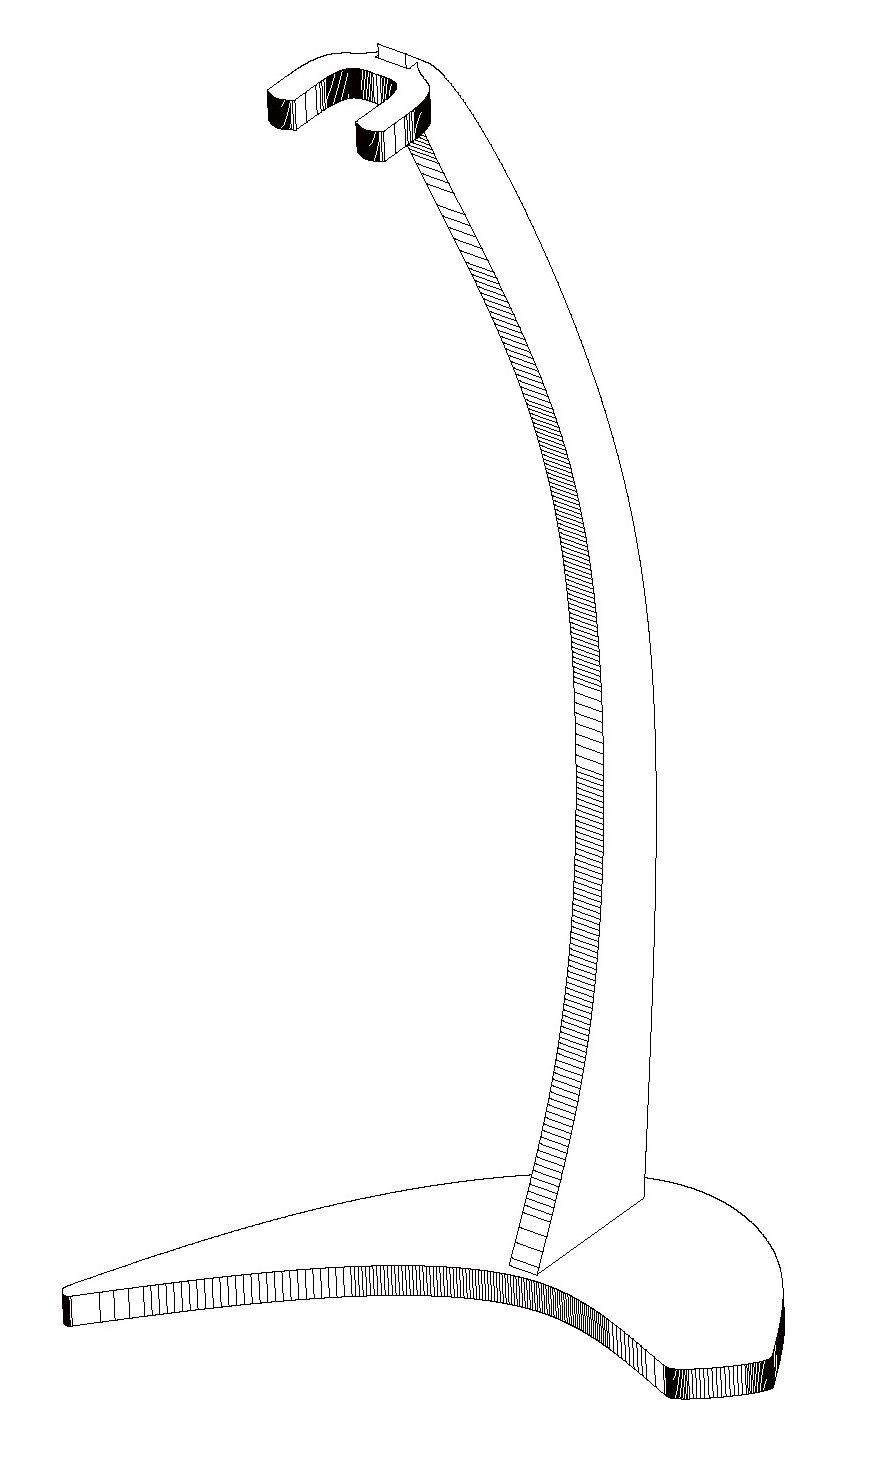
 After sanding down by hand, the stand will be ready for assembly. Assembly is done using chipboard screws as per the drawing below.
Fitting rubber studs to the bottom of the base is optional.
Note: When assembling the stand you need to fix the base to the neck in a way that the base extends beyond the point where the guitar will hang (the cradle). This is done as to prevent the stand from tipping forward when the guitar is placed on it. (Refer to the diagram to the right).
Step 6 – Finish
After assembly, the stand can be treated. I used a dark mineral oil for the stand in the tutorial to bring out the characteristics of the wood.
When the treatment has cured, add a buffer to the cradle to protect the guitar when it is placed on the stand.
I wrapped two pieces of cotton rope around the cradle and secured it with a glue gun.
 Woodworkjunkie.com, DIY like a pro.
That is a beautiful guitar stand. It’s so nice when you can make something yourself and you know it is a quality piece and is built to last. My dad did a lot of woodworking and make beautiful pieces. He was a perfectionist and made sure everything was just right. I have several pieces to remember him by.
Hi Sandra,
One of the beauties of working with wood is the longevity of wooden articles.
I too am somewhat of a perfectionist and I feel it is a good quality to possess when working with wood.
Thank you for your comment.
Jean
hay Jean i wanna make one myself for a school project but i need to know the wight and length of the wood board you used in the video to start thank you
Hey Joan
I made this a while back so I will have to look into my old drawing to calculate the boards size. I will try get back to you soon.
That is a sweet stand. It is always fun to have a DIY project that looks so nice in the end. Thanks for sharing the information.
Hey,
Thanks for your comment.
Yes, it is a very gratifying feeling when your finish product is a success.
Jean
This is too cool. Do you post more items to build on your site? I took wood shop in High School but never put time into it later on in life. I think a lot of people would love to make different items with instruction like you provided. I like it.
Hi Ronnie,
We will be posting projects with the focus on beginners often. We will try including videos where we can.
As this site is for the beginner we try to keep our tutorials as thorough as possible.
Thanks for your comment and check back soon.
Jean
Awesome looking stand and great directions. The fact that you included the video was incredibly helpful for me. I find that’s the easiest way to follow along on projects like this. What a cool site! Thanks for sharing all of this, especially the free measurements, most sites charge for that stuff.
Hey Craig,
Thanks for stopping by.
Access to all the content on our site is free and will always be. We have a genuine passion for inspiring beginner woodworkers and want to give them all the information they need to hone their craft.
Stop buy soon for more.
Jean
Wow. that’s a great looking stand. My son and I plan on building a couple next weekend. I may even scale it down for my banjo’s. Your instructions were very clear but what really sold me was the video. It was so nice to have both options on the page. Thanks for sharing!
Hi Dale.
It’s not always easy to explain a build using only images so I try and will continue trying to add videos to all the builds that the site features.
Enjoy the build and if you’d like, you can share it on our Facebook page.
Jean
Wow, it was really interesting, I enjoyed reading. Look forward to reading more good materials on the subject. Thank you for sharing this!
Hi Daniel,
Thanks for stopping by. We have many nice builds on its way so stop by soon.
Jean
What an incredible finish! I love how its free and I can really imagine you to feel great when it is finished. I might give it a go I have a few guitars laying round the house with tacky stands, all I need now is to buy the tools!
Hi Kourtney,
Completing a project is a great feeling. Especially when it’s something you haven’t built before. I will admit, especially for beginners, not all projects are going to be a success but like with most things in life, practice makes perfect.
Thanks for the comment.
Jean
As a fellow wood worker, I would like to compliment you on not only the beauty of your project but your instructions on how to make one just like it.
Keep up the good work
Clyde
Hi Clyde,
Thanks for the kind words. It’s always nice getting positive feedback.
Jean
I love how you’ve shown the entire step-by-step process to building out your own DIY wooden guitar stand. I’ve never seen any tutorial quite like this, but providing the images, video, and instruction makes this one of the most useful tutorials around. Just want to say keep up the great work and that the final guitar stand is a true beauty!
Hey Peter,
Thanks for your encouraging comment.
From here on out we will be aiming to structure all of our tutorials in this manner.
Jean
Hi Jean – I’m really not into woods but I really liked this post and the product the wooden guitar stand. I have not seen anything like this of a guitar stand. Hope I will try to get this soon. Thanks.
Wow, is this a lifesaver or what. Is it possible to build one that’s capable of carrying an electric guitar? like a regular Stratocaster?
I would prefer using a fancy wooden guitar stand like this rather than a cheap plastic one.
/Henric
Hey Henric,
Yes, this stand can definitely be built to accommodate an electric guitar. The only major difference would be modifying the cradle to suit the electric guitar.
Alternatively, you can purchase an already made cradle (like the ones found on wall mount guitar brackets) and modify that to fit on a stand like this.
The wood used for this stand is a very robust hardwood and will be able to support the heavier load that comes with an electric guitar. I fear a softwood will not make the cut.
Thanks for your comment.
Jean.
This is awesome, I know what my boyfriend will build me next lol thank you for the great instruction!
Hey Emily,
Always happy when people like our content.
Thanks for stopping by.
Jean
This is awesome! I am so in love with this stand!!! Too bad I don’t woodwork- I will need to find someone lol. I have a travel guitar that is smaller dimensions than a regular guitar but from looking at the picture (beauty) it looks like the dimensions will still fit.
Hey Andrea,
Thank you for the positive feedback.
This stand will definitely accommodate a smaller guitar just as well. Alternatively, with basic modifications to the original design, a smaller stand can be built for a smaller guitar specifically.
Thanks for stopping by.
Jean
I just gave my 50 yr old son my 51 yr old acoustic guitar. I plan to use your plan to make him a Christmas gift with your plan as a pattern. It is beautiiful and stylin’. Thank you for your sharing spirit.
Hi Carolyn.
That’s a great idea. I love the stand in this tutorial. The one I built here is still standing in my home.
I don’t, however, have the honor of owning a vintage guitar.
The two should make a beautiful display together.
Jean
Jean,
Do you have more guitar stand plans? I have 5 guitars no and love this stand but do not want to display all my guitars on the same stand. Anything will help. Thanks for the free plans. I am starting this one this weekend.
Hey Greg,
I have a few sketches but sadly I haven’t built any of them. I have been looking at making another stand for my second guitar. When I do I will post the plans to it.
What a great post – a beautiful guitar stand that would grace any room, and a great series of steps to show how to build it. Well done Jean!!
For the neck what was the overall width of the board you used before you cutthe neck? On the drawing, there is no vertical dimension from the base line, so one cannot determine the width of board needed
kind regards, and keep uip your great work
PJ
Jean, forgot to mention above, I intend using two boards of dense hardwood each 1200 x 130 x 20mm How would you suggest I go about using there to make that neck?
Hi Peter,
I could kick myself for forgetting to add those dimensions. I measured my stand now and it is about 250mm from the furthest point on the back curve to the furthest point on the opposite edge. I should really look at doing a revision of this post and video. So sorry.
thanks for this quick response, Jean. The photo you provided at the top is probably the most sleek and attractive stand I have seen. so I am keen to make it.
Would appreciate if you could update that drawing and show the vertical dimensions at each of the key points so I can get into it.
Looks like I am going to have to edge glue my 250mm boards, for at least half of the overall height.
Keep up your good work, Jean, you are an inspiration
Peter ( PJ)
I am going to try my best to put in some time on it. Feel free to email me if you need more info.
sorry, typo, meant “edge glue my 130mm wide boards to get to 250mm”
I would like to make this stand for my grandson. What are the vertical dimensions from the baseline at the key points? I can’t figure out the curve.
Hi Allan,
My apologies. I will update the drawings soon.
Great video, I do have a question for you WsJ’s.In the neck plot component 1 you show 3 bend locations, other than your free hand design are there measurements for those three bends? Measurements represented by dotted lines going up to the 80.06mm, 80 mm and 80.06mm say from the dotted line from bottom to the bend itself. I hope this makes some sense.
Thx,
best regards,
Hi Dave,
There are measurements but for some reason, I forgot to add them to the drawing. It was brought to my attention very recently and I have sat down to redraw the stand (I lost the original drawings) but I haven’t gotten around to posting them. I will be doing so soon.
Hi Dave,
I scaled the drawing provided and found the missing dimensions, working from left to right, to be:
145.0 (under the shown 80.06)
190.0 (under the shown 60.00)
145.0 (under the shown 50.06)
Hope this helps. I plan to lay mine out and just be sure that the resulting curve is smooth from end to end.
Mike
Hi awesome build! Do you have dimensions for the curved piece? Thanks!
Hi
This is great
Can you send the original size to the template
Hi, in your December 2019 response you mentioned you’ll be updating the plan drawings. Have they been updated yet? I’d like to make the stand but figured I willl wait for the updates. Thanks
Hi any update yet??
Thank you so much for sharing these awesome plans! I just finished making one out of Sapele. I finished it with Odie’s Oil and am quite pleased by the end product!
Great if you don’t have much money to spend on a guitar platform. This is an excellent method to protect your guitar. As a beginner guitarist, utilize this guide to get started and learn all the basics.