
Wooden cutting board from scrap wood – Making your own
Hardwood cutting boards add a certain panache to a kitchen thanks to their functionality coupled with their stylishness.
Floating around your favorite stores you may have noticed that these boards don’t come cheap considering its’s just a piece of wood…or is it?
Wooden cutting boards have a huge advantage over their glass and plastic counterparts. Why? Well, when working with quality knives you would naturally want to preserve their edge (No one likes a blunt knife).
A wooden board tends to be much more “knife friendly” in the sense of preserving the sharp edge of your quality knives. In addition, in the case of hardwoods, are more water resistant and take much less punishment from a knife cutting into it.
The luxury of owning a high-quality hardwood cutting board does not have to come with a steep price tag. It can easily be produced with a few power tools and a little know-how. In fact, it is one of the first projects I would generally advise woodworking hobbyist to try out due to its simplicity.
Make one for yourself or as a gift with the easy Woodworkjunkie “making a cutting board from scrap wood” tutorial.
Tools you’ll need
- Belt sander (With low grit paper)
- Orbital sander (120 and 220 grit paper)
- Table or circular saw (For sizing)
- Gluing clamps (Sash and F-clamps)
- Hand plane (Optional)
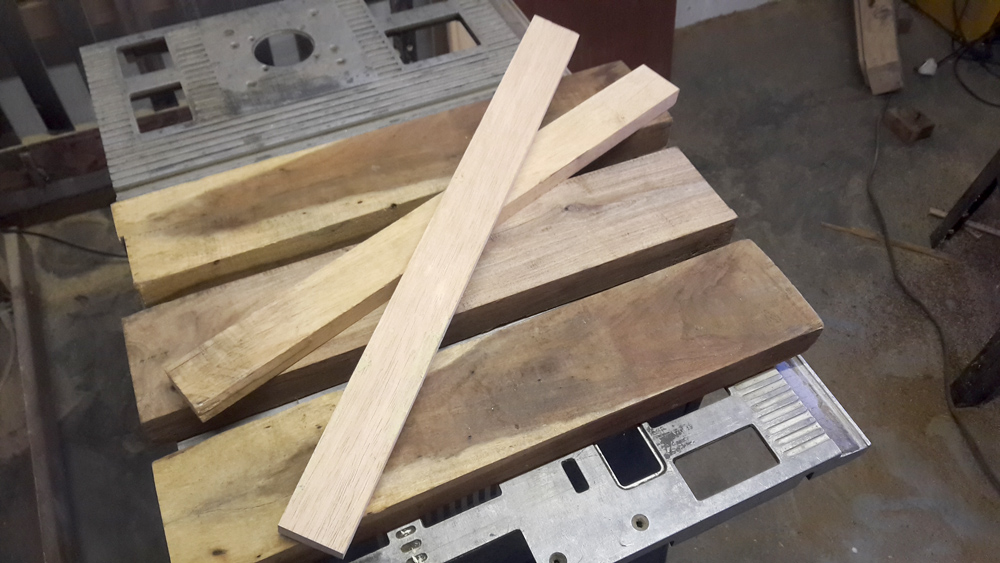
Step 1 – Select the offcuts
From your scrap bin select lumber that would produce an appealing result.
Using more than one type of wood can produce a pleasing collage of colors, grains, and patterns.
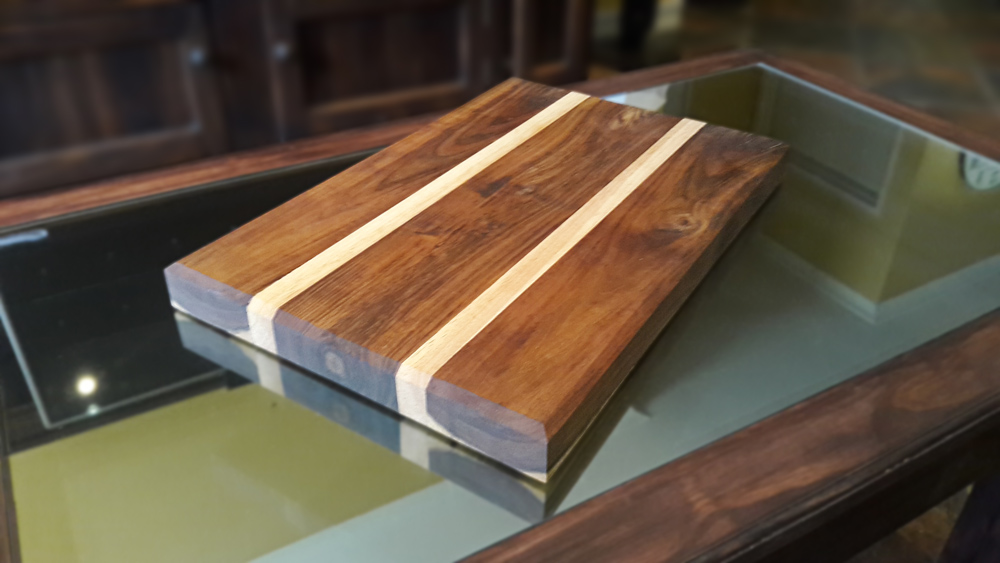
For this tutorial, I used two types of wood namely Kiaat and Oak but any combination of hardwoods can be used.
Decide on the desired dimensions for the board you would like to make.
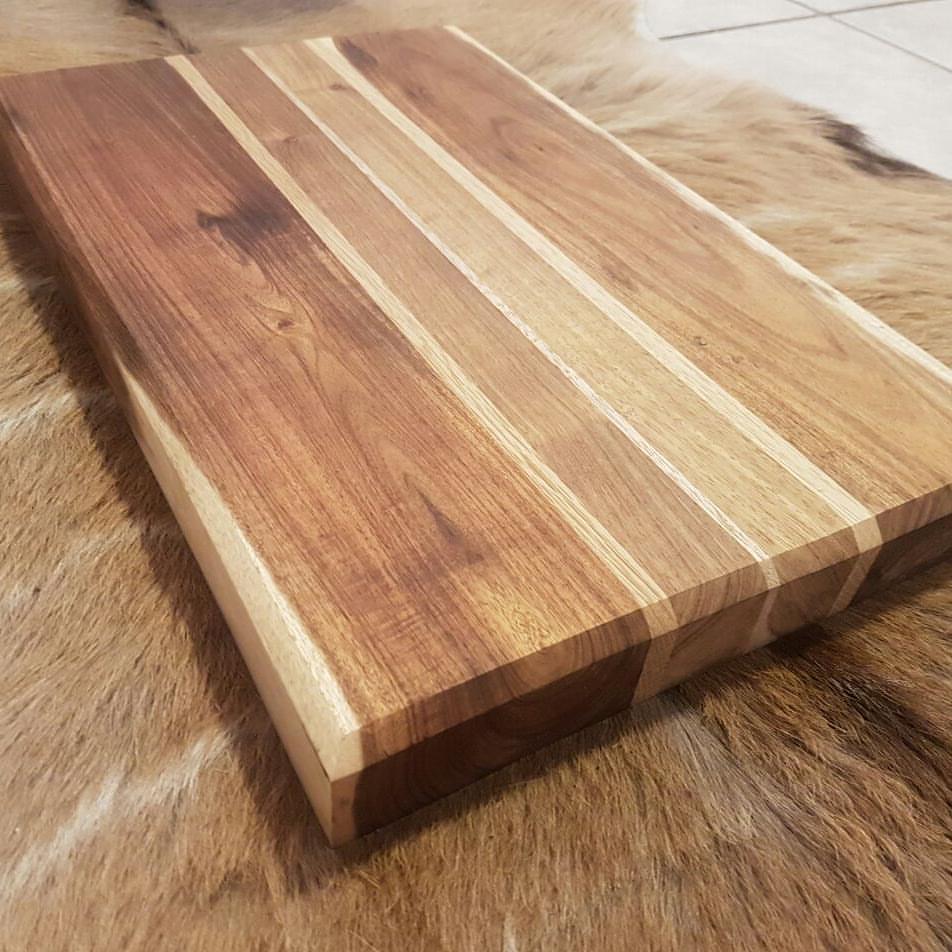
The board I made for the tutorial is 17″ long, 12″ wide and 1-1/2″ thick. (430x300x40mm)
I had 3 pieces of Kiaat in my offcut bin and just ripped two pieces of Oak with my table saw to act as a break between the darker Kiaat pieces.
Step 2 – Glue together
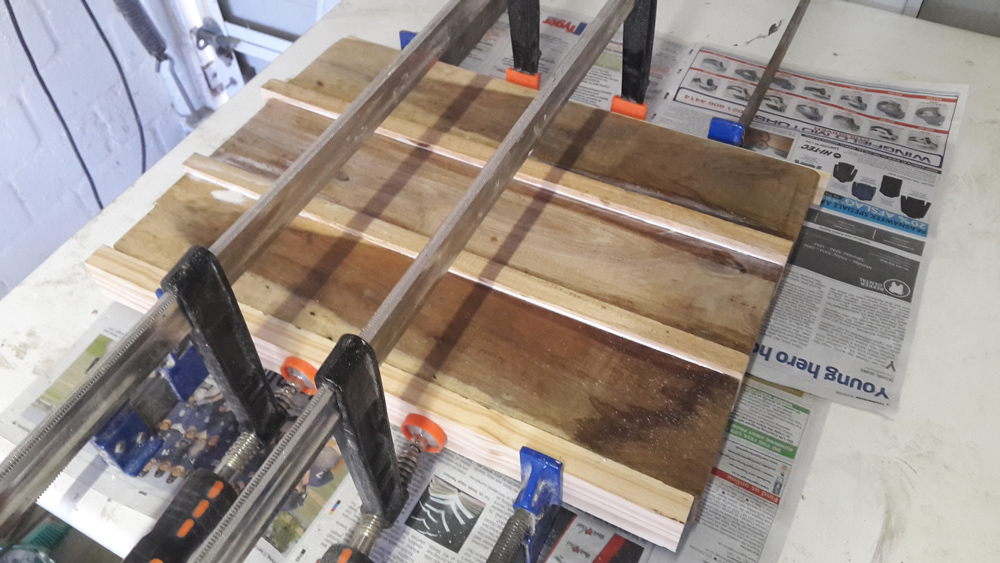
Using a high-quality wood glue and clamps to apply pressure, glue your selection together. The time required to allow the glue to cure correctly will be indicated by the instructions on the glue container. (Different types of glue have different curing times)
When applying the glue be sure to spread it evenly over the entire surface of the wood that needs to bond to the adjoining piece.
Step 3 – Level it out
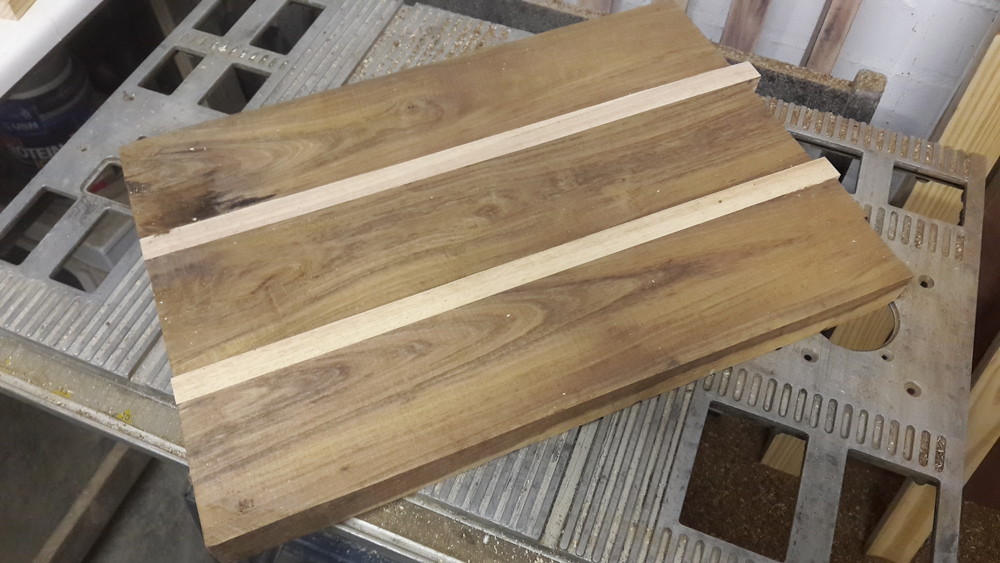
When the glue has cured the board needs to be leveled out. The is ideally done with a hand planer followed by sanding with a belt sander.
If you don’t have a plane, a belt sander and a little bit of elbow grease will deliver close to the same result.
If you are using purchased process lumber a hand planer will likely not be required as all the wood used will already be the same thickness. In that case, a quick run with a belt sander should be all that’s necessary.
Step 4 – Trim the edges
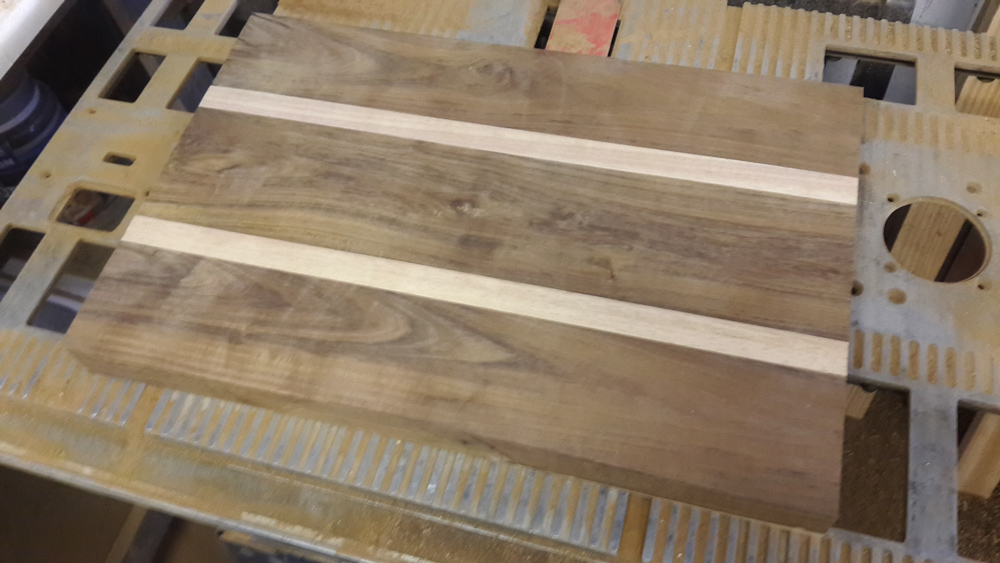
With a table or circular saw, trim the edges to even up and square out the board.
After completing this step your product should start to resemble a crude cutting board.
Step 5 – Cut a decorative edge (Optional)
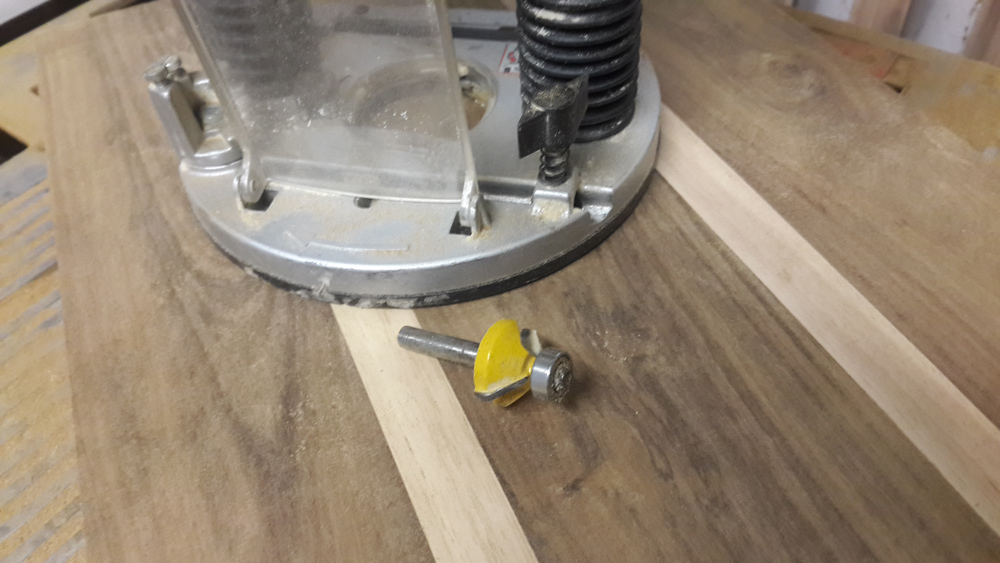
At this point, you might want to consider adding a profiled edge to the more appealing side of the board. This can be done using a router along with a bit that would produce a desirable result.
Besides adding an additional decorative component, it also indicates the top side of the board.
Step 6 – 2 Stages of sanding
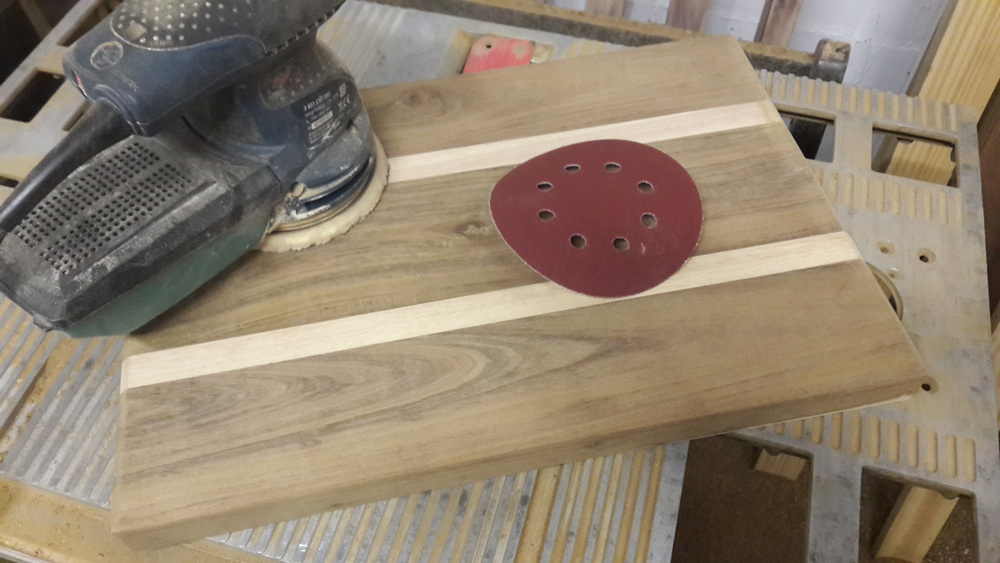
You almost have a quality cutting board.
Using a power sander, start the first stage of sanding with 120 grit paper. This is to remove the most prominent imperfections and blemishes that may be present on your board.
Stage two would be completed using a high grit paper. I used a 220 to get the finish as smooth as possible.
Stage 7 – Treatment
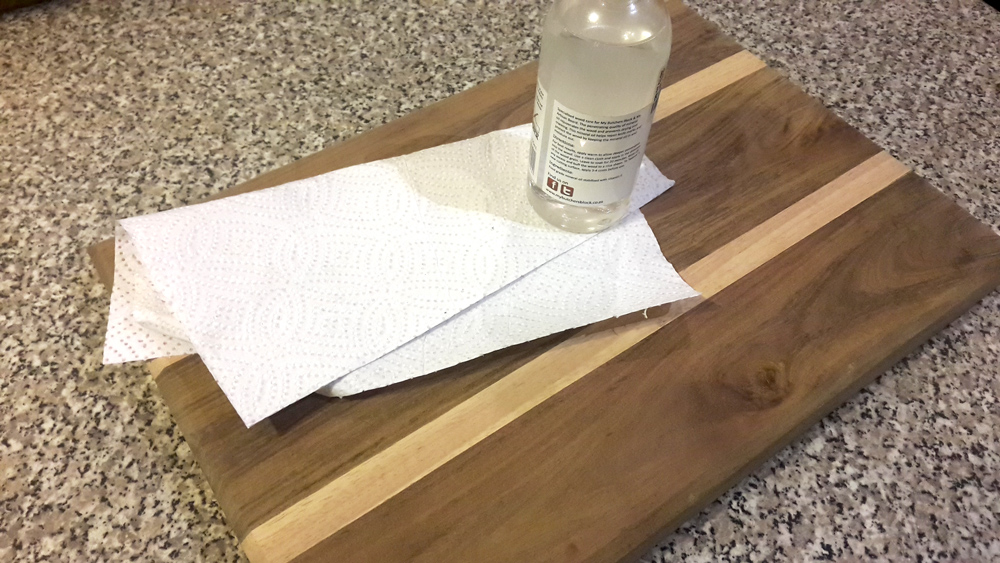
Treating the wood with a clear food grade mineral oil will preserve the wood and accentuate the characteristics of the wood.
The oil can be applied by rubbing it on with a cloth or paper towel.
A few coats may be required depending on the wood you decide to use.
Once again, consult the product directions for more accurate instructions.
 Woodworkjunkie.com, DIY like a pro
If you like the tutorial or have any suggestions we would like to know about it.
Please leave a comment below.
This project looks amazing! I really love it! Your post was well written and easy to understand.
Hello Dawn.
Very happy to hear you enjoyed the post and thank you for the positive feedback.
Jean
I LOVE this post! I am a dabbling woodworker and would absolutely love to make this for my husband, the dabbling chef! Very clear, concise, step by step instruction is very appreciated by someone who wouldn’t otherwise have a very good idea of where to start. Thanks so much for sharing! I look forward to reading more!
Great Tamara.
Happy woodworking
Jean
Dude this is fricken awesome! I never once thought of making my own cutting board, but boy have I found something to do over the summer. I am absolutely a fan of this site, so please send me updates on your latest posts so I can be in the know. Thanks in advance!
Hey John
Very happy that you like the post.
The site is very new and we will be adding a mailing list soon. Feel free to join for updates on new projects.
Happy woodworking
Jean
Hi Jean
Once again, very well written post and easy to follow instructions. This cutting board looks very stylish and will fit in anyone’s home.
Good job
Jaco
Hi Jaco.
Always nice to get positive feedback.
Thanks
Jean
Hi Jean…i really like your website! It wasn’t really a bad considence that i found myself browsinv your website…i did woodwork in secondary school and have always had a soft spot for making my own cupdoards and i always felt like i have lost my touch with the tools.
But with your website i think i can get back to my oldself.
This is indeed my site.