

Floating TV cabinet build tutorial

Whether a beginner looking for their first furniture project or a more seasoned woodworker looking for an easy project to sell, look no further than Woodwork Junkie’s floating tv cabinet.
A beautiful wall mount cabinet that is simple in design and easy to build.
It incorporates a very convenient cavity behind the cabinet that allows for wiring and the mounting bracket to be out of sight.
Power tools you will need:
- Saw for rip cuts
- Saw for cross cuts
- Drill/Driver
- Power sanders
Also:
- A few gluing clamps
Cutting list mm[inches]:
The use of a good quality hardwood that would result in the desired grain and color is advised.
For this cabinet, we used Kiaat wood PAR’ed to a thickness of 20mm [0.8″].
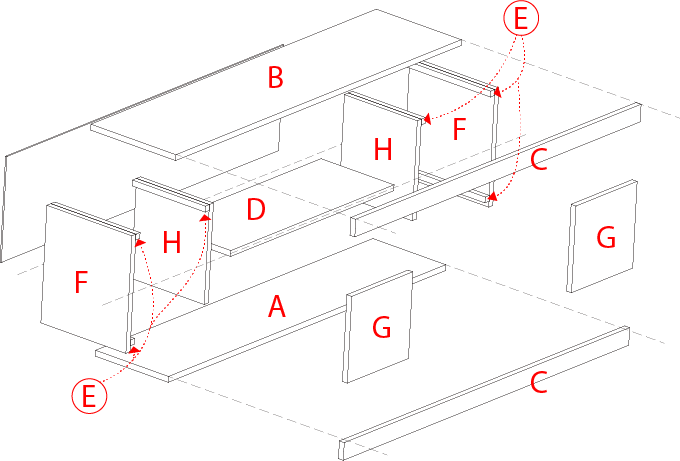
Note that the hardboard back board visible in Fig 3 is not present on the cutting list because the woodworker can either have a full back board or decide to leave the center area open.

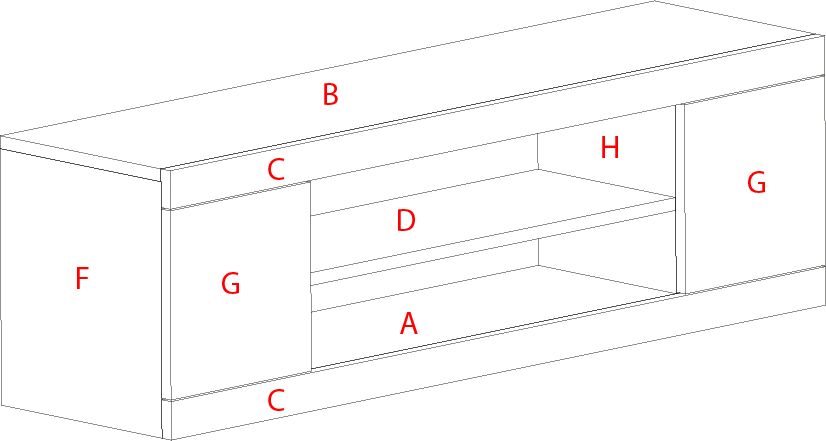
Cabinet assembly diagram
Assembly tutorial
Step 1 – Sizing and preparation of wood for assembly

Source enough lumber to accommodate the cutting list in fig 1.
If you are unable to find the desired lumber in wide enough planks to cut the panels from, you can opt to laminate (glue) two or more planks together to produce the required widths. In this case, however, a jointer may be required.
Cut all the components that will be assembled to make the tv cabinet as per fig 1.
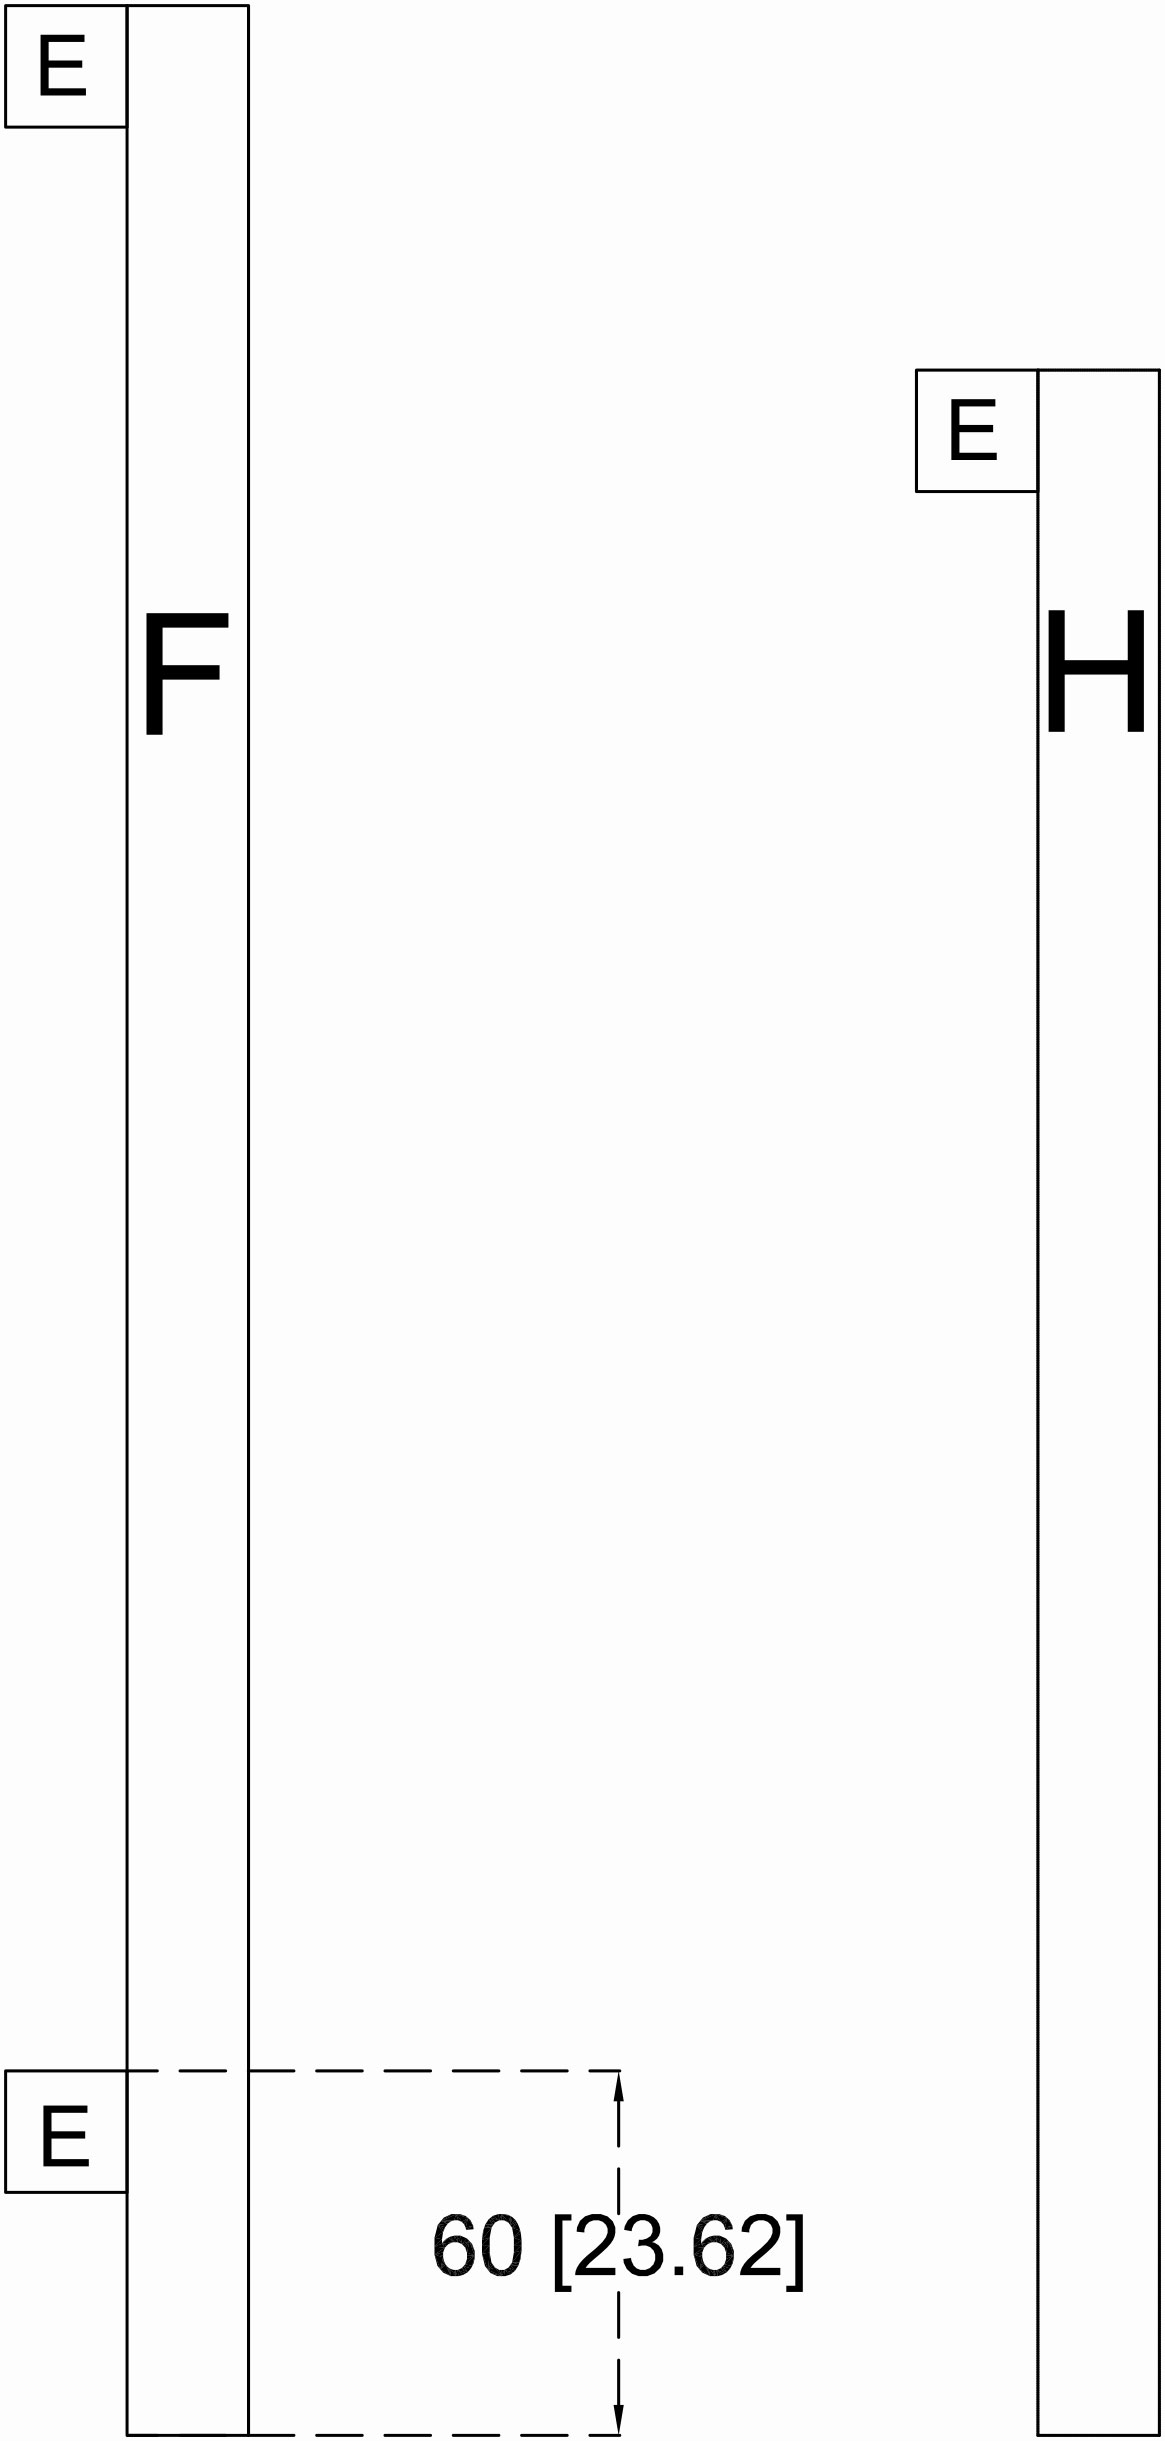
You can also, at this point, fix panels E“, using screws as well as glue, to panels F” and H” as shown in Fig 3 and Fig 4.
Note: The E components become redundant if the woodworker opts to assemble the cabinet using pocket screws. This would dramatically increase convenience but would require a pocket hole jig.
>>Shop for a pocket hole jig<<
Step 2 – Start assembly
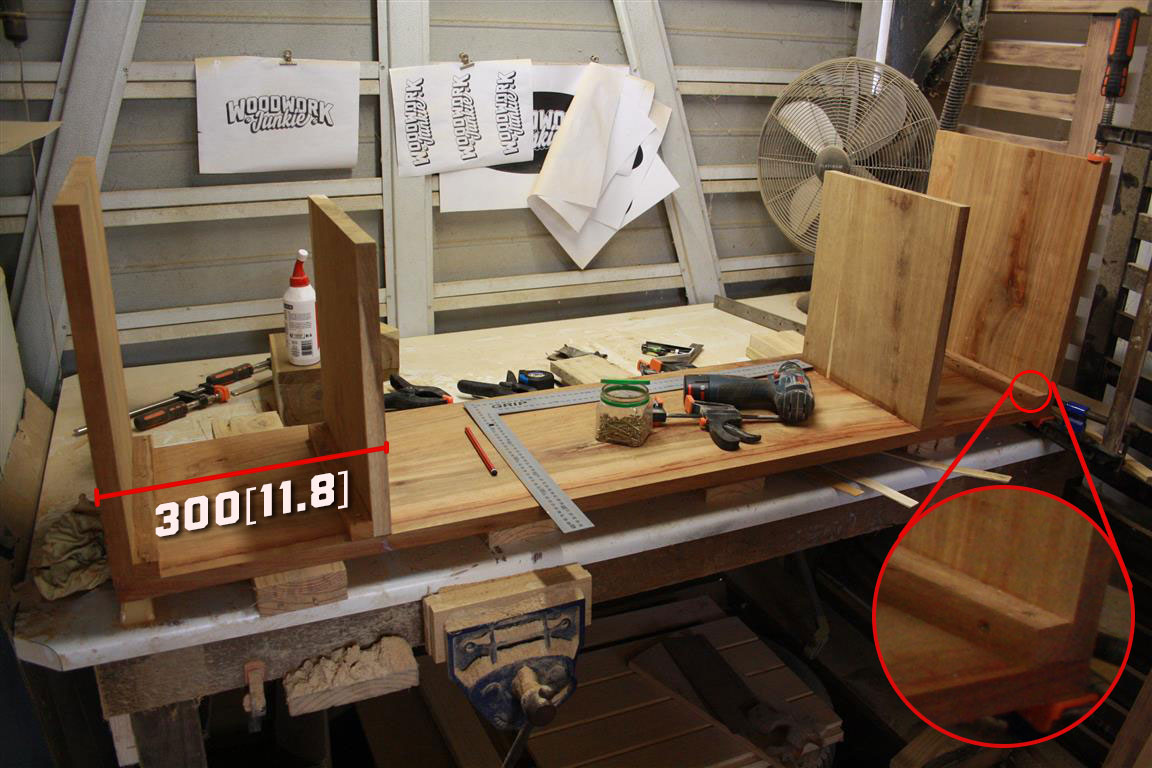
The process of assembling the wall mount cabinet starts with fixing panels F and H to panel B (the top of the cabinet).
This is done by once again using chipboard screws and glue to fix the E components (already fixed to F and H) to panel B as shown in the picture above.
Looking at the cutting list you will notice component H (the inner uprights) being narrower than component F (the outer uprights). This will result in the cavity behind the tv cabinet that will accommodate wiring and wall sockets when the cabinet is fixed to the wall.
Both components F and H are to be fixed to line up with the same edge on plank B as indicated by the picture above. This will be the front of the cabinet.
Step 3 – Fix cabinet base (A)
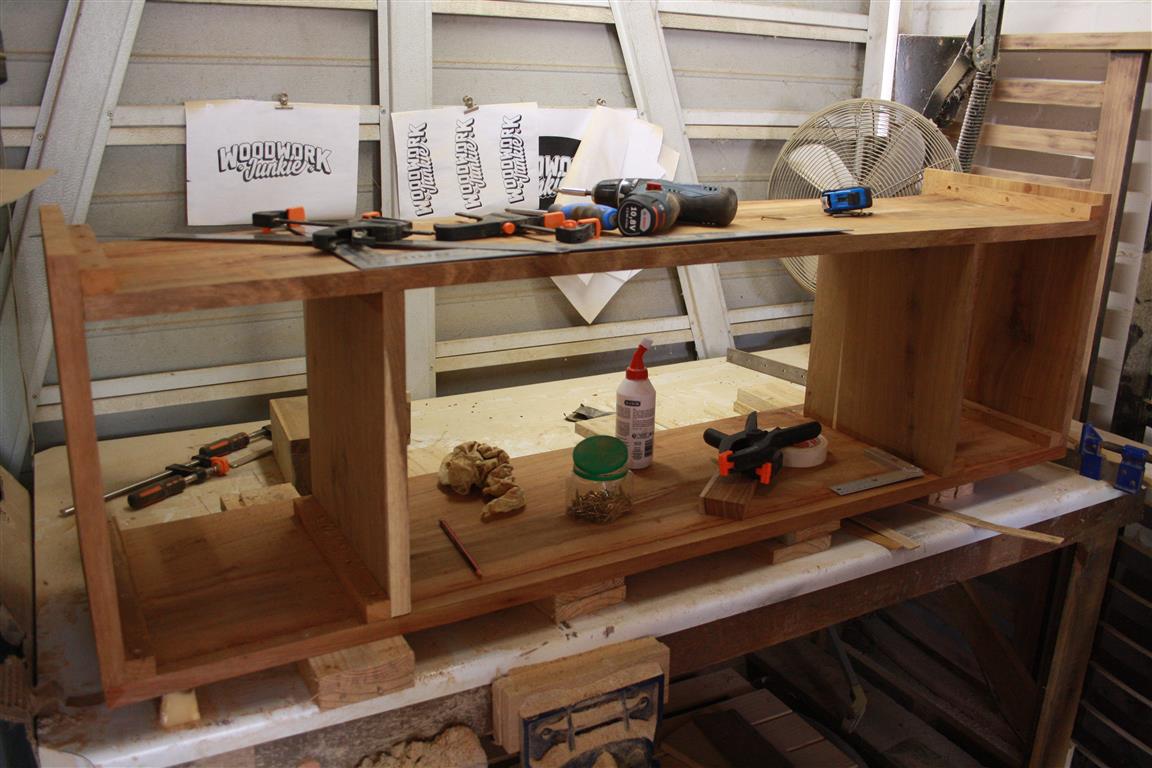
Fixing component A to the already partially assembled cabinet is as easy as turning the cabinet upside down and fixing with screws from underneath.
Step 4 – The face of the cabinet

The main function of the C components is to cover up the fixing points of the assembly and giving the cabinet a more solid, appealing appearance. They are fixed using glue and secured with applied pressure from gluing clamps.
Once the glue has cured the cabinet doors can be added using hinges and fitted with door handles of your choice.
Step 5 – Backboard and shelf

1/4″ hardboard is used for the backboard/s and can be fitted from the back of the cabinet on the inside of the side panels (F) using small nails.
Fitting a full backboard has the advantage of concealing any wiring that is present within the cavity behind the cabinet.
The shelf will be fitted using shelf studs or a similar product. It can simply be nailed into the sides of the panels in a way that would allow the shelf to rest on top of them.
When the backboard and shelf are fitted drill 1-2″ holes in the center of the backboard with respect to the shelf to allow wiring to run from any devices to the now concealed cavity behind the TV cabinet.
The shelf studs are visible in the next image.
Step 6 – Sand and finish
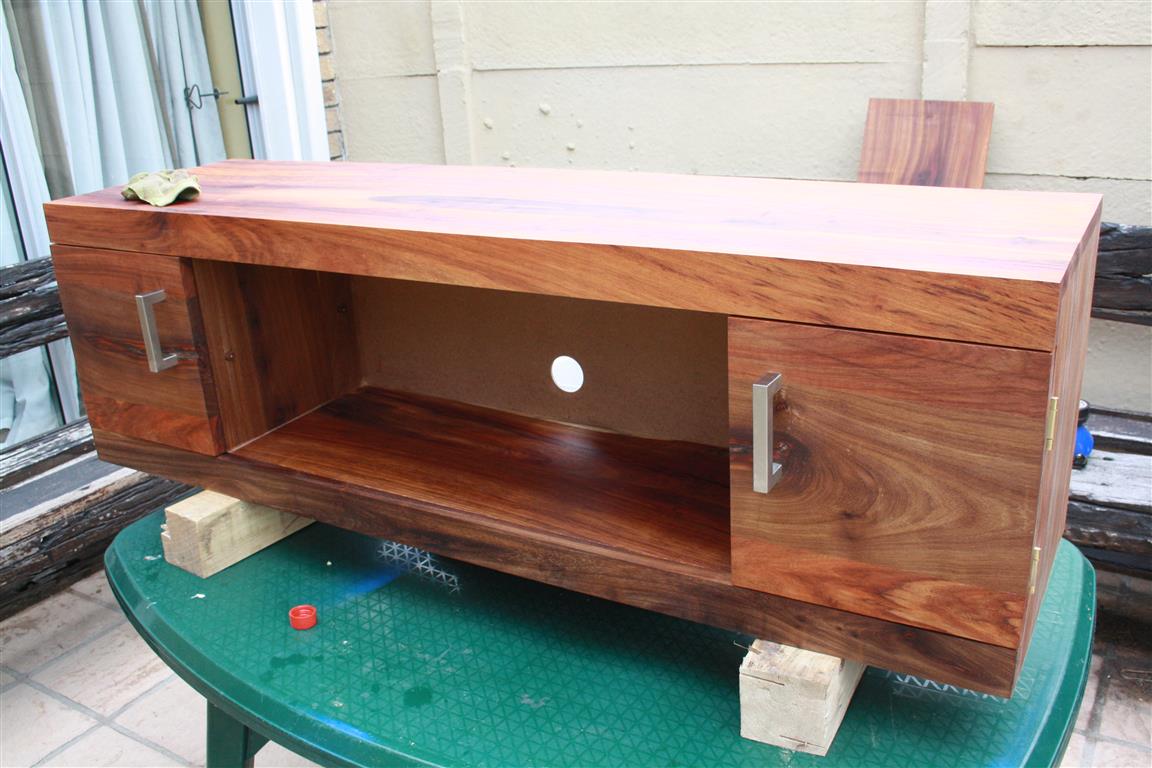
After the assembly is completed use a power sander to sand the cabinet thoroughly by starting with a low 100 grit paper and ending with a 200+ grit paper.
When the desired smoothness has been achieved the cabinet can be treated with a good quality mineral oil the will accentuate the characteristics of the wood.
Finished
The wall mount cabinet is now complete and ready to be fitted using a bracket of your choosing.
A two-part mounting bracket that would allow one component to be fixed to the wall and the other to the cabinet would be advised. This would allow the cabinet to be fitted by simply hooking the bracket that is fitted to the cabinet into place on the bracket fitted to the wall.
Being a woodworker myself, I had to check this out when I found out about it.
Nice piece of work and very well presented in the post. Being visual, I really appreciated the pics and diagrams.
What did you do the drawings in? I’ve used SketchUp a little, but yours looks like they were done in something else.
Great job! I’ll be checking out your stuff again.
Hey Keith
Thanks for stopping by. I;m glad you found value in the post.
I generally make these drawings with software like AutoCAD but will soon be moving over to Sketchup for the drawings used on the site.
The reason for this is that instead of myself, my associate will soon start to do the drawings.
Do stop by soon.
Jean
Thanks for sharing Jean. My uncle loves to make his own cabinets and what not! So I will definitely show this to him. Looks like a great piece of work.
Hey Rob
Thanks for your comment.
Stop by again soon as we have new content posted regularly.
Jean
I’m looking for a tv cabinet and found your site on building one here. The price of a cabinet is so expensive and now i’m looking on the option of building my own. Looks like it is not that hard to construct a TV cabinet on my own. How long have you spend on building this?
Hey,
If you follow the instructions then you shouldn’t have a problem. Our site is built for beginners so all our projects are developed with beginners in mind.
The cabinet in the tutorial took about a day to build minus the glue curing times.
We will likely be adding a video of a similar build soon that would also give more clarity.
Jean
I’ve always been in love with cabinets made out of wood, and I must say that you’ve done a mighty fine job with this one! First and foremost, thank you very much for outlining everything in a step-by-step manner, it helps newbies like me get it done easy and effortlessly. Great job and keep up the good work.
Hi Brandon
Thanks for the comment and the compliment.
Making our tutorials transparent and easy to follow is our no.1 priority. We realise how confusing projects like these can become. Especially to a more inexperienced worker.
Stop by again soon.
Jean
Very interesting article, Jean! Good work with the presentation. I loved how you are pointing all the details and describing with pictures. Great job!
Hey
Thanks for stopping by and for commenting. We’ll have more builds coming soon.
Jean
Dear Jean, As one who does not even do well with a hammer but creates in my mind… I truly appreciated the complete walk through step by step. It gave me the confidence to think I could do this. Thank you for making this so informative and easy to follow.
Hi Ariel
No problem at all. We try to make our tutorials as easy to follow as possible and I personally believe showing someone something is much more effective than telling them.
Jean