

Drill and router bit organizer build tutorial and plans
Making the most of a small woodworking workshop has to start somewhere.
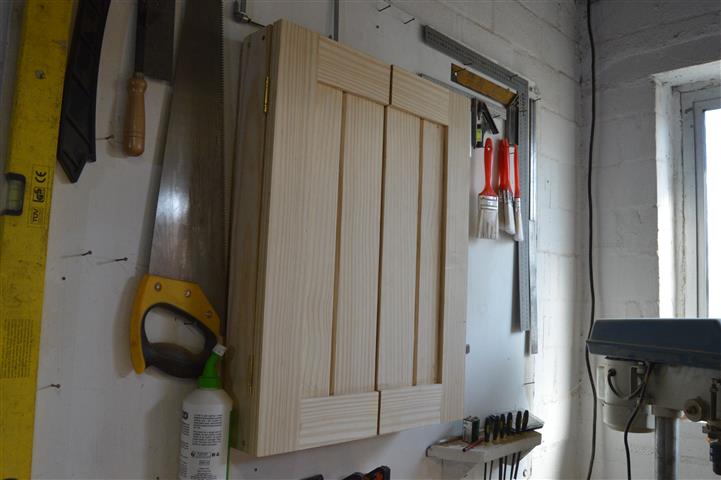
Why not start by organizing and storing the range of bits laying around our shops in a convenient wall mount drill bit holder and save ourselves the frustration of trying to find the right drill bit in the cluttered space that is our workshops.
The beauty of this drill bit holder is the folding trays. The folding tray mechanism is achieved by fitting the trays on a pivot and adding a spring-loaded cam to change the angle of the tray when the door is opened. This is to allow storage of bits not just in columns but also in rows which allows for easy access to all bits and optimizes space.
(Watch above video for building procedure)

What you’ll need – Lumber cutting list
Lumber cutting list is based on standard PAR’ed pine and chipboard sizes.
In addition to the lumber for the project, you will also need a spring that can fit in a 10mm hole. The spring needs to be strong enough to push the cam up and tilt the trays. (Refer to video)
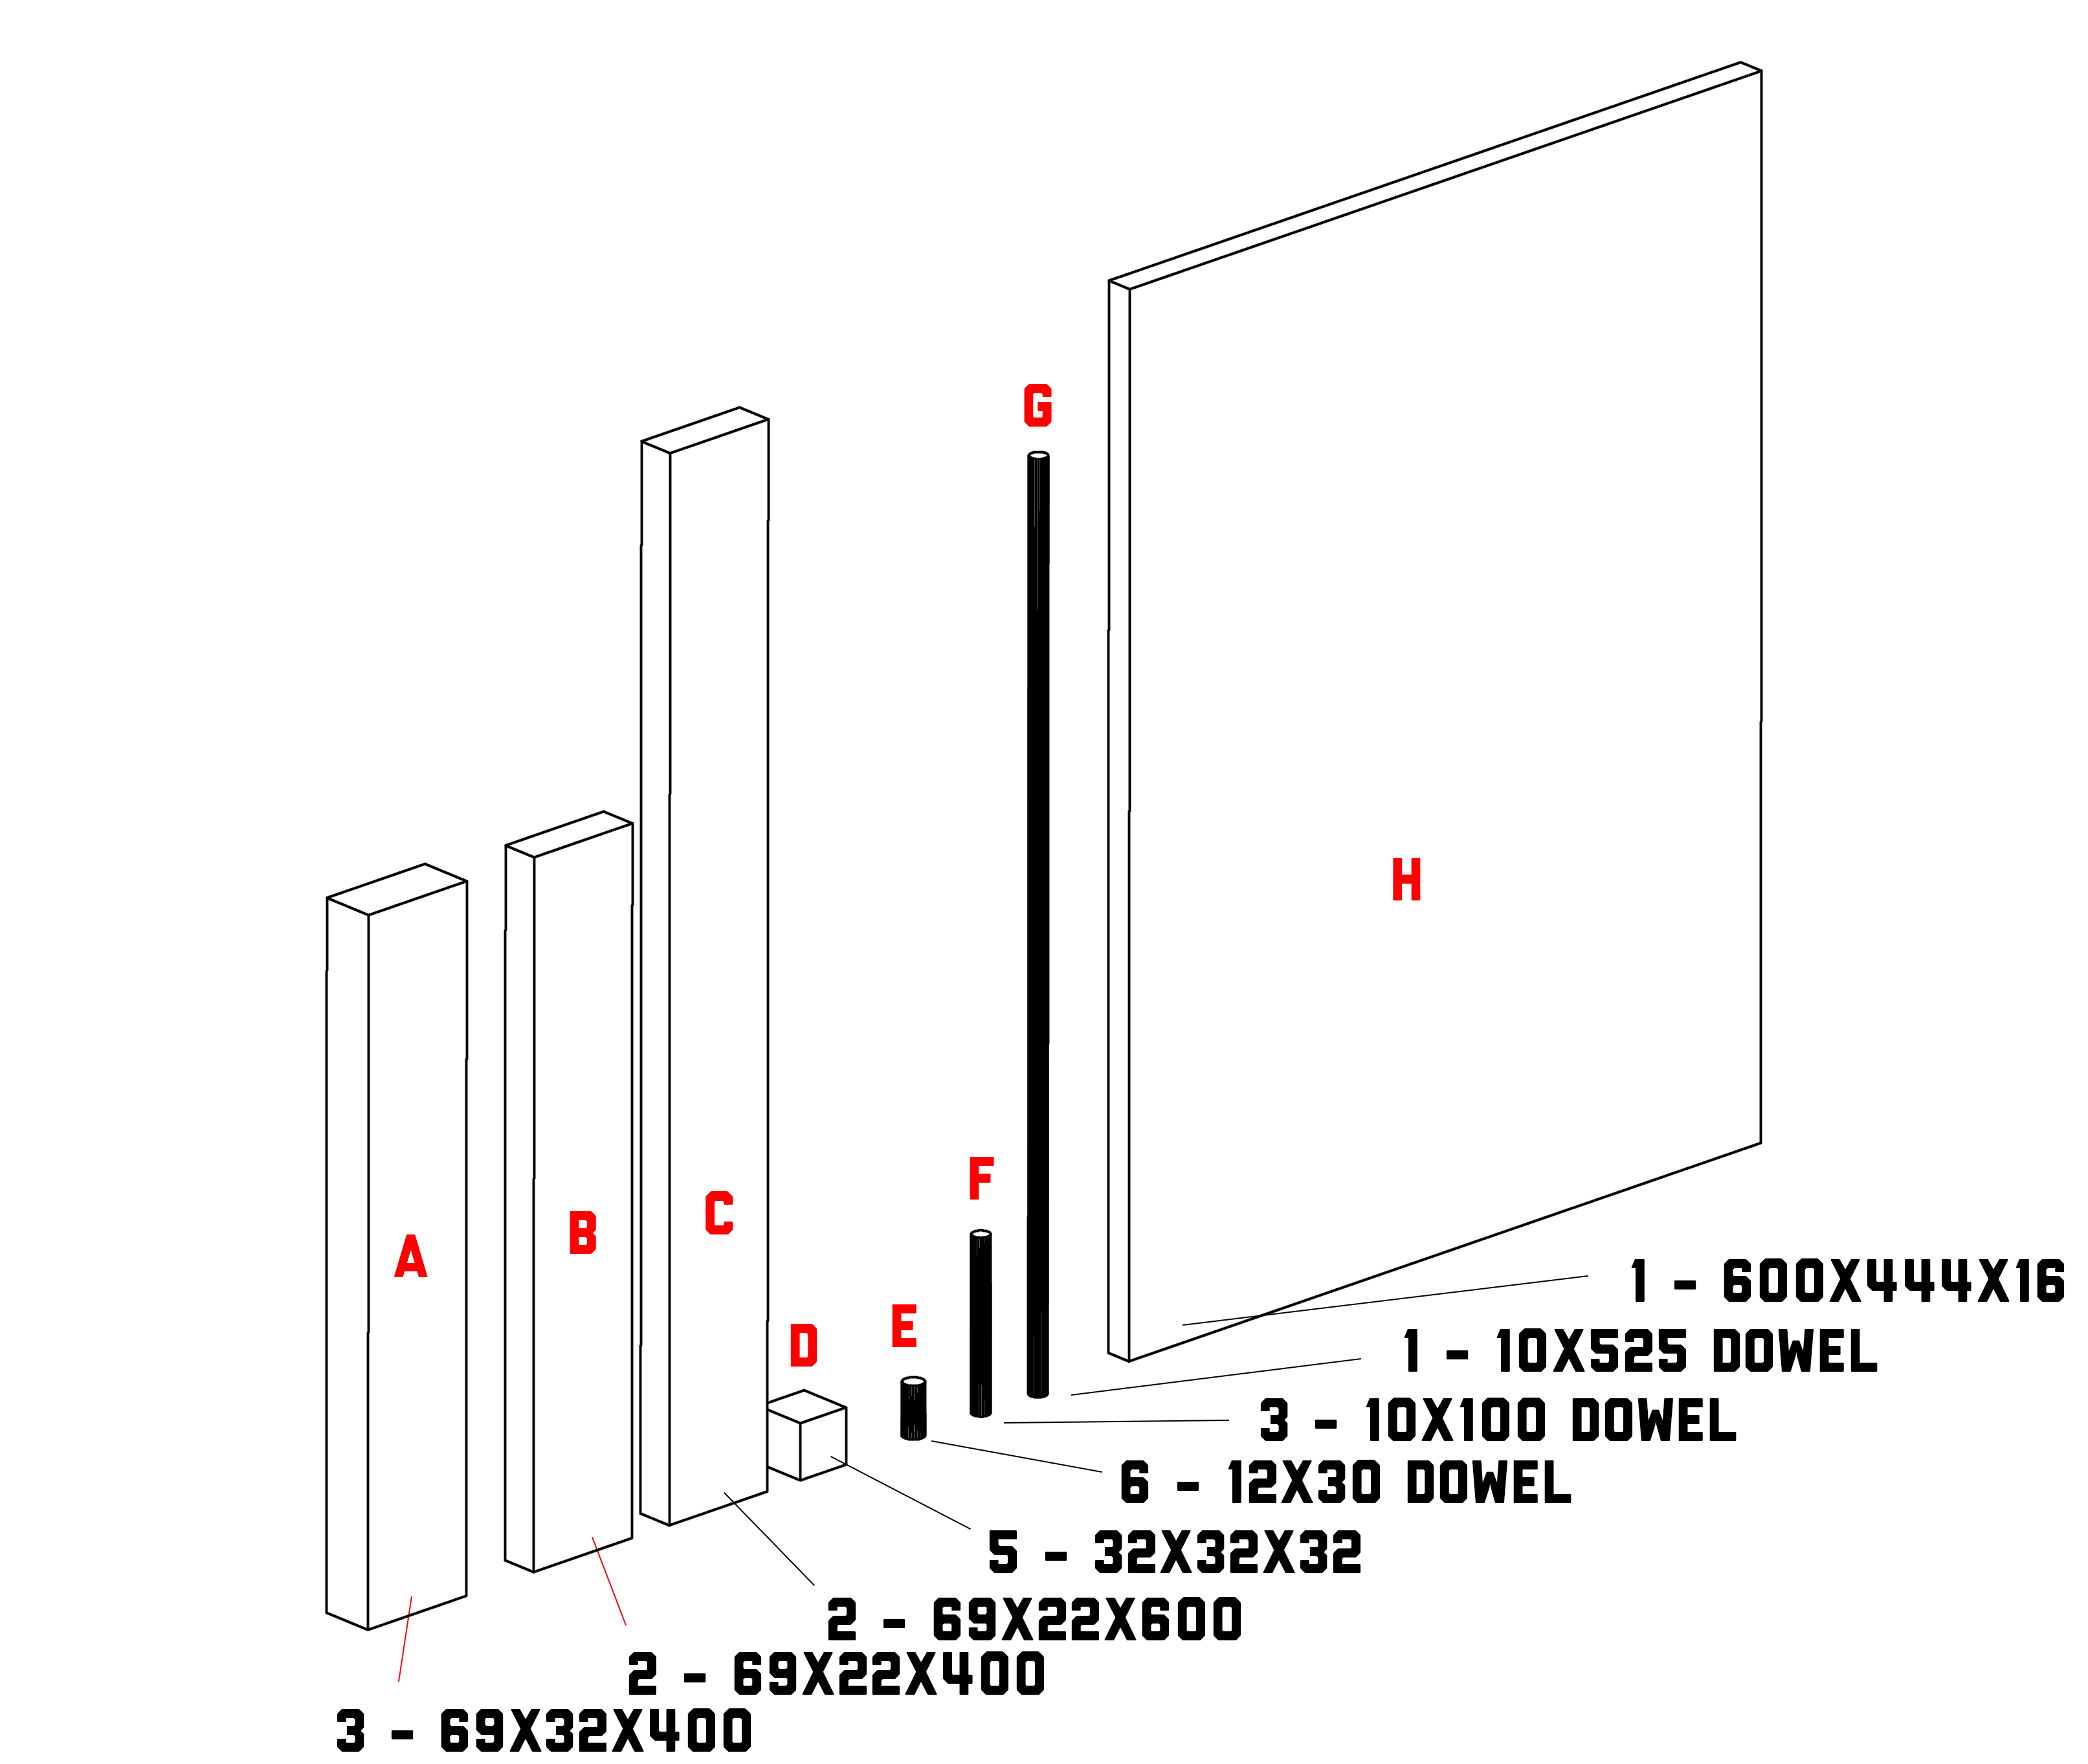
NOTE: Cutting list of cabinet doors are NOT included as the woodworker can opt for a different look and feel for the door.
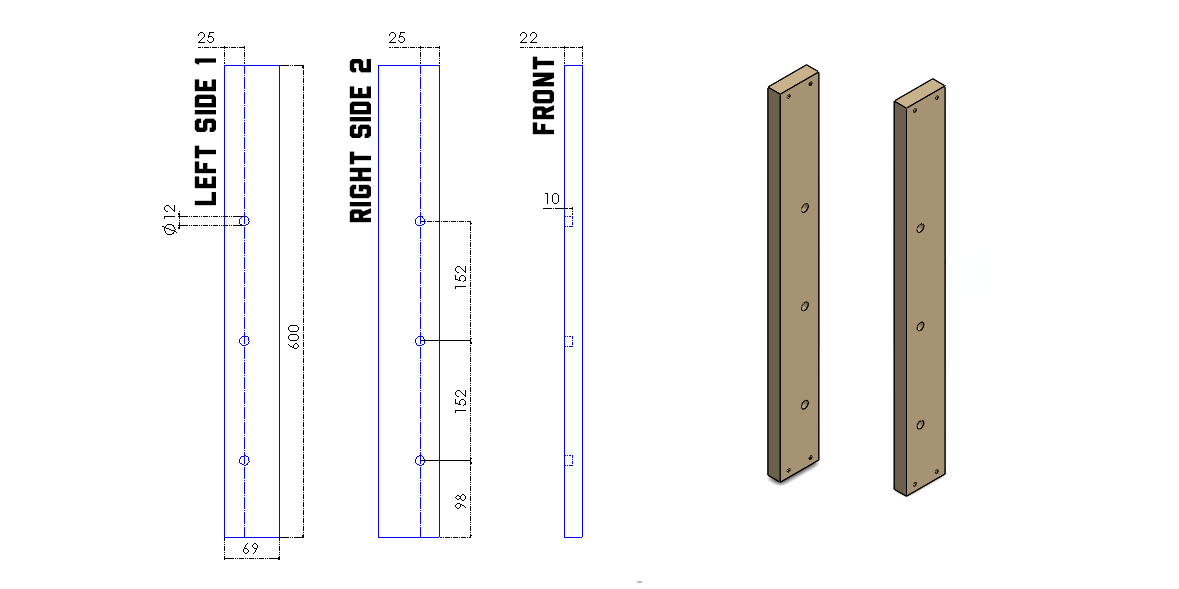
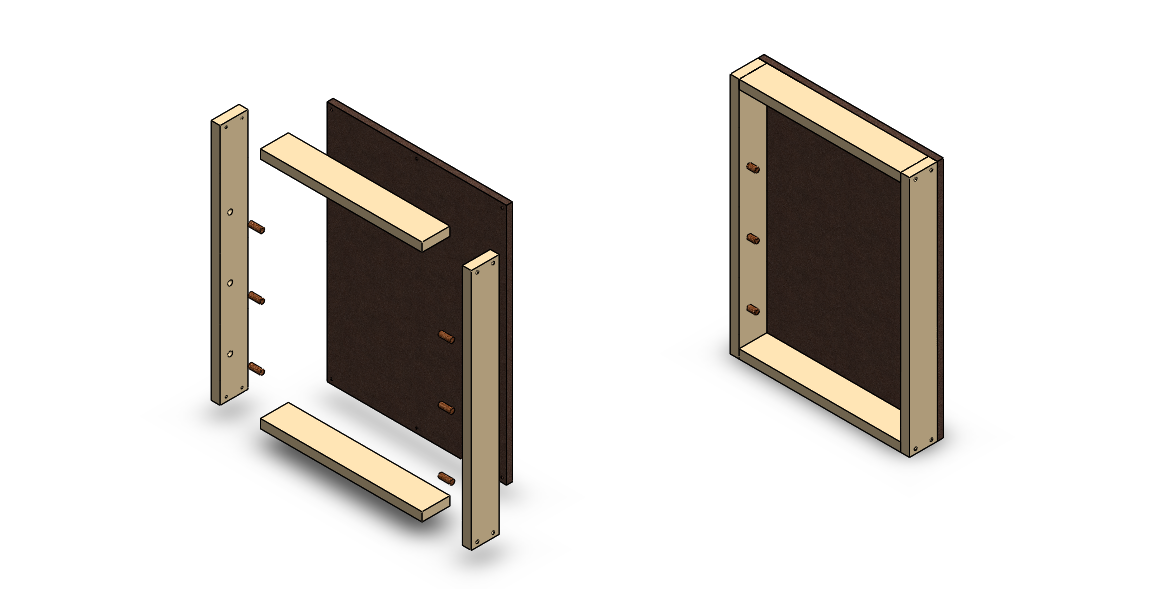
Component prepping – Box sides (uprights)
Prepare the two cabinet box side uprights (C) by drilling the holes into which the six 12mm dowels (E) will be glued. This will be the pivot point for each one of the three trays.
The holes are drilled at a depth of 10mm.
Keep in mind that the orientation of the holes on the left upright and the right upright are different as shown in the diagram below.
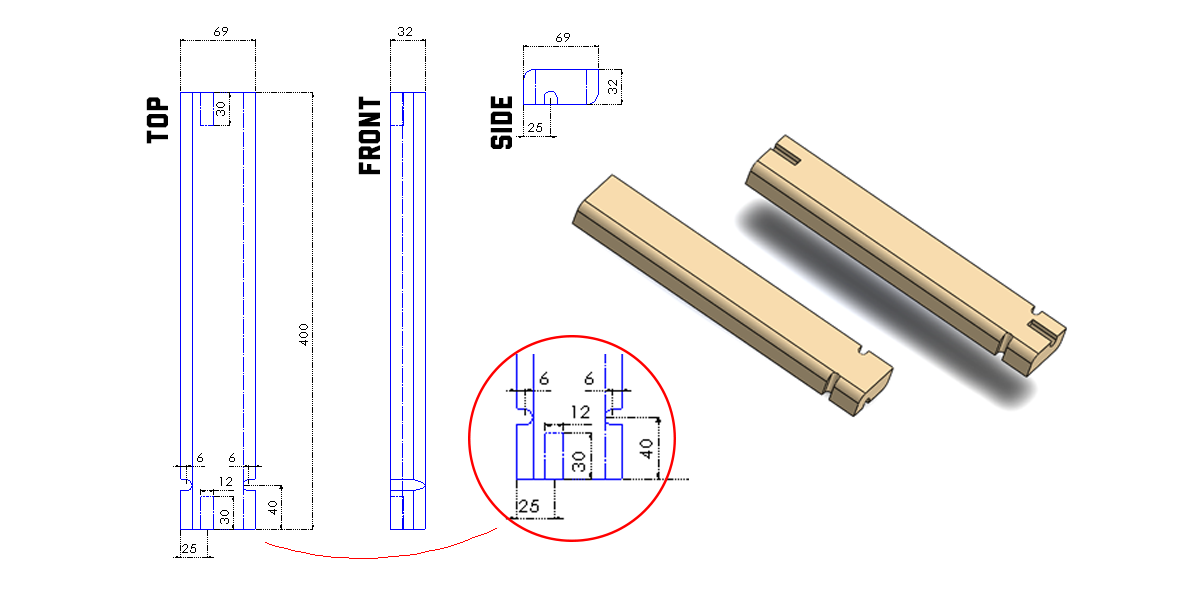
Trays
The three trays are prepared using the “A” components on the cutting list.
Make the cut-outs as indicated by the diagram using a router with the appropriate bit.
Also, use a router to fillet the top front and lower back edge of the tray. This is done to prevent the tray from jamming against the backboard when the tray is being folded down.
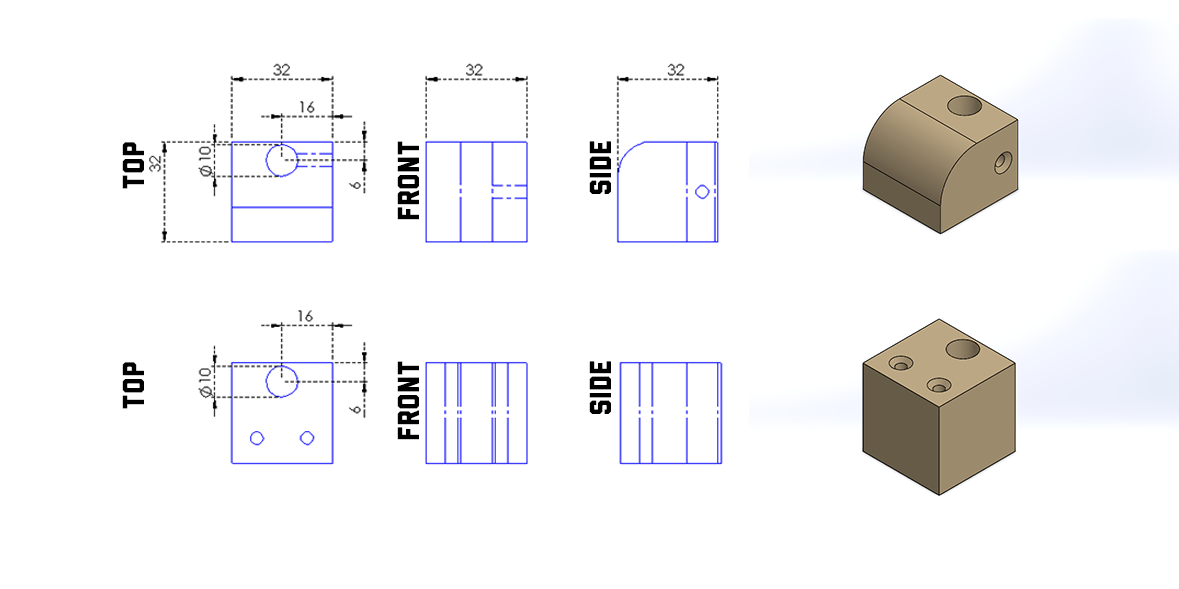
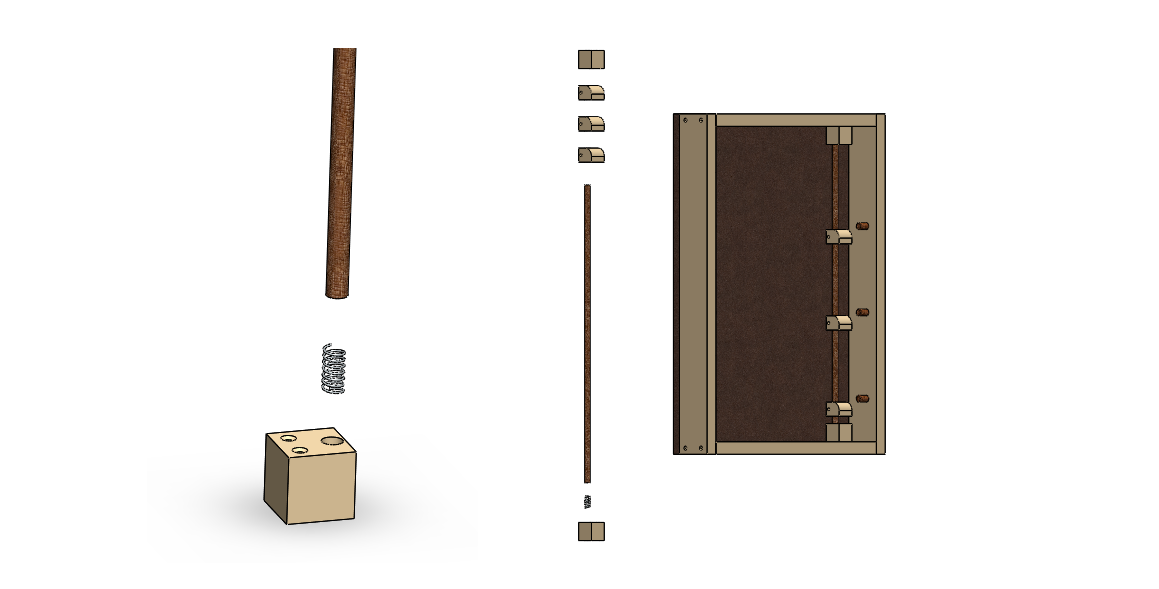
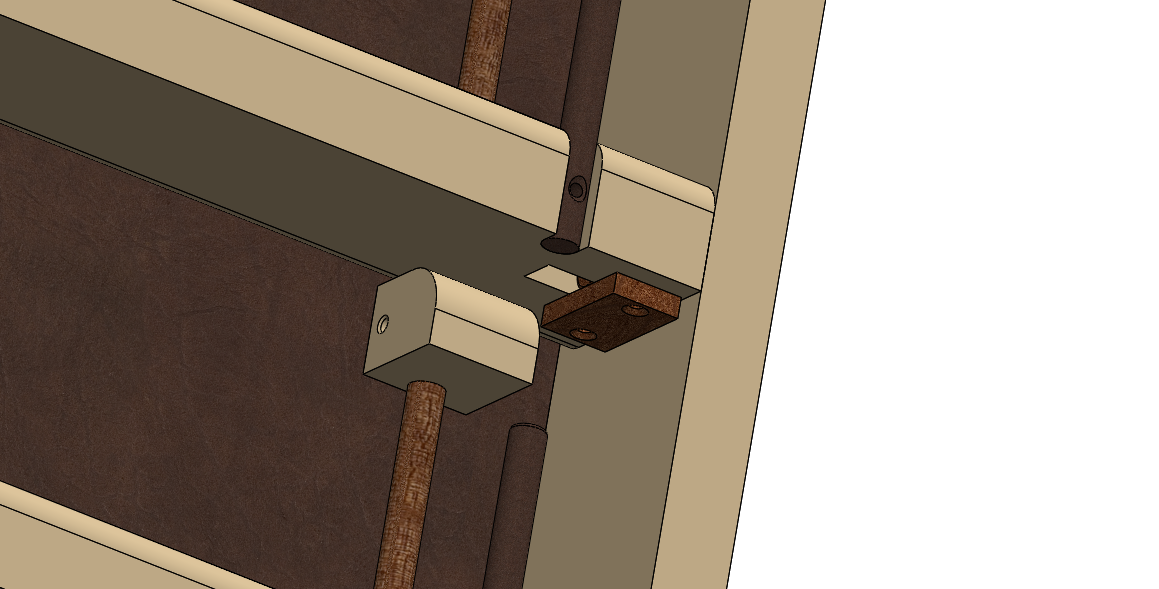
Cam blocks
Three of the “D” components will be prepared to look like the first block on the diagram below. The remaining two “D” components will be prepared like the second block on the diagram.
The first block (three of) will be attached to the camshaft and will act as push blocks, pushing the trays into their tilted position when the doors are opened.
The second block (two of) will be attached to the bottom and top of the box to house the camshaft and facilitate the movement of the shaft from its lower position to its upper position.
Assembly – Step one – The box
Assemble the box as indicated in the diagram below.
Glue the six pivot dowels (E) into place on the already prepared “C” components.
The “C” components will then be assembled along with the “B” components using screws to make up the box frame.
Thereafter the backboard “H” can be attached from the rear using screws.
Step two – Fit the cam
When installing the cam, fit the block that gets fixed to the bottom of the box first.
Place the cam spring inside the hole of the lower block, insert the cam on top of it, and then fix the top block also. (The cam spring should not be longer than 10mm when compressed and should have enough force to lift the trays even when they are loaded with bits)
Test if the cam is moving correctly by manually pushing it down and observing if the spring returns it to its top position.
After this, the push blocks need to be fixed to the camshaft in their correct positions.
This is done by pushing the camshaft down to its lower position and then fixing each of the push blocks so that the top of the push block lines up with the lower part of the corresponding pivot dowel. If the push block is lined up correctly, the tray will be leveled when installed as the tray will be supported by the pivot dowels and push blocks only.
Step 3 – Tray fitment
After the cam has been installed the trays can be fitted. It would be wise to drill the bit holder holes into the trays before installing them into the cabinet.
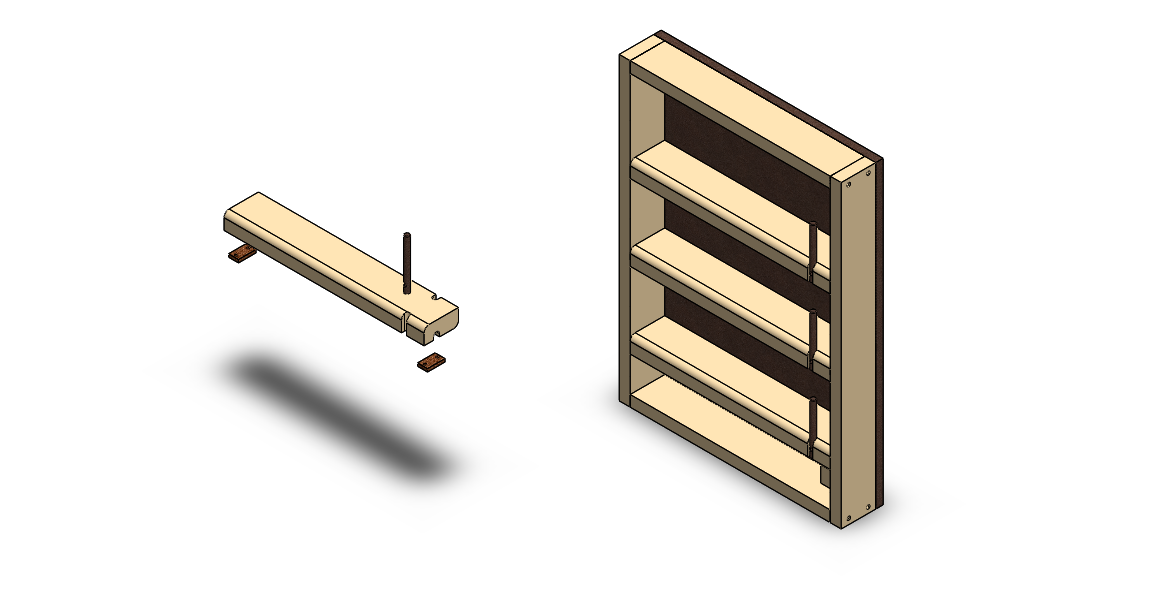
To secure the trays in place, use a piece of hardboard or steel plate as shown below.
Attach stoppers in the form of galvanized profiles or even just wooden stopper blocks to prevent the trays from tilting too far forward.

Final step – Fit door/s
In the final step, the door or doors can be fitted to the box.
In the case of a single door, it is important to fit the door hinge on the same side of the box as the tray lever dowel. This is done so that the door will push against the lever dowels before touching any of the bits.
The cabinet can then be fixed to the wall and the drill bits added.
Thank you for this info! I’ve shared it with my husband, he’ll love it!
And thank you for stopping by and sharing the content.
Jean
Another amazing tutorial!!
The video really makes it easy to visualise the how the various parts fit together. Would it be possible to use a router on the piece of wood that the cam blocks are made out of before cutting into 32mm pieces!?
I don’t have one of those band/coping saw things.
Hey Anthony,
You can absolutely use some other method to shape the push blocks. A router or maybe a handheld coping saw, whatever works for you.
Cheers
Jean
OMG, this is such an amazing and informative article with easy steps to do it. One of my friends wanted to build one, and I am going to share this with him for sure. You are an amazing writer that’s why you have explained every bit in a very simplistic way.
Hi Sarah,
I do try and keep the tutorials as simple as possible to make them easier to follow.
I have found that overly complicated explanations can often discourage beginners and that goes against what this site is trying to achieve.
Jean
Great plans and site. Thanks. I would love to have a shop to permanently mount my bits but not for another year or two. Till then I’m stuck lugging them around with me and of course losing some. But I have bookmarked this so I can build it once I have my shop.
Hi George,
Having a workshop is indeed a luxury for some. Myself included.
Hope you get to have you own space to tinker and make soon.
Jean
Hi Jean! I just have to say that this is a fantastic tutorial! As for someone who is very visual this post helps immensely. I appreciate all of the detail that you have added. Those diagrams and step by step instructions help so much. You are a true craftsman. Thanks for sharing your knowledge. I look forward to future tutorials.
Hi Colleen,
I’ve always found that the best way to teach someone is by showing them as opposed to only explaining something to them.
This is especially true when it comes to something like woodworking. That’s why I try to add as many diagrams and photos to all my tutorials as I can.
Jean
That is one great tutorial on how to fit a cupboard to the wall. In the past my DIY skills have been a bit of a flop, but if i need any future tips i shall definitely come back to your site.
Thanks for stopping by Andrew.
Best of luck with your future DIY endeavours.
Jean
Love this project. Your videos are very inspiring.
XThis is a great solution for storage and spacesaving. The question is: Do you have a drawing? Thank you very much.
Frank Kwaaitaal – Holland
Scroll eens naar boven Frank en klik op meer weergeven, daar staan alle componenten inclusief bemating afgebeeld, simpeler kan het niet :-). Good luck.
A really great design which goes well beyond the simple ‘block of holes’ concept. Congratulations on a smooth video and presentation. The plans presented here along with the video make it really simple to follow.
Congratualtions Jean and thanks for your altruism in sharing this with the rest of us – an inspiration,
Cheers
Ray
Whooaa! brilliant project mate; maybe a little complicated for an old block like me those days.
I also love the way you have built your saw table which disappear to access other table.
👍👍👍👍👍👍
Jean, this needn’t require a reply, but…
Have you considered having a “compact” version of these blog posts into a consolidated, downloadable PDF file? For various members using disparate web browsers, the “Print to PDF” options available may have, shall we say, Various Effects from Advertisements on the final product of the PDF. A Pre-Configured PDF which is missing those “blocks” of Ads would, in the end, be a more consistent result for all of your readers & those (perhaps not so tech-friendly) just-starting-out woodworking hobbyists.
With Supply-Chain collapses, wood price increases, and simply the heavy learning curve that some folks experience as they start out in this hobby, trying to deal with all of that on top of their browser’s HTML-PDF conversion algorithms spitting ‘goodness-knows-what out as a PDF format’ is perhaps one thing, at least, that you might be able to ease their journey into the hobby which we collectively love.
(sorry if this was too verbose, when I’m in “stream of consciousness” mode, I can wax loquacious…)