
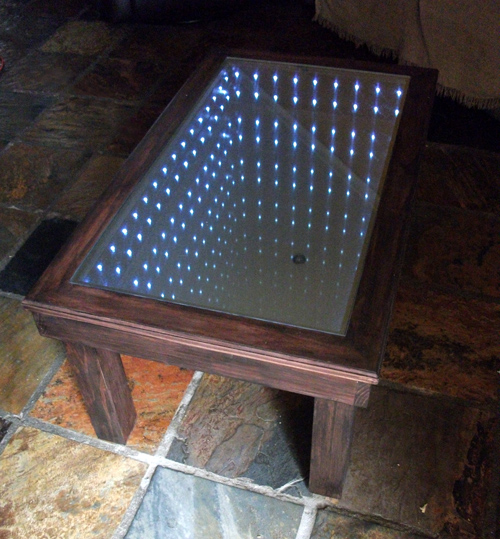
 Stare into infinity…
An infinity mirror is an object that incorporates the reflection of light inside a mirrored box to produce a quite spectacular illusion.
The illusion is obtained when bouncing light between two reflective surfaces while one of these surfaces is slightly transparent. The transparent surface allows the observer to view this movement of light from outside the box and so creating the illusion of staring into infinity.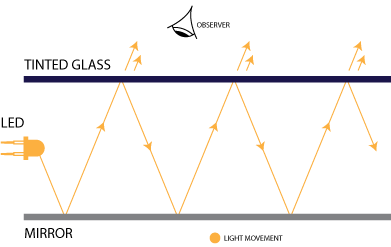
In this Woodwork Junkie tutorial, we will be using this illusion to build an infinity mirror coffee table.
Note, this project incorporates an electrical component.
Tools you will need:
- Saw for cross cuts and miter cuts (Ideally a miter saw)
- Router with 1/2″ wide straight bit and 1 profiled bit for edge (optional)
- Drill with bits
- Jigsaw
- Power sander/s
- Glue gun

The material you will need
We always encourage our readers to place their own spin on things.
Don’t feel limited to these dimensions, build it your way.
Wooden components:
- 1 x 3 (19 x 64mm) for top frame and box
2 x 19-3/5″ (500mm)
2 x 35-2/5″ (900mm)
2 x 21-3/5″ (550mm)
2x 36″ (910mm) - 2 x 3 (38 x 64mm) for table legs
4 x 15-7/10″ (400mm)
4 x 13-1/5″ (335mm) - 33-4/5″ x 19-3/5″ (860 x 500mm) Fiberboard 3/4″ thick
- A sheet of 1/4″ thick fiberboard
Infinity components:
- 1/4″ glass for table top
- Mirror
- LED strip
- Mirror tint
Step 1 – The Box

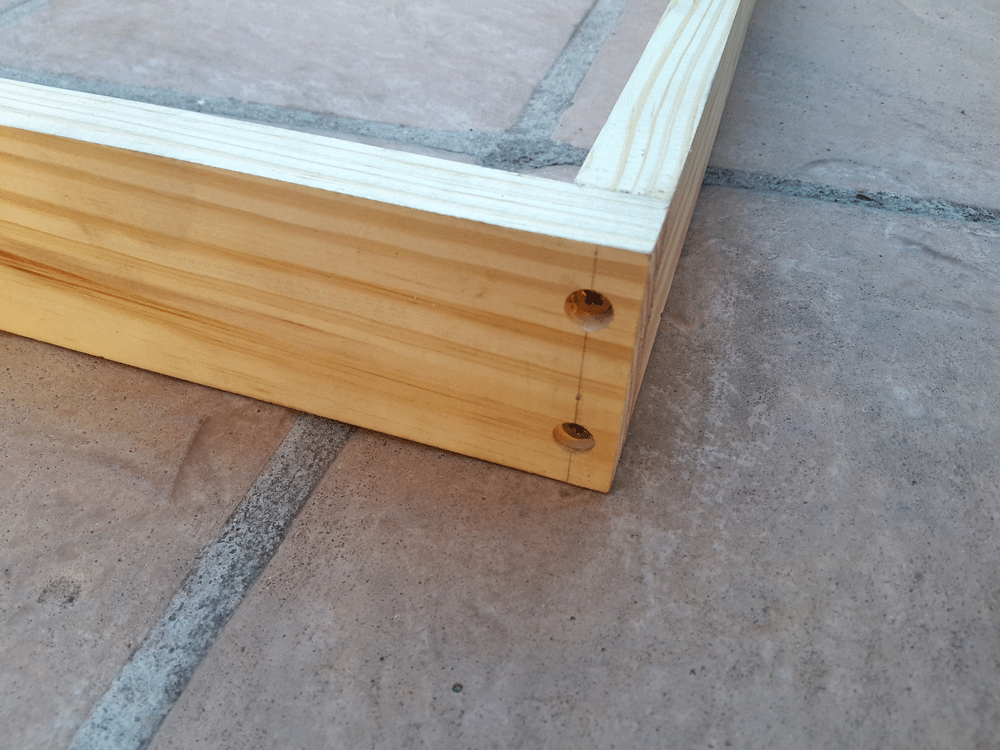 Cut 4 planks (1 x 3 – 19 x 64mm) and assemble using countersunk screws.
For the tutorial, we used 2 x 19-3/5″ (500mm) and 2 x 35-2/5″ (900mm) lengths and assembled as shown.
Ensure the frame is square by checking it with a framing square and measuring it from corner to corner. (Top left-hand corner to bottom right as well as top right to bottom left should be the same distance)
Once squared fill the holes with a matching wood filler and sand the outside of the box.
Step 2 – The legs
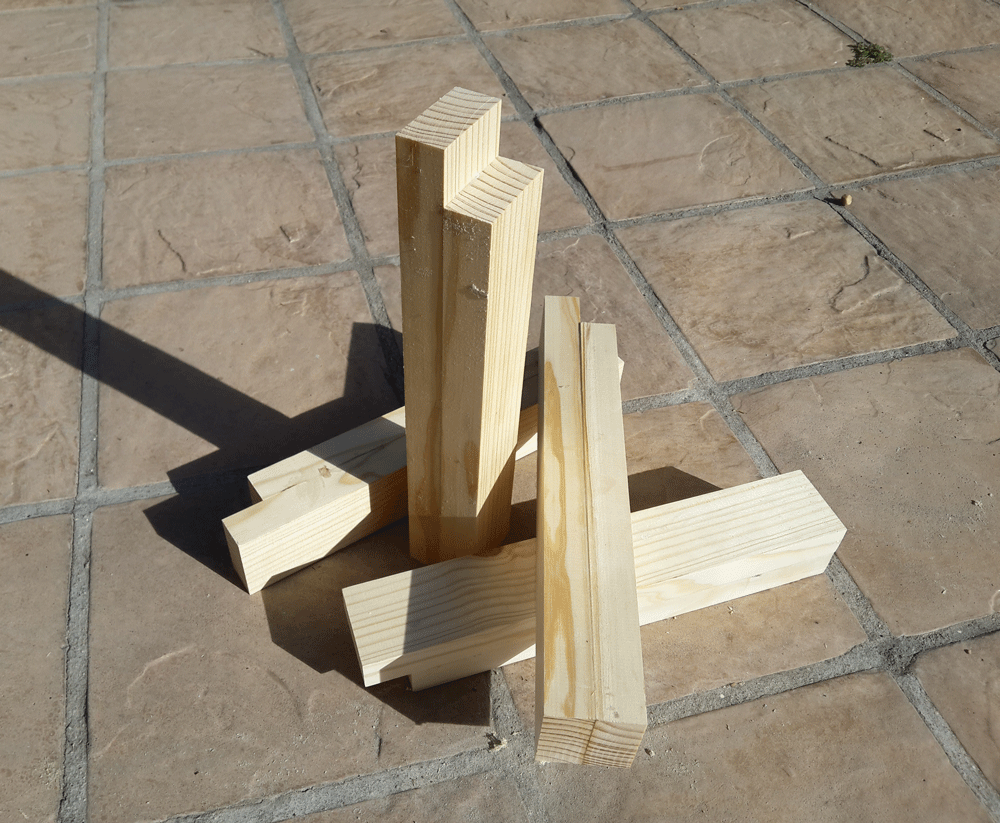
 The legs are made using 2 x 3’s (38 x 64mm) with each leg being made up of two pieces glued together. Of these two pieces, one will be cut at the desired height of the table (in this case 15-7/10″ or 400mm ) while the second should be the width of the 1 x 3 shorter that the other (64mm). This means when the legs are fitted the shorter pieces should sit flush with the bottom of the box.
If at it’s hard to envision this refer to the next step for clarity.
Glue these two planks together and after the glue has cured, sand for a flush finish.
Step 3 – Assemble legs and box
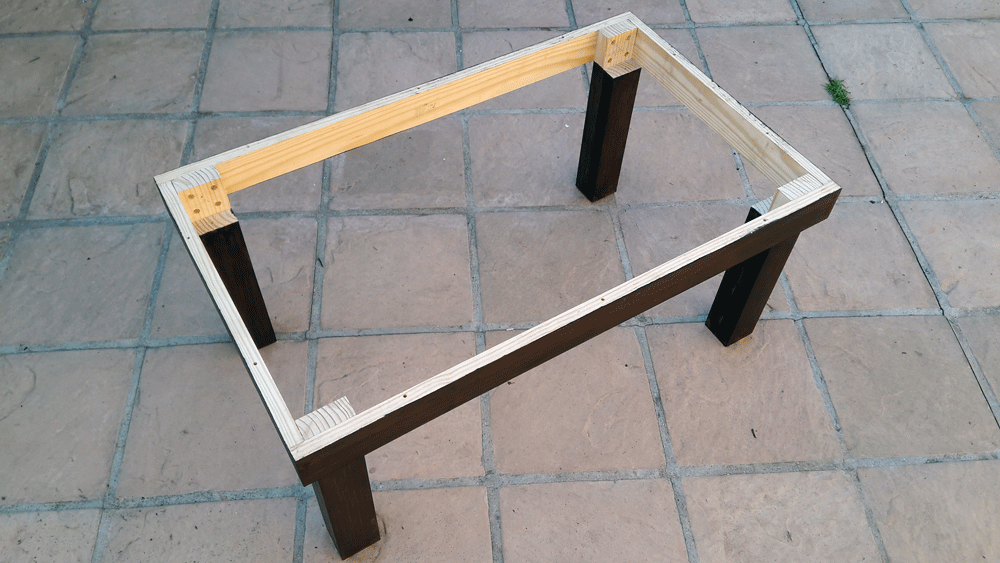
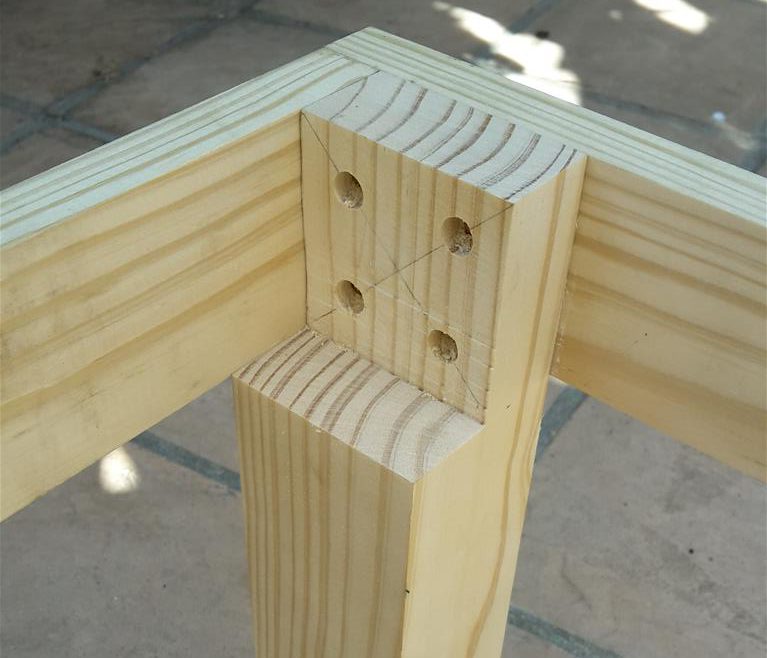 Fit the four legs to the inside of the four corners of the box as indicated by the above image.
The legs are fitted using four screws per leg. Again countersinking the screws.
On each leg, the longer piece of wood should sit flush with the top of the box while the shorter one should sit flush with the bottom.
After fixing the legs you can treat the wood in any way you see fit.
We went with a dark teak wood stain.
Once this step is complete you will have a standing frame. Everything from here will be fitted to this frame.
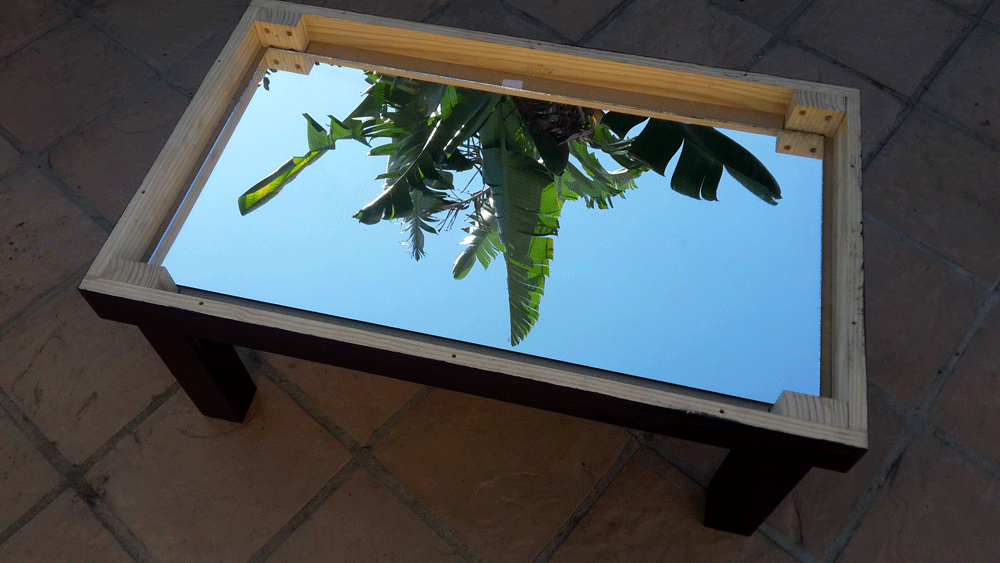
Step 4 – Fit the base and mirror
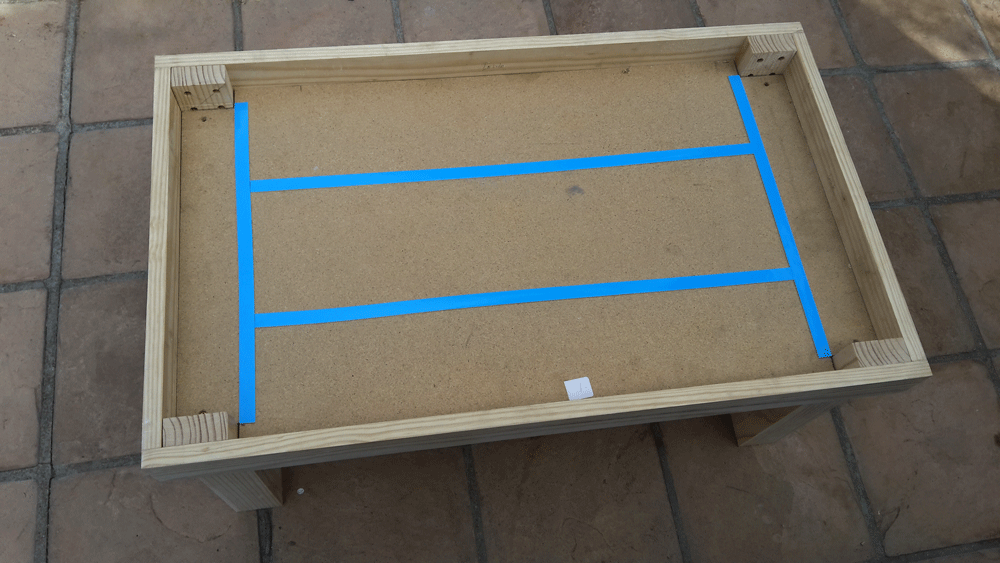
 Size the fiberboard to fit the inside of the box (making cutouts for the legs). The board will rest on the shorter part of the legs and should be fixed with screws as per the above image.
Use double-sided tape to secure the mirror to the base.
The mirror should be cut to size to fit between the protruding legs and about 1/2-1″ from the inside of the box.
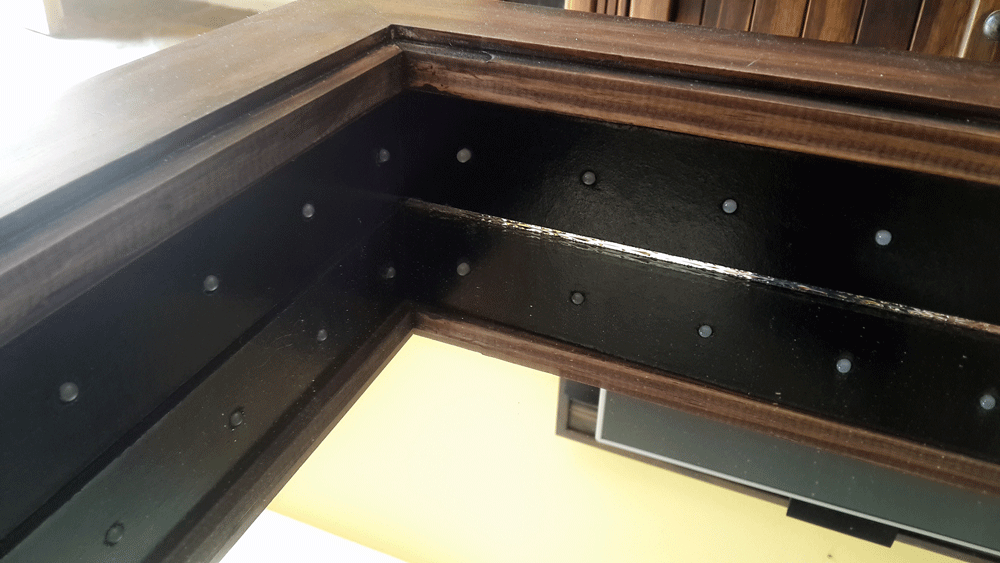
Step 5 – Fit the LED’s
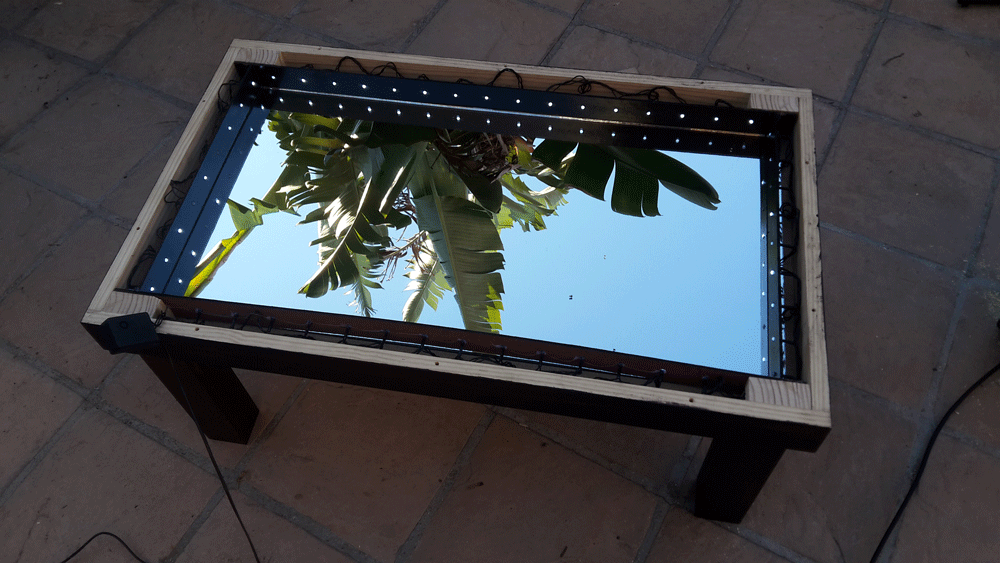
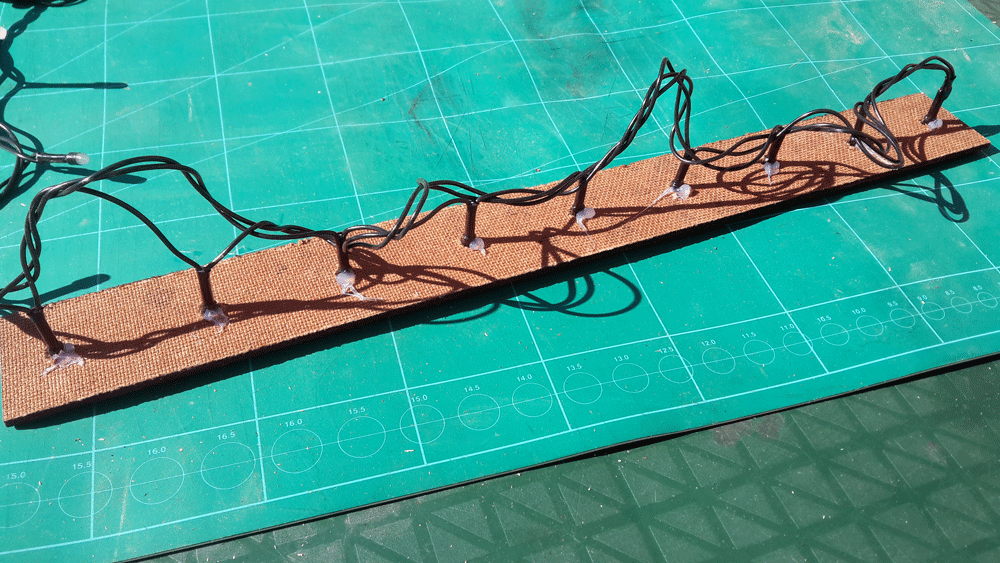 The inner box to house the LED’s is built using a thin fiberboard that gets cut to size, painted using black spray paint and fitted using hot glue and a glue gun. Before fitting the inner box the LED’s are glued into holes drilled to the size of the LED’s you intend on using.
Many people opt for LED strips or rope lights as this is faster and more convenient during the building process. The downside of this, however, is the visibility of the strip or rope light housing when the infinity effect is actuated on the completed table.
Step 6 – Top frame
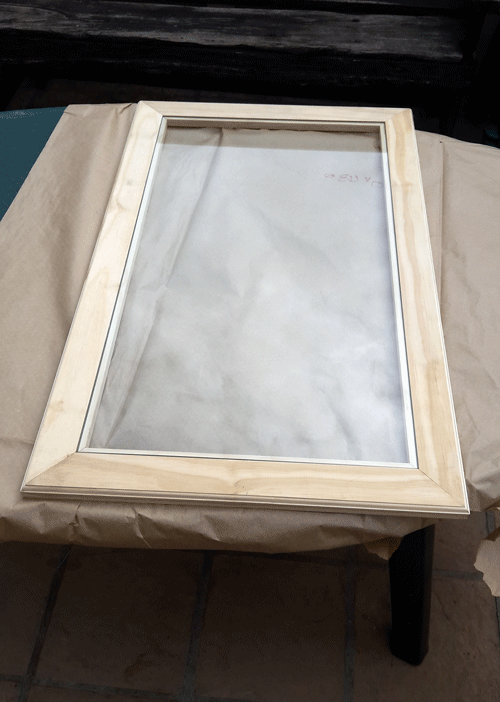
The top frame will be the face of your table and the first thing people will notice when looking at your project.
Assemble this frame to be a 1/2 inch wider and longer than the box and so creating an appealing overhang when assembled.
Using a router with a straight bit, cut a recess on the inside of the frame for the glass. This is ideally done before assembling the frame.
The depth of the recess should be the thickness of the glass you are using so that when the glass is in place the top of the frame and the glass should be flush.
For this table, we used 1/4″ thick tempered glass.
In addition, cut a decorative pattern around the outer edge of the frame using a profiled bit.
The joints are glued together miter joints.
After assembling the frame, test fit the glass. Remove the glass again, sand down and treat the frame to match the rest of your table.
The frame can now be fitted to the already constructed table base.
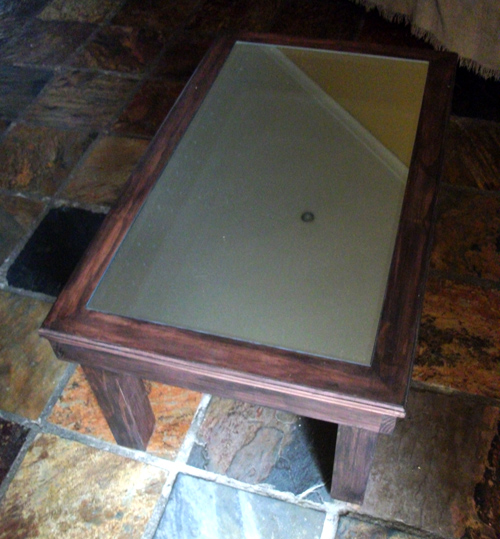
Step 7 – Add the tint

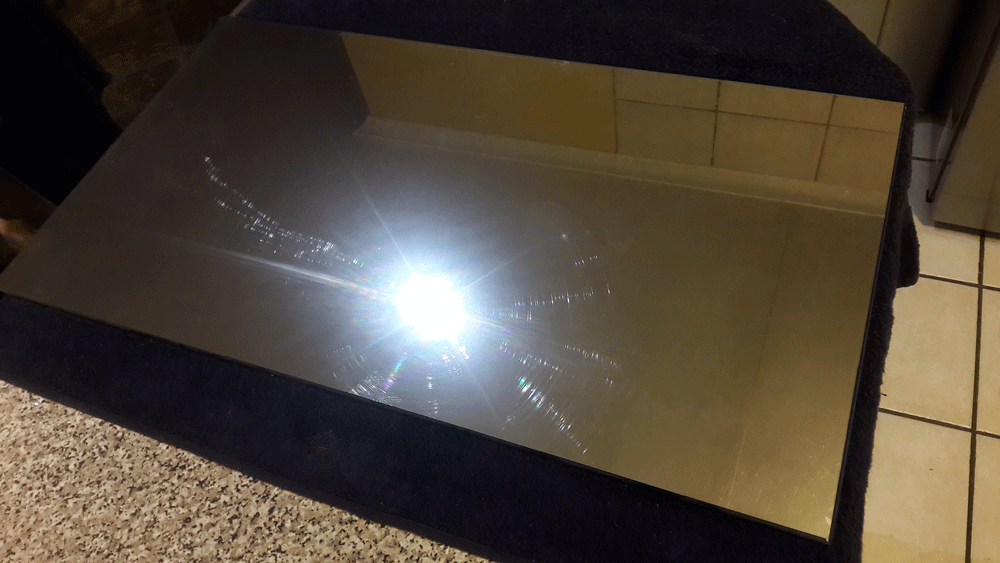 The last step will be tinting then glass to a mirror finish.
The tint should be slightly transparent to allow a small amount of the light to pass through it. When the tint is applied the glass can be fitted on the table.
For our table, we used silver automotive tint. When the tint is applied the glass can be fitted back on the table and the infinity table will be complete.
Happy building!
Completed!
 Woodworkjunkie.com, DIY like a pro.
If this post was helpful or if you have any suggestions, please let us know by leaving a comment below.
This infinity table is beautiful. I love the fact that your tutorial is laid out step by step and very easy to follow. I personally am not a “crafty” person but every now and again I will try my hand at building something. This makes me feel like I could possibly do it. Great job!
Hey Phyllis
Thanks for the comment.
We are glad you like the project.
Jean
This has got to be the coolest thing I’ve ever seen! I sure wish I would have done these kind of instructions on my projects! Bravo for the inspiration!
Hi Pam,
Thanks for the comment.
We do aim to inspire.
See you soon.
Jean
Jean, the best I can do at woodwork is assemble Ikea pre-made furniture. And although your step by step instructions seem easy enough, I know I would never be able to cut wood to measure. But the idea is absolutely brilliant, and I am sure that if I handed your instructions over to an expert skilled person, the outcome would be a fabulous table. Thank you.
Hello Guilia,
Thank you so much for your comment.
Yes, using power tools like table saws can be a daunting venture as these tools can be very dangerous and are not advised unless operated by an experienced operator.
We will, however, have regular posting regarding crafts that would be more suited to people who may not have access to these types of power tools so check back soon.
Jean
Great idea!
This table looks as if it can tell your future…
Undoubtedly the talk of people when they enter the room. More! More! More!
Hi Nardus
I’m very pleased to hear you like the build. We will be adding a video tutorial for this build so check back soon.
Jean
This table is so cool! My baby and toddler would both be in love. Love how easy your instructions are, I definitely want to try this out (read: ask the husband to make it for me!).
Hi,
Thank you for your comment. As this is a site for beginners, we try to keep our instructions as forward and simple as possible.
Jean
Wow! I am so not a handy person and neither is my husband and this post really is insightful and clear regarding the instructions you provide.
I am going to give it a try and revert once I have (barring cutting the wood I may outsource that.. lol)
Hi Helen,
Give it a go! This is one of my favorite projects as well. It’s easy but finished can look very professional.
Happy woodworking.
Jean
Wow – what an awesome project! I’m not up to this skill level yet – your beginner projects on here are awesome for beginners like me…but with a little bit of help from my partner I definitely think this project would be doable, and would make a great feature piece to any room. Thanks for sharing!
Hey Angela,
Thanks for your comment.
These tables do tend to be the point of conversation where they get displayed while still providing the same functionality as a normal coffee table.
Jean
OMG that table looks so cool! It’s a shame that I don’t have any woodworking experience because even though your instructions are very simple, I still think I would get confused if I attempted to make it. Maybe my father in law could help me make one lol
Hey Dan,
Asking your father in law is a great idea.
When I started woodworking I depended a lot on the wisdom of my woodworking uncle. From a safety standpoint, it was also very helpful having a more experienced person around to guide me in proper tool use and safety equipment.
Thanks for your comment.
Jean
Excellent project and very detailed step-by-step instructions. I saw this project many years ago in a home show. Although I was impressed with it back then, I never took the time to construct one. Now with these super easy to follow instructions, I may just give it a go. Thanks.
Hi Cj,
Thanks for your comment.
We are very pleased that you like the article.
The idea behind this project is not a new one but we tried to make the build as simple as possible so that even beginners can give it a go.
Jean
Nice project. Awesome site too. I have plans to have a friend help me build a murphy bed. Judging from this post, info from your site could be very helpful. Thanks.
Hi Michael,
Glad to help.
Happy woodworking.
Jean
This is a really neat table. It looks like it would be pretty easy to make and I like how you have the materials needed and the plan all laid out. I think I can take this project on and I appreciate your article. It makes everything a little easier. Thanks again,
Mitch
Hey Mitch,
Thanks for stopping by. Very happy you like the tutorial. Stop by again soon.
We have much more on its way.
Jean
Amazing post!
I’ve seen a lot of videos on Facebook and Youtube of those infinity mirror tables and I always wanted to build one myself. I love the design. I bookmarked your page and I hope that if I have enough time this weekend I will build one! Thanks for the post, it is very detailed! Cheers!
Hey Andrei,
Thanks for stopping by. Very happy you enjoyed the build.
We will be adding a video of the build soon.
Jean
Wow! What project!
I am a woodworker myself and have never seen anything like this project.
I am already making my list of things I need to get this one going
Thanks!
Hi Clyde,
Always a pleasure. Glad you like it.
I will be playing around with the “infinity” effect in the weeks to come and will definitely post any result that may be appealing so stop by soon.
Thanks for popping in.
Jean
This is soooo awesome! It just gave me the idea to make an infinity picture frame, too!
Great work here, it truly does look incredible. I’m super excited to get the materials and start building one for myself.
Hi Samuel,
I’m very happy to hear you like our site. It’s still very young and we will be adding many build as time goes by. If you would like notifications by email everytime we post a new project you should subscribe to our site.
Thanks for you comment.
Jean
This infinity mirror coffee table is absolutely gorgeous! You are a talented craftsman and this would look perfect in my living room.
Can they be done in any colours or is it just the one that is pictured?
Hey Matthew,
I opted for cool white LED’s but you can fit RGB LED’s also and so get a variety of different colors.
Any light source placed inside the mirrored box would produce the infinity effect. The arrangement of the LED’s will determine the pattern.
Thanks for stopping by.
Jean
Wow! This looks soooo awesome! I bet my wife would enjoy something similar in our living room 🙂
Well done, that’s a badass coffee table. I think infinity mirrors should be used more in home decoration and for furniture projects.
How long does this particular project typically take to complete?
Also, do you have a ballpark number on how much someone could expect to spend on building this table?
Look forward to hearing back from you, thanks.
Hi Dom,
This is a very simple design with not many time consuming components.
Excluding glue curing times, I am very confident that even a beginner would be able to build this table in less than a day given that they own or have access to the relevant equipment.
Hope this is helpful.
Jean
Oh wow, I really love this table! I just moved from Texas to Florida and left all my furniture behind, because quite honestly, moving it (very heavy) for just me seemed like too much. Of course now I am cursing myself, as I am looking at repurchasing all new furniture. I have been looking for a coffee table, but my problem has been first the color (I want a “Florida” color) and then secondly, of course the price. I am a DIY gal, and of course I brought all of my tools. I am going to make this table! One question, can you tell me what the final dimensions are? Also, I will want to paint it “weathered blue” color. Any suggestions on how to give it that weathered look?
Hey,
The absolute best way to get the weathered look is to use actual weathered wood. Haha.
Reclaimed wood would work well to produce the weathered look. Though hard to find wood with the right dimensions, it is well worth it.
Jean
Great look to the finished table! It would look great in a bar or club too. I like the use of lots of photos in the post and the steps are easy to follow I feel like I could give it a go with my limited experience, good job!
Hey Rob.
You should definitely try.
Let us know how it goes.
Jean
This is an incredible project! Absolutely beautiful. I think I just found my next project!
I love how you laid everything out step by step. I am an experienced carpenter, but even a complete novice could take your instructions and build this.
I’m going to have to look around here a little more and see what else I can find to build in my spare time!
Thanks for a great post!
Hey Nathan
Thanks for popping in. Very glad you like the build.
I will be adding a video to this post soon.
Jean
Can you please let me know What is the percentage of light the tint(the one you used) allows
Should I go for the 5%,15, or 20%
Hi Sharath,
I used a high percentage tint but it it’s up to you what effect you aim to achieve. The more reflective the surface is the more intense the effect would be. i.e. the more times the light would reflect back and forth giving a longer “tunnel” effect. However, the more reflective the surface is the less light would be visible outside the box meaning the effect would appear dimmer when viewed.
I hope this makes sense.
Jean
Sir,
Would this work with Plexiglass
I can’t see why not.
The only drawback is that Plexiglass isn’t very scratch resistant which doesn’t make it ideal for a surface that you are going to be placing stuff on top of.
Hi Jean,
Great coffee table!
Am in the process of making one now.
Question, how is the Top Frame fastened to the Table Base?
PJD
I used long screws to fix the top to the box from underneath the box frame.
Hope this is helpful.
Cheers
Jean
Hi Jean,
Another question. Where did you get the LED strip you are using? I am having trouble finding an LED Strip with the same shape of LEDs like you are using.
Thanks again,
PJD
I used Christmas type lights because each light is an individual unit and all the lights are connected via wires. This allowed me to choose the spacing of the lights and also conceal the wire connections between each light.
Is there a way to add a door or drawer to the table??
Hi Olive
The infinity effect can be added to many different designs and applications. I have even added it to a woofer box. https://www.youtube.com/watch?v=zaMVIM2ShXQ
For this design, if I had to add a drawer, I would have done it underneath the existing “infinity box”. By increasing the depth of the box while still placing the bottom mirror at the same depth I would create the space needed to add a drawer underneath.
I hope this is helpful.